Hello! It's the 8th of the month, which means it's Reverse Confetti blog hop time *AND* all the goodies we've been showcasing for the past few days are now available! WOOT! :)
To create my project, I started by first wrapping one of the Clear Treat Boxes with a piece of patterned paper from the Free Spirit paper pad. Next, I filled my box with some goodies, and then wrapped it with an aqua ribbon and bow. I then stamped the uber cute bear and star images from Christmas Bear in Versafine ink, and heat set it with clear embossing powder before coloring the image with Zig Clean Color markers. Once the images were dry, I then die cut them with the coordinating Christmas Bear Confetti Cuts.
Next, I die cut Stone, Cloud White and Iced Aqua cardstocks using the Fa La La Circle Confetti Cuts, layered them together, and then secured them to the treat box using Scor-tape. To finish up, the bear and stars were adhered to the treat box front, then I covered the stars with Sugared Distress Stickles.
I hope you've enjoyed hopping with us today. Be sure and hop with us on the 8th of every month for more Reverse Confetti inspiration!
Here's the full list of today's hop participants:
Have a great one!
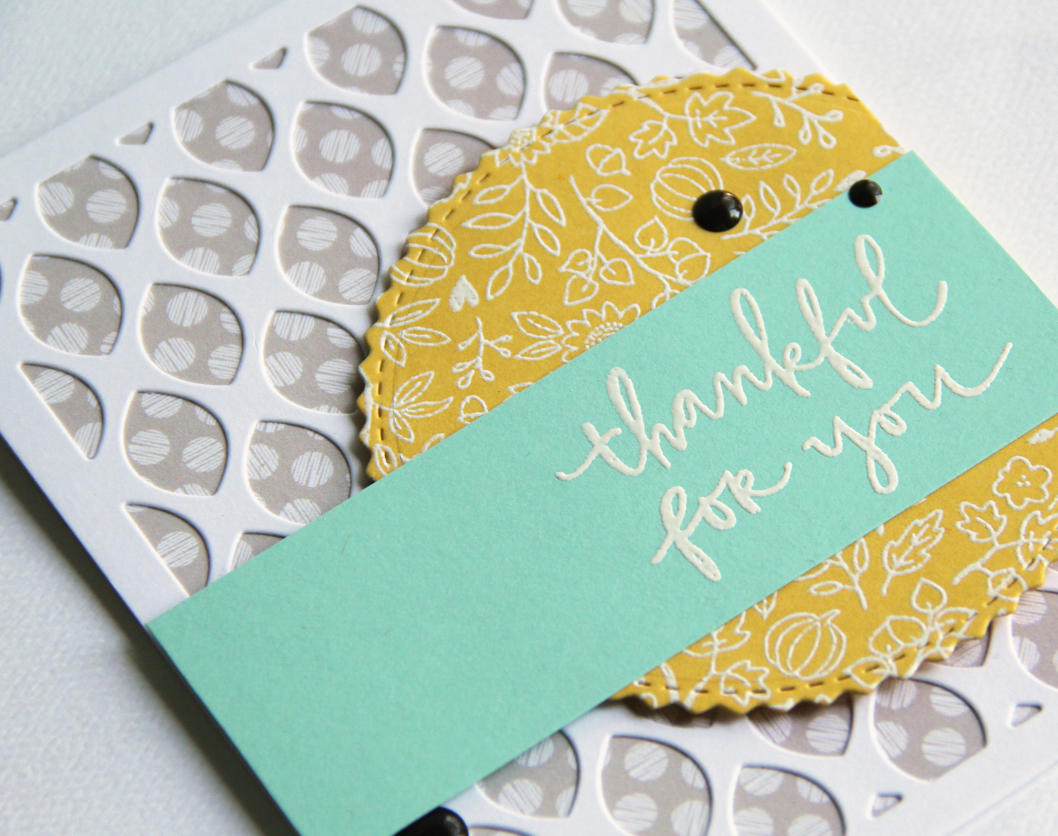
Hello! It's the second day of Reverse Confetti September sneak peeks, and today I'm sharing a card created using the new Autumn Blessings stamp set, the Leaf Lattice Cover Panel Confetti Cuts and Fa La La Circle Confetti Cuts dies, and my newest 6x6 patterned paper pad, Every Little Bit. :)
To create my card, I started by first creating a Cloud White card base and topping it with a piece of gray polka dot patterned paper from the Every Little Bit paper pad. I then die cut a piece of Cloud White cardstock using the Leaf Lattice Cover Panel Confetti Cuts and adhered it to the card front. Next, I stamped the outline floral image from Autumn Blessings in Versamark ink onto yellow cardstock, and heat set it with white embossing powder before die cutting it using the Fa La La Circle Confetti Cuts.
The circle die cut was then adhered to the card front with foam tape. One of the sentiments from Autumn Blessings was stamped in Versamark ink onto Iced Aqua cardstock, heat set with white embossing powder, then adhered to the card base. To finish up, I embellished with black enamel dots.
Would you like to be entered for your chance to win one of two gift certificates to RC (one for blog commenters, and one for Facebook commenters)? To enter, simply leave comments on the RC DT blogs, then hop on over to the Reverse Confetti Facebook page. (Full details can be found over on the RC Blog.)
Have a great one!
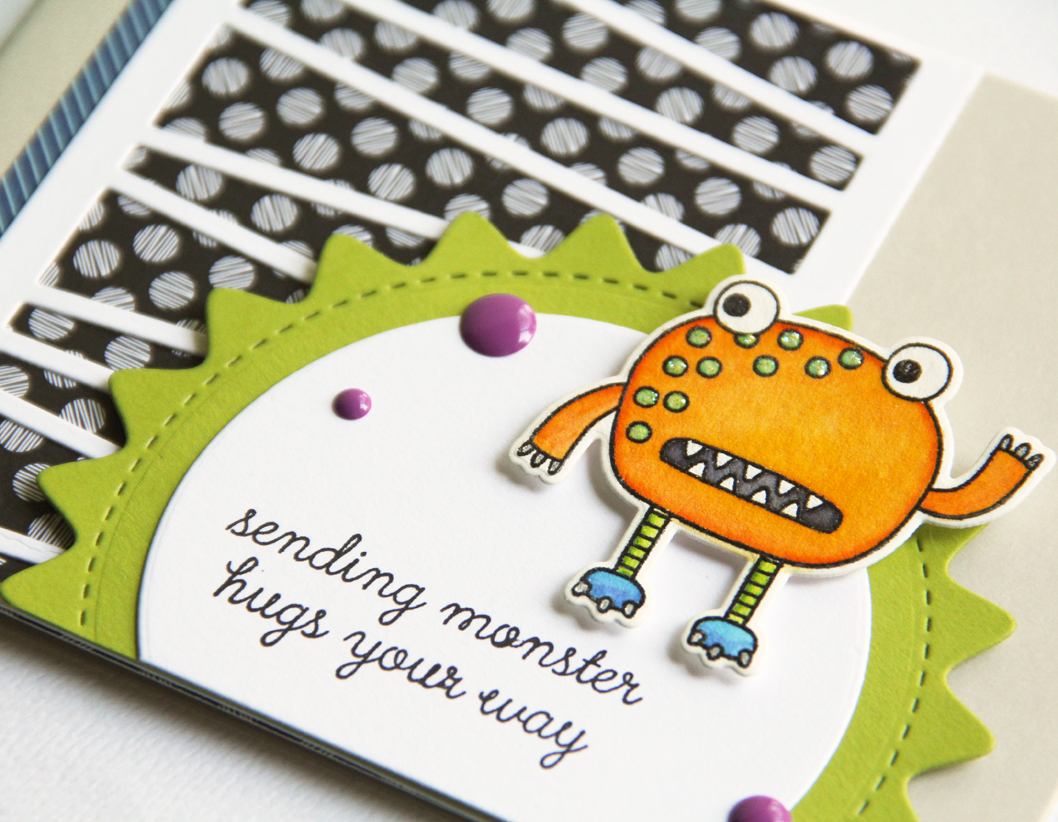
Hello! It's the first day of Reverse Confetti September sneak peeks, and today I'm sharing a card created using the new Monsterous stamp set, the Boo to You Circle Confetti Cuts and Wonky Stripe Panel Confetti Cuts dies, and my newest 6x6 patterned paper pad, Every Little Bit. :)
To create my card, I started by first creating a Stone card base and adhering a small strip of striped patterned paper from the Warm Hearts paper pad. I then die cut a piece of Cloud White cardstock using the Wonky Stripe Panel Confetti Cuts and backed it with one of the patterns from the Every Little Bit paper pad. Next, I stamped one of the monsters from Monsterous in Versafine black ink onto watercolor paper, and heat set it with clear embossing powder before coloring it with Zig Clean Color markers.


While the image was drying, I then die cut the large scalloped circle using Lime Green cardstock, the white circle using Cloud White cardstock, and the Boo to You Confetti Cuts. The two die cuts were adhered together, and then the sentiment from Monsterous was stamped in black ink. Once the monster image was dry, it was die cut using the Monsterous Confetti Cuts dies. To finish up, the polka dot panel was adhered to the card base, the scalloped circle was adhered with foam tape & I embellished with purple enamel dots.
Would you like to be entered for your chance to win one of two gift certificates to RC (one for blog commenters, and one for Facebook commenters)? To enter, simply leave comments on the RC DT blogs, then hop on over to the Reverse Confetti Facebook page. (Full details can be found over on the RC Blog.)
Have a great one!
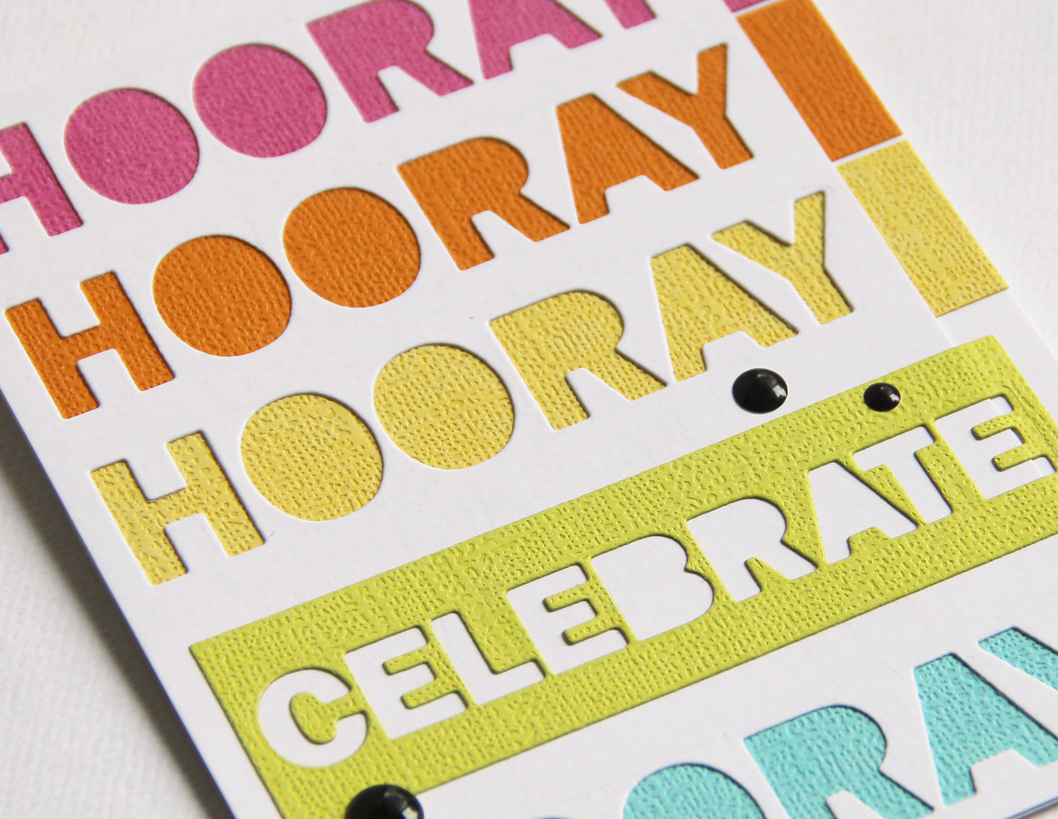
Hello! It's the first day of previews for the new Winnie & Walter release, and today my card is showcasing the new In a Word: Birthday Tiles Cutaways die set. Definitely one of my favorites from this release!
To create my card, I started by first creating a white card base. I then die cut a piece of white cardstock with the hooray die four times, leaving a large space between the third and fourth die cut. Next, I die cut a piece of chartreuse cardstock using the large frame from the Birthday Tiles Cutaways set, discarding the outer ring. The negative of the die was then die cut with the celebrate die.
I then adhered strips of colored cardstock behind the die cut panel, leaving some excess on the right side. The panel was then adhered to the card base before trimming off the excess. To finish up, the celebrate die cut was adhered to the card front, and I embellished with black enamel dots.
Would you like to be entered for your chance to win some of the goodies revealed today? Please hop over to the Winnie & Walter blog for more details! :)
Have a great one!
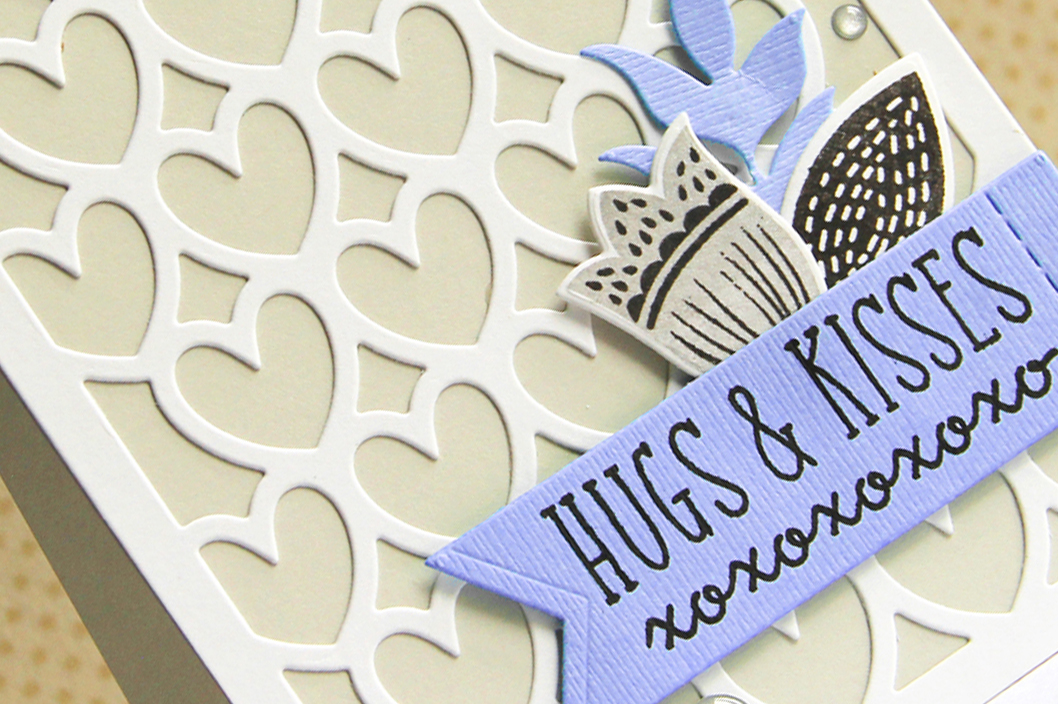
Hello! Just popping in to share a card I created that's a CASE of a card I made way back in January... :)
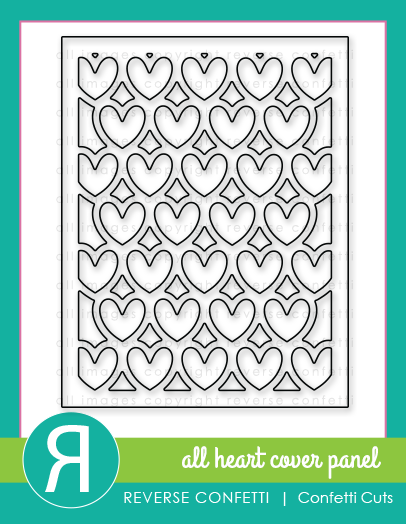
To create my card, I first die-cut a heart background using the All Heart Cover Panel Confetti Cuts on Cloud White card stock and adhered it to a Stone card base. I then die-cut a banner for my sentiment using Bazzill cardstock, and stamped it with two sentiments from Reverse Confetti's Crazy About You stamp set in Versafine ink.
The flower and leaf images from the Blooms ‘n Buds stamp set were stamped in gray and black ink, then cut out with the coordinating Blooms 'n Buds Confetti Cuts. Next, I die-cut a leaf silhouette using the Wheat Confetti Cuts and adhered a simple flower bouquet together. To finish up, I adhered the sentiment and floral bouquet to the card with foam tape, then embellished with silver enamel dots.
Have a great one!
More Recent Articles
|