Here are a couple more cards I made using the Stampin' Up Hot Foil System The beautiful Garden Silhouette Hot Foil Die, is just SO beautiful. Love how it dresses up any card And think of all the cards you could make even by cutting up the piece after ...
Here are a couple more cards I made using the Stampin’ Up Hot Foil System
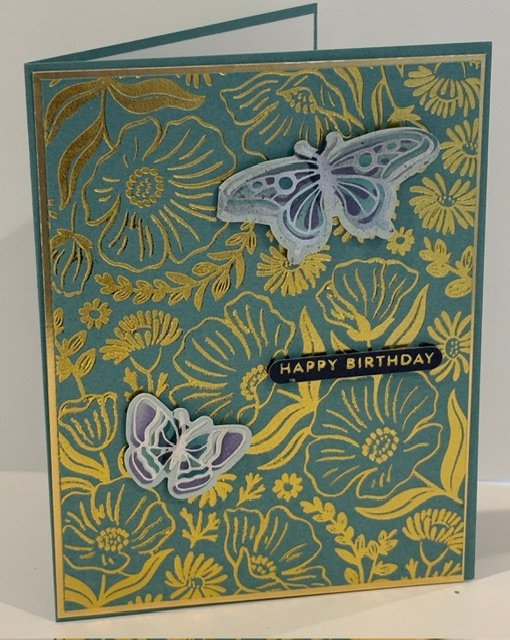
The beautiful Garden Silhouette Hot Foil Die, is just SO beautiful. Love how it dresses up any card
And think of all the cards you could make even by cutting up the piece after hot foiling it!
I used Lost Lagoon and added the Garden Silhouette in Gold Foil. I also cut some of the butterflies in the Butterfly Flight Hot Foil Dies – and used the masks that come as part of the bundle to add color to the butterflies. The sentiment is from the Sweetly Sentimental Hot Foil Dies
Measurements
Lost Lagoon Card Base 8 1/2″ x 5 1/2″ scored at 4 1/4″
Gold Foil Sheets 5 3/8″ x 4 1/8″
Lost Lagoon 5 1/4″ x 4″
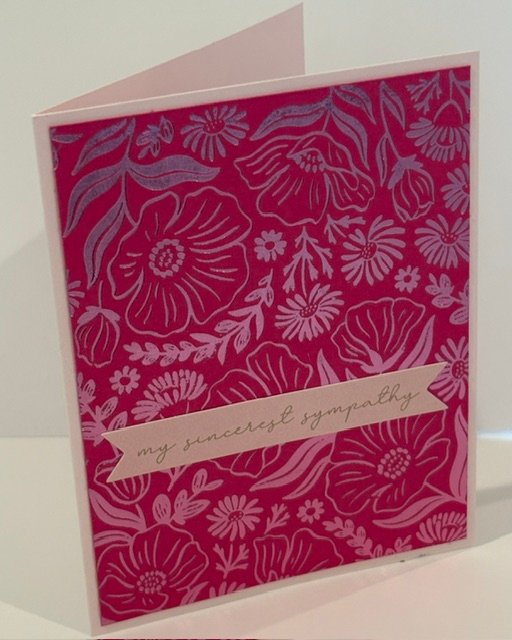
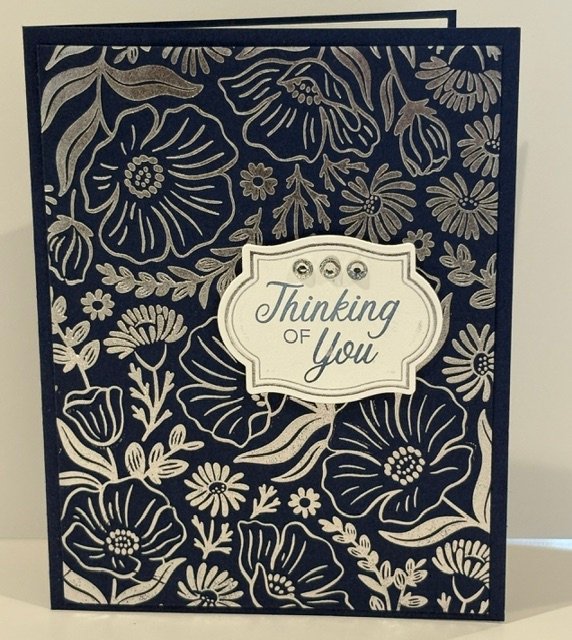
The 2nd card I made also uses the Garden Silhouette and Light Pink Hot Foil
I used a sympathy sentiment from the Sincerely Noted Mix & Match Ephemera pack
Measurements
Barely Blush card base 8 1/2″ x 5 1/2″ scored at 4 1/4″
Once you get to the area, you can shop stamp sets, stamp bundles, etc. I will be adding DSP and embellishments soon.
Just add the products you want to the cart and once you check out, I will be notified and will send you a Paypal Invoice. You don’t need to have a paypal account – you just pay with your card. Thanks for looking.
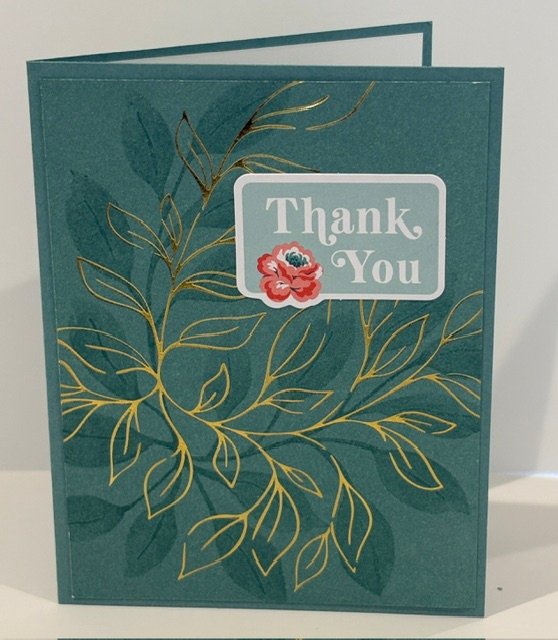
Here’s another beautiful card using the brand new Stampin’ Up Hot Foil System. It’s really easy to use and packs such a WOW!!
I used the beautiful and brand new Botanical Glow Bundle for this card
I used Lost Lagoon Cardstock for the base – and stamped the Botanical Glow stamp first in Lost Lagoon Ink and then did the Hot Foil using the Botanical Glow Die to add the gold leaves.
I also used the Sincerely Noted Mix & Match Ephemera sentiments for the Thank you!
Once you get to the area, you can shop stamp sets, stamp bundles, etc. I will be adding DSP and embellishments soon.
Just add the products you want to the cart and once you check out, I will be notified and will send you a Paypal Invoice. You don’t need to have a paypal account – you just pay with your card. Thanks for looking.
I wanted to share some other cards I made using the new Stampin’ Up Hot Foil System
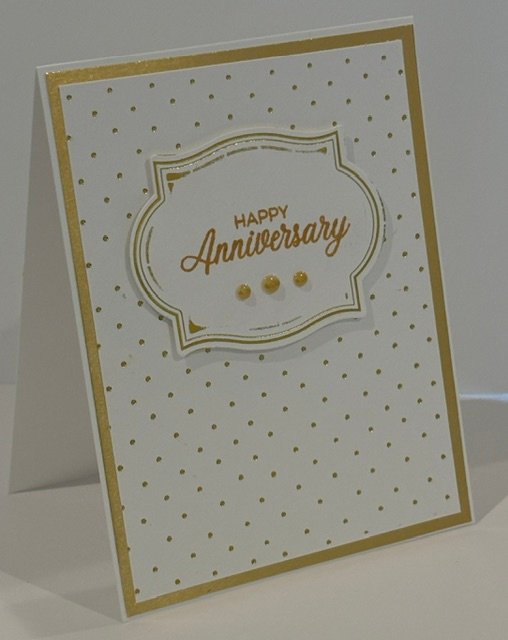
Here’s one using the Dotted Swiss Hot Foil Die , and the Flourish & Frames Hot Foil Dies
Looking for an Anniversary card? Here’s one – simple yet elegant. I stamped the sentiment in Golden Glow ink and it goes SO well with the gold for the Swiss Dots
Measurements
Basic White Thick Card Base 11″ x 4 1/4″ scored at 5 1/2″
Once you get to the area, you can shop stamp sets, stamp bundles, etc. I will be adding DSP and embellishments soon.
Just add the products you want to the cart and once you check out, I will be notified and will send you a Paypal Invoice. You don’t need to have a paypal account – you just pay with your card. Thanks for looking.
![Stampin' Hot Foil System Na & Craft Class [ 170009 ]](https://assets1.tamsnetwork.com/images/EC042017NF/170009s.jpg "Stampin' Hot Foil System Na & Craft Class [ 170009 ]")
![Sincerely Noted Mix & Match Ephemera Pack (English) [ 167706 ]](https://assets1.tamsnetwork.com/images/EC042017NF/167706s.jpg "Sincerely Noted Mix & Match Ephemera Pack (English) [ 167706 ]")
![Lost Lagoon 8-1/2" X 11" Cardstock [ 133679 ]](https://assets1.tamsnetwork.com/images/EC042017NF/133679s.jpg "Lost Lagoon 8-1/2\" X 11\" Cardstock [ 133679 ]")
![Gold Stampin' Hot Foil Rolls [ 170066 ]](https://assets1.tamsnetwork.com/images/EC042017NF/170066s.jpg "Gold Stampin' Hot Foil Rolls [ 170066 ]")
![Light Pink Stampin' Hot Foil Rolls [ 170068 ]](https://assets1.tamsnetwork.com/images/EC042017NF/170068s.jpg "Light Pink Stampin' Hot Foil Rolls [ 170068 ]")
![Barely Blush 8 1/2" X 11" Cardstock [ 167689 ]](https://assets1.tamsnetwork.com/images/EC042017NF/167689s.jpg "Barely Blush 8 1/2\" X 11\" Cardstock [ 167689 ]")
![Gold Foil Sheets [ 132622 ]](https://assets1.tamsnetwork.com/images/EC042017NF/132622s.jpg "Gold Foil Sheets [ 132622 ]")
![Highland Heather Classic Stampin' Pad [ 147103 ]](https://assets1.tamsnetwork.com/images/EC042017NF/147103s.jpg "Highland Heather Classic Stampin' Pad [ 147103 ]")
![Pool Party Classic Stampin' Pad [ 147107 ]](https://assets1.tamsnetwork.com/images/EC042017NF/147107s.jpg "Pool Party Classic Stampin' Pad [ 147107 ]")
![Sweetly Sentimental Hot Foil Dies (English) [ 170052 ]](https://assets1.tamsnetwork.com/images/EC042017NF/170052s.jpg "Sweetly Sentimental Hot Foil Dies (English) [ 170052 ]")
![Butterfly Flight Hot Foil Dies [ 170045 ]](https://assets1.tamsnetwork.com/images/EC042017NF/170045s.jpg "Butterfly Flight Hot Foil Dies [ 170045 ]")
![Butterfly Flight Decorative Masks [ 170076 ]](https://assets1.tamsnetwork.com/images/EC042017NF/170076s.jpg "Butterfly Flight Decorative Masks [ 170076 ]")
![Butterfly Flight Bundle [ 170065 ]](https://assets1.tamsnetwork.com/images/EC042017NF/170065s.jpg "Butterfly Flight Bundle [ 170065 ]")


![Phrases & Frames Photopolymer Stamp Set (English) [ 167581 ]](https://assets1.tamsnetwork.com/images/EC042017NF/167581s.jpg "Phrases & Frames Photopolymer Stamp Set (English) [ 167581 ]")
![Phrases & Frames Bundle (English) [ 167587 ]](https://assets1.tamsnetwork.com/images/EC042017NF/167587s.jpg "Phrases & Frames Bundle (English) [ 167587 ]")
![Basic White 8 1/2" X 11" Thick Cardstock [ 159229 ]](https://assets1.tamsnetwork.com/images/EC042017NF/159229s.jpg "Basic White 8 1/2\" X 11\" Thick Cardstock [ 159229 ]")
![Basic White 8 1/2" X 11" Cardstock [ 166780 ]](https://assets1.tamsnetwork.com/images/EC042017NF/166780s.jpg "Basic White 8 1/2\" X 11\" Cardstock [ 166780 ]")
![Golden Glow Classic Stampin' Pad [ 167676 ]](https://assets1.tamsnetwork.com/images/EC042017NF/167676s.jpg "Golden Glow Classic Stampin' Pad [ 167676 ]")
![Golden Glow Stampin’ Blends Combo Pack [ 167682 ]](https://assets1.tamsnetwork.com/images/EC042017NF/167682s.jpg "Golden Glow Stampin’ Blends Combo Pack [ 167682 ]")
![Antique Pearls [ 164679 ]](https://assets1.tamsnetwork.com/images/EC042017NF/164679s.jpg "Antique Pearls [ 164679 ]")
![Flourish & Frames Hot Foil Dies [ 170064 ]](https://assets1.tamsnetwork.com/images/EC042017NF/170064s.jpg "Flourish & Frames Hot Foil Dies [ 170064 ]")
![Night Of Navy 8-1/2" X 11" Cardstock [ 100867 ]](https://assets1.tamsnetwork.com/images/EC042017NF/100867s.jpg "Night Of Navy 8-1/2\" X 11\" Cardstock [ 100867 ]")
![Silver Stampin' Hot Foil Rolls [ 170067 ]](https://assets1.tamsnetwork.com/images/EC042017NF/170067s.jpg "Silver Stampin' Hot Foil Rolls [ 170067 ]")
![Night Of Navy Classic Stampin' Pad [ 147110 ]](https://assets1.tamsnetwork.com/images/EC042017NF/147110s.jpg "Night Of Navy Classic Stampin' Pad [ 147110 ]")
![Rhinestone Basic Jewels [ 144220 ]](https://assets1.tamsnetwork.com/images/EC042017NF/144220s.jpg "Rhinestone Basic Jewels [ 144220 ]")
![Garden Silhouette Hot Foil Die [ 170041 ]](https://assets1.tamsnetwork.com/images/EC042017NF/170041s.jpg "Garden Silhouette Hot Foil Die [ 170041 ]")

![Safari Smiles Photopolymer Stamp Set (English) [ 167574 ]](https://assets1.tamsnetwork.com/images/EC042017NF/167574s.jpg "Safari Smiles Photopolymer Stamp Set (English) [ 167574 ]")
![Safari Smiles Bundle (English) [ 167578 ]](https://assets1.tamsnetwork.com/images/EC042017NF/167578s.jpg "Safari Smiles Bundle (English) [ 167578 ]")
![Sweet Old Friends Photopolymer Stamp Set [ 167618 ]](https://assets1.tamsnetwork.com/images/EC042017NF/167618s.jpg "Sweet Old Friends Photopolymer Stamp Set [ 167618 ]")
![Pecan Pie 8 1/2" X 11" Cardstock [ 161717 ]](https://assets1.tamsnetwork.com/images/EC042017NF/161717s.jpg "Pecan Pie 8 1/2\" X 11\" Cardstock [ 161717 ]")
![Smoky Slate 8-1/2" X 11" Cardstock [ 131202 ]](https://assets1.tamsnetwork.com/images/EC042017NF/131202s.jpg "Smoky Slate 8-1/2\" X 11\" Cardstock [ 131202 ]")
![Balmy Blue Classic Stampin' Pad [ 147105 ]](https://assets1.tamsnetwork.com/images/EC042017NF/147105s.jpg "Balmy Blue Classic Stampin' Pad [ 147105 ]")
![Tuxedo Black Memento Ink Pad [ 132708 ]](https://assets1.tamsnetwork.com/images/EC042017NF/132708s.jpg "Tuxedo Black Memento Ink Pad [ 132708 ]")
![Pecan Pie Classic Stampin' Pad [ 161665 ]](https://assets1.tamsnetwork.com/images/EC042017NF/161665s.jpg "Pecan Pie Classic Stampin' Pad [ 161665 ]")
![Stone & Vine 3 D Embossing Folder [ 166990 ]](https://assets1.tamsnetwork.com/images/EC042017NF/166990s.jpg "Stone & Vine 3 D Embossing Folder [ 166990 ]")
![Small Blending Brushes [ 160518 ]](https://assets1.tamsnetwork.com/images/EC042017NF/160518s.jpg "Small Blending Brushes [ 160518 ]")
![Safari Smiles Dies [ 167577 ]](https://assets1.tamsnetwork.com/images/EC042017NF/167577s.jpg "Safari Smiles Dies [ 167577 ]")