Sunday, July 29, 2012

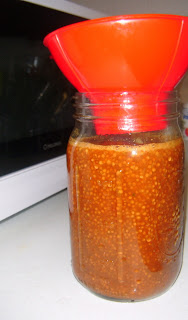
Brandy Molasses Mustard

So... there I was, trolling Facebook.  Imagine my delight when Marisa from Food in Jars posted about homemade mustard.

I happen to have a ginormous stash of mustard seed, both whole and ground.  This, of course, is due to my not reading the fine print when I ordered it.  I thought I was buying a one-pound bag of each and instead, ended up with several pounds of seed and a couple of pounds of ground mustard.  Solution?  Make a lot of things that require mustard, of course!

I'm pretty lucky that my middle kidlet loves all things mustard.  She'll eat it on anything.  I tend to like mustard with pretzels and ham... and little else.  Well, until this stuff.

Once obsessed with Stonewall Kitchen's Bourbon Molasses Mustard, I decided to try to replicate it.  I think this version is pretty close, except I swapped out brandy for bourbon... because that is what I had on hand.

Brandy Molasses Mustard


1 c. whole yellow mustard seeds
1 1/2 c. apple cider vinegar
1/2 tsp sea salt

Mix above ingredients in a non-reactive bowl; cover and set aside at room temperature for a day.

In a saucepan, mix the above with: 

1/2 cup cane sugar
1/2 cup light brown sugar
1/4 cup molasses
1/3 cup ground yellow mustard
3 Tbsp brandy
1/2 tsp turmeric

Bring to a boil.  Allow to boil 10 minutes on medium heat, stirring constantly.  Pour into a sterilized quart-sized canning jar, or smaller jars if that is your preference.  Process 10 minutes in a hot water bath, or store in the refrigerator.   Makes 1 quart.

Let sit for three weeks before using.  If it is too sharp, let sit for another week.  


Saturday, May 12, 2012

Jalapeno Bread & Butter Pickles

It has been a strange, tiring week.  I sent a resume in to a posting that I would really love, and had an appointment for an interview less than a half hour later.  So, I might be relocating to Boston.  I'll be visiting at the end of the month.  Fingers crossed!

The weather is getting warmer here in Florida; high 80s during the day; mid-60s at night.  With Memorial Day creeping up on us, I am craving a burger.  I'll have one, in Boston, surrounded by family members that I haven't seen in well over a year.  As if it doesn't get any better, I'll be topping my burger with the Jalapeno Bread & Butter Pickles that I made today, thanks to Elise.

It really doesn't get any better than that.

Saturday, April 28, 2012

Sweet Chili Fried Eggs & Avocado


The combination of eggs and avocado has been around for a while.  Who hasn't seen an avocado sneak onto a plate of huevos rancheros, looking at you with feigned innocence?  I came across a baked egg in avocado on Pinterest recently, and tried it.  Booooring!  It was definitely flat in the flavor department.  Something needed to cut the richness of the yolk and avocado.  But... what?  That's usually the function of the salsa.  I was on a mission!  (Not really.. I was just hungry).  

I thought of ways to give that combo some zing.  Lime?  Vinegar?  Frankly, the thought of citrusy fried eggs did nothing for me.  But... add a squeeze of lime to some avocado?  It's magic.  It makes your taste buds wake up and say "hello!"  Squeezing lime over things always makes me want pad Thai.  I know, I know... a lot of people think about an icy cold beer... but not me.  So, "eggs and avocado do Thailand" was in full production.  I'm happy to say that it was absolutely delish.  Sweet, sour, creamy, spicy... made my taste buds supremely happy.

Sweet Chili Fried Eggs & Avocado
(serves 1 rather hungry person)

1 avocado, pitted, sliced, and scooped out of its skin
1 wedge lime
2 large eggs
1 tsp. neutral-flavored oil, such as canola or grape seed
1/2 tsp Thai fish sauce
3 Tbsp sweet chili sauce
pinch of salt and freshly ground black pepper

1/2 cup cooked white sticky rice (leftovers are fine, just reheat them with a teaspoon of water)

Place the avocado slices on a serving plate.  Squeeze the lime over the avocado.  Add the hot rice to the plate.  Set aside.
In a hot nonstick skillet coated with the oil, fry the eggs to desired doneness (I like mine over-medium).  Once eggs are done, add the fish sauce to the pan and swirl the eggs, coating  them with the sauce.  Remove eggs from the pan, and set on top of the rice.  Sprinkle with salt and pepper.  Top with sweet chili sauce.  Enjoy!

Don't blame me if you want to eat this every day.  It's that good.

Thursday, April 26, 2012

Duxelles-Stuffed Artichokes

Despite the laboriousness in preparation, I love artichokes.  There is a certain finesse involved in peeling each petal off, dipping it in melted butter or a spicy vinaigrette, and scraping it gently with your teeth.  I cheat the clock by steaming these in the microwave.  The duxelles--a minced, sauteed mushroom concoction is usually found tucked around a tenderloin of Beef Wellington, offer the artichoke an earthy, substantive quality.  This duxelles recipe makes more than you'll need for two large artichokes, and I highly recommend either mixing the leftovers with unsalted butter, rolling it into length of waxed paper, and putting it in the freezer.  The next time you have a perfectly grilled steak, cut a slice and melt it on top.  If you're not willing to wait that long (I don't blame you one bit), slather it on a bagel in the morning.  It's amazing stuff.

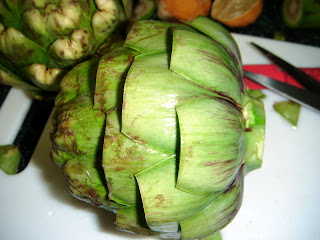
If you're new to artichokes, there are a few things you should know about this flower.  When buying artichokes, carefully lift the petals from the sides, looking inside for any bugs or bug... residue.  There's nothing worse than getting a nasty artichoke.  They should look clean, like this:

The petals have a sharp spiny bit at the very tip, just in the middle.  You're going to want to be careful handling these.  As you trim the tips from the petals, gently lift each petal by the side edge to avoid being jabbed by the thorn.  They're nasty little buggers, and the bigger the artichoke, the bigger the thorns are.


Timewise, you're going to want to prep the artichokes after you make the duxelles.  You don't need anything fancy to make these, but a mini food processor will speed things up considerably.  

Duxelles

1- 8 ounce package sliced white mushrooms, minced very fine
1/3 cup very finely minced sweet onion
2 Tbsp unsalted butter
1/2 tsp salt
1/2 tsp ground black pepper
1/2 tsp dried thyme leaves
2 Tbsp. red or white wine
1/2 cup fresh breadcrumbs (if you use the prepackaged stuff , reduce this to 1/4 cup)

Over medium-high heat, melt the butter in a heavy-bottomed saute pan.  Add onion and saute until translucent.  Add the mushrooms, salt, pepper, and thyme, stirring to combine.  The mushrooms will release a liquid after a minute or two:


Stir in the wine, and continue to stir frequently until the mixture is dry and caramelized.  Remove about a quarter of the mushroom mixture from the pan and reserve for another use.  Add the breadcrumbs to the pan and cook for another 2-3 minutes.  Remove from heat and allow to cool.

After the breadcrumbs have been added.  See the difference?


Prepping the Artichokes:

You'll need:
2 large artichokes
1 lemon (optional)
1/2 cup water
microwave-safe shallow glass dish (ie. pie plate or casserole dish)
microwave-safe cling film, or a microwave-safe bowl that will fit over the plate you are using
Duxelles recipe, above

The first thing you're going to want to do is wash these.  Sometimes they're coated with a waxy coating that you'll need a soft scrub brush to take off (I use an extra-soft toothbrush).  You also may like to have a lemon handy to keep the cut parts from browning, but it isn't absolutely necessary.  If you don't have one, no worries.


Be mindful of the thorns, take the artichoke from the stem, turn it upside down, and brush downward under running water.  We'll save rinsing the inside until after the petals have been trimmed.  

Once rinsed, pull the tiny petals at the very bottom off.  My mom pulls the entire bottom row of petals off after this step, but I don't find it necessary unless they're in bad condition.  Beginning on the bottom row of petals, take a pair of kitchen shears (or scissors), and snip the top third of the petal off.  Continue doing so until you are in the center of the artichoke and you just cannot pull any more petals apart.


Once trimmed, rinse the artichoke under running water, right side up.  Gently separate the petals so the water can rinse any trapped dirt.  Shake them over the sink to dry.  

Slice the stem off of the artichoke, as straightly as possible, so they can stand up in the plate without leaning over.  Place one of the two artichokes in a microwave-safe, shallow glass plate (I use a Pyrex pie plate).  

Using your fingers, gently pry a petal open, and stuff the opening with a pinch of duxelles.  Continue until all of the cut petals have been stuffed (except for the tightly-packed petals in the very middle; don't worry about those).  Repeat with the second artichoke.  If you have duxelles/breadcrumb mixture left over at this point, continue stuffing the petals until you don't have any more stuffing.  Place both artichokes in the dish, and pour   the water into the dish (NOT over the artichokes).  

Cover the dish with the cling film.  If you're using the bowl, put the dish into the microwave and then cover with the bowl.  Microwave on high power for 9 minutes in a 1000-watt microwave.  Let stand in the microwave for 5 minutes.  Wearing oven mitts, remove the plate from the microwave.  Keep the mitts on as you slice the cling film (which, by this time, looks vacuum-sealed).  Be careful: the hot steam trapped in the bowl can cause a nasty burn.  Using tongs, lift the artichokes to serving plates.  Serve these with melted butter on the side, if you wish.  

If this is your first artichoke-eating experience, you'll want to peel the petals from the bottom, one at a time as you eat them.  The only edible portion of the artichoke is the tender bit at the bottom of the petal, where the petal was attached to the stem: 

You don't want to bite into the petal, as the outer part tends to be tough.  Put the bottom half of the petal in your mouth, and pull it out slowly; gently scraping the petal (and the duxelles) between your teeth.  The edible bit just comes right off of the petal.  The petals will have a larger edible bit as you approach the center.  As you get to the VERY middle, you're going to approach the fuzzy, inedible "choke".  Don't spazz and throw it away!  It is super easy to scrape the choke from the "heart" of the artichoke with a spoon.  Each little hair of the choke is attached to to the heart.  Just slide the edge of a spoon in there and scrape all of those fuzzies off.  You should now have the heart of the artichoke.  Dip it in butter... or of you're a gluttonous heathen, go get the remaining duxelles and pack it into the heart (it's okay, I won't tell).  

The "choke" attached to the artichoke heart


Wednesday, April 25, 2012

Fiery Cucumber Sandwiches


I don't know about you, but when it is hot out, I can't eat anything heavy.  Living in Florida, this leaves me craving food that fills you up, but doesn't make you feel like you have a lead balloon in your stomach.  If you like spicy food that makes your tongue tingle, give this a shot.  It is crispy, sweet, hot, and definitely addictive.


The bread you use for this is rather important.  You want to avoid a harder, chewy crusted bread, because when you bite into it, the cucumbers will slip out the other end.  A bread that is too soft can't support the moisture that the cucumbers produce, and will fall apart in a gummy mess.  Aim for bread rolls that are substantial, with a dense, drier crumb.  My supermarket bakery calls these Water Rolls, and they are somewhat like an Italian bread with a soft, chewy crust due to the egg wash that is applied.

Fiery Cucumber Sandwiches  (makes 2 small sandwiches)


1/3 English cucumber, peeled and sliced thinly (this is not an exact science)
thinly sliced onion, about a tablespoon per sandwich
2 tsp mayonnaise (real mayonnaise!), divided
2 tsp Thai sweet chili sauce, divided
1/2 tsp sriracha sauce, divided*
2 small rolls (hamburger roll sized)

Slice the rolls horizontally.  Spread the bottom of each roll with 1 tsp mayonnaise, and squirt about 1/4 tsp of sriracha sauce directly on the mayonnaise.  Spread evenly on top of the mayonnaise.  Spread half of the sweet chili sauce on the other half of the roll.  Divide cucumber slices and onion slices between the sandwiches.  Place the top of the roll on each sandwich, grab a napkin, and go to town.


Tuesday, January 10, 2012

Pineapple Bread Pudding


I love pineapples. Quite a bit of my early teens was spent sitting on our front steps scooping pineapple rings out of a can with a fork and eating them, while my friend Robin and I watched cars go by. We lived in a small suburb... watching cars go by was a way to pass the endless amount of time that summer seemed to be, since we couldn't go to the beach until the weekend.

Unlike big hair, Wham!, and acid-washed jeans, my love of pineapple has stood the test of time. It is quite versatile, but one of my favorite ways to eat it has to be sliced into huge, watermelon-like wedges, or tucked into this bread pudding. My kids love this for breakfast the next day, but I love it when it is still barely warm.

Pineapple bread pudding

2/3 cup granulated sugar

5 tbsp unsalted butter, softened

4 eggs

3/4 tsp kosher salt

1 20 ounce can crushed pineapple, in its own juice, drained

6 slices white or wheat sandwich bread, crusts removed, diced into 1/2 inch cubes

2 Tbsp packed light brown sugar

Preheat oven to 350F; butter an 8x8 pan; set aside.

Cream the butter and granulated sugar together until fluffy. Add eggs, one at a time, until well incorporated. Add salt and stir until well blended. Add pineapple, stir until mixed thoroughly, then stir in bread cubes. Pour into prepared pan. Sprinkle brown sugar over the top. Bake uncovered for 35 minutes. Let cool for at least 15 minutes before serving.


Sunday, January 8, 2012

Small-Batch Red Currant Apple Jelly


Since I moved to the wild tropics (also known as Florida), I'm a bit thrown back at the endless summery season here. The great bonus, of course, is the abundance of local fruit and veg all year around.

I happened upon a couple of half-pints of red currants on offer at my local grocery store. I snatched them up and headed home to make the tart, versatile jelly that I love so much. Slather it on toast, croissants, or mix it with a bit of Dijon mustard and glaze some chicken breasts with it.

You'll find that the measurements don't require a certain amount of currants, but as long as you have at least a cupful, you can make enough of this ruby red jelly to last you for a week or so. This recipe doesn't require any additional pectin, it will softly gel thanks to the apple. The jelly is unprocessed, and is unsuitable for long-term storage.

Small-Batch Red Currant Apple Jelly

1 Granny Smith apple, unpeeled and grated
minimum 1 cup red currants, stems removed
1/3 cup water
granulated sugar
cheesecloth

Prepare several layers of cheesecloth in a sieve, and place it over a liquid measuring cup In a nonreactive pan, heat the water, apple, and currants until it comes to a simmer. Gently crush the berries with a spatula or a spoon to encourage them to release their juices. Simmer for 5 minutes. Remove from heat and scrape into the cheesecloth-prepared sieve. Allow to drain. Resist the urge to press the solids into the cheesecloth; this will result in cloudy jelly. If cloudy jelly doesn't bother you, of course, go right ahead and squeeze the last essence from the simmered fruit.

Measure the liquid. Wash out the nonreactive pan, and pour the liquid back into the pan. Add the same measure of sugar as there is liquid to the pan. I had a little under 3/4 of a cup, and added enough water to bring it to 3/4 cup. Have a couple of clean heat-safe glass containers (I use Pyrex 6 oz. custard cups, but feel free to use a proper canning jar). Heat the juice and sugar to a rolling boil, stirring. Keep an eye on it, as it does have a tendency to boil over. Once the mixture boils, time 5 minutes for a batch under 2 cups of liquid, and 10 minutes for a batch over 2 cups of liquid. Pour hot liquid into the glass jars, and allow to cool to room temperature. Cover and store in the refrigerator. Eat within a couple of weeks, if you can manage to make it last that long.