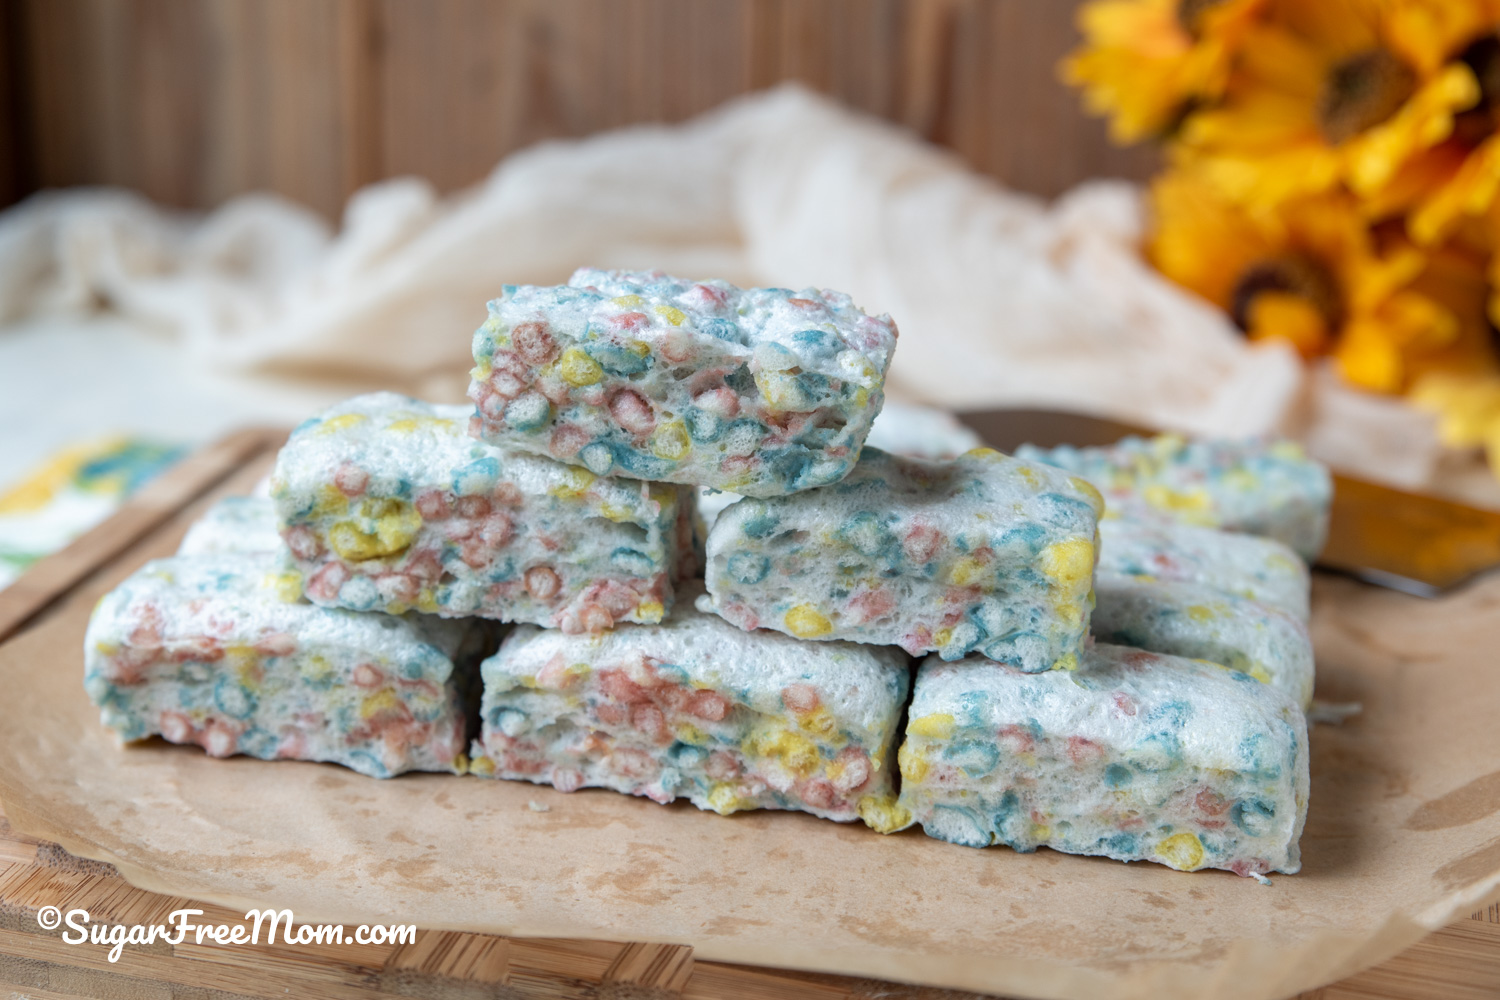
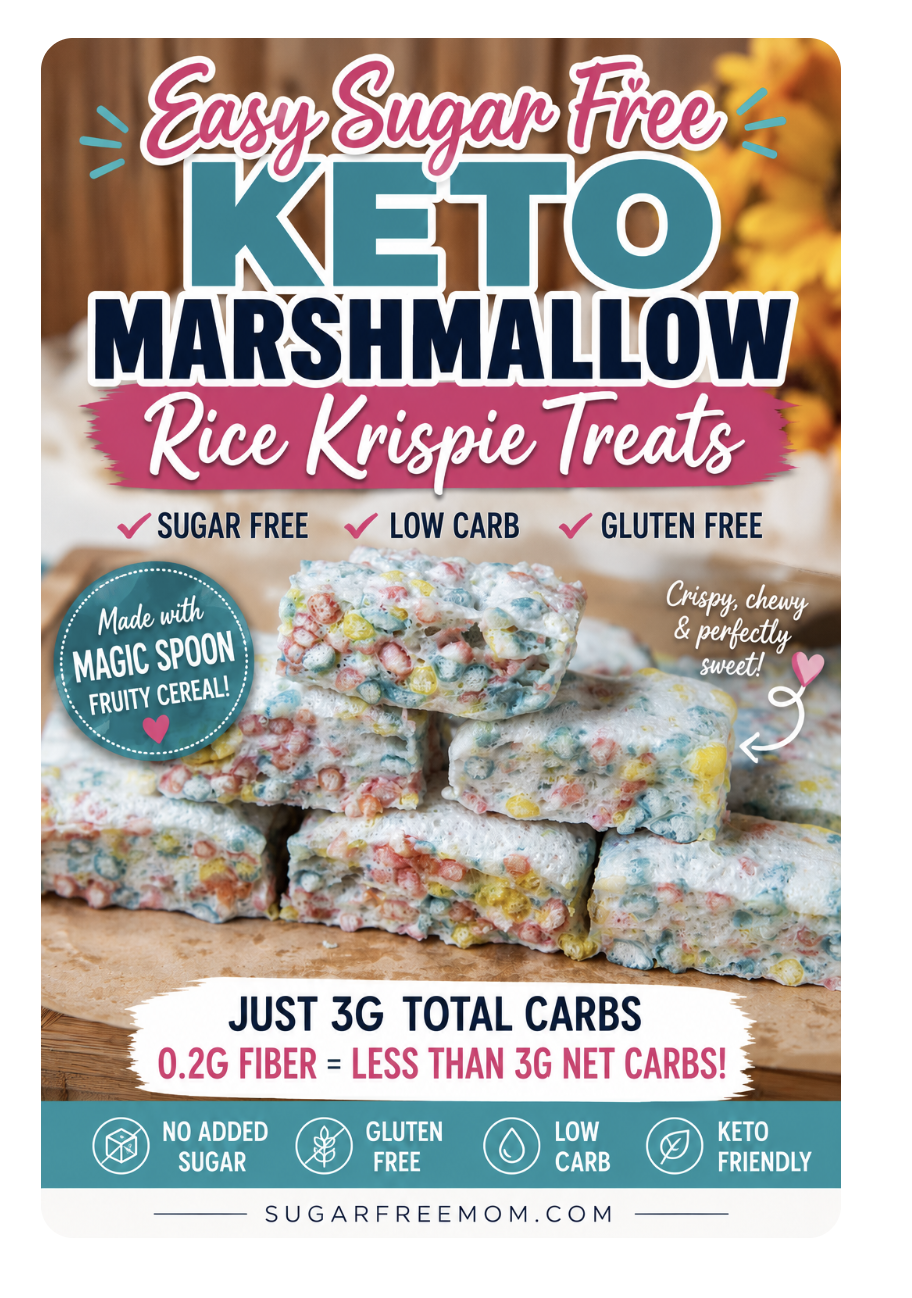
These easy Sugar-Free Keto Marshmallow Rice Krispie treats are soft, gooey, crispy, and wonderfully nostalgic—without the added sugar, corn syrup, or traditional rice cereal found in the classic recipe. They’re perfect when you want a quick, no-bake dessert that the entire family can enjoy. Use your favorite keto cereal, protein cereal, low-carb granola, or even crushed pork rinds to make a more budget-friendly version.
Sugar Free Keto Marshmallows
After I recently posted my new keto marshmallow recipe that has been on my foodie bucket list for years, I knew I wanted to make a keto rice krispie treat!
Surprisingly, the fruity flavor was the only one all of us really liked, so that is the crispy cereal I used to make these keto Rice Krispie treats.
You can absolutely use any flavor or brand you prefer. The most important thing is choosing a crunchy, low-carb cereal with no added sugar.
Are Rice Krispie Treats Keto?
Traditional Rice Krispie treats are not keto-friendly or even gluten free. A classic rice krispie treat recipe is made with crisp rice cereal and a bag of marshmallows containing plenty of sugar and corn syrup.
Regular Rice Krispies cereal is also high in grams of carbs and can quickly raise blood sugar. Even though the bars are light and airy, they are not a low-carb food.
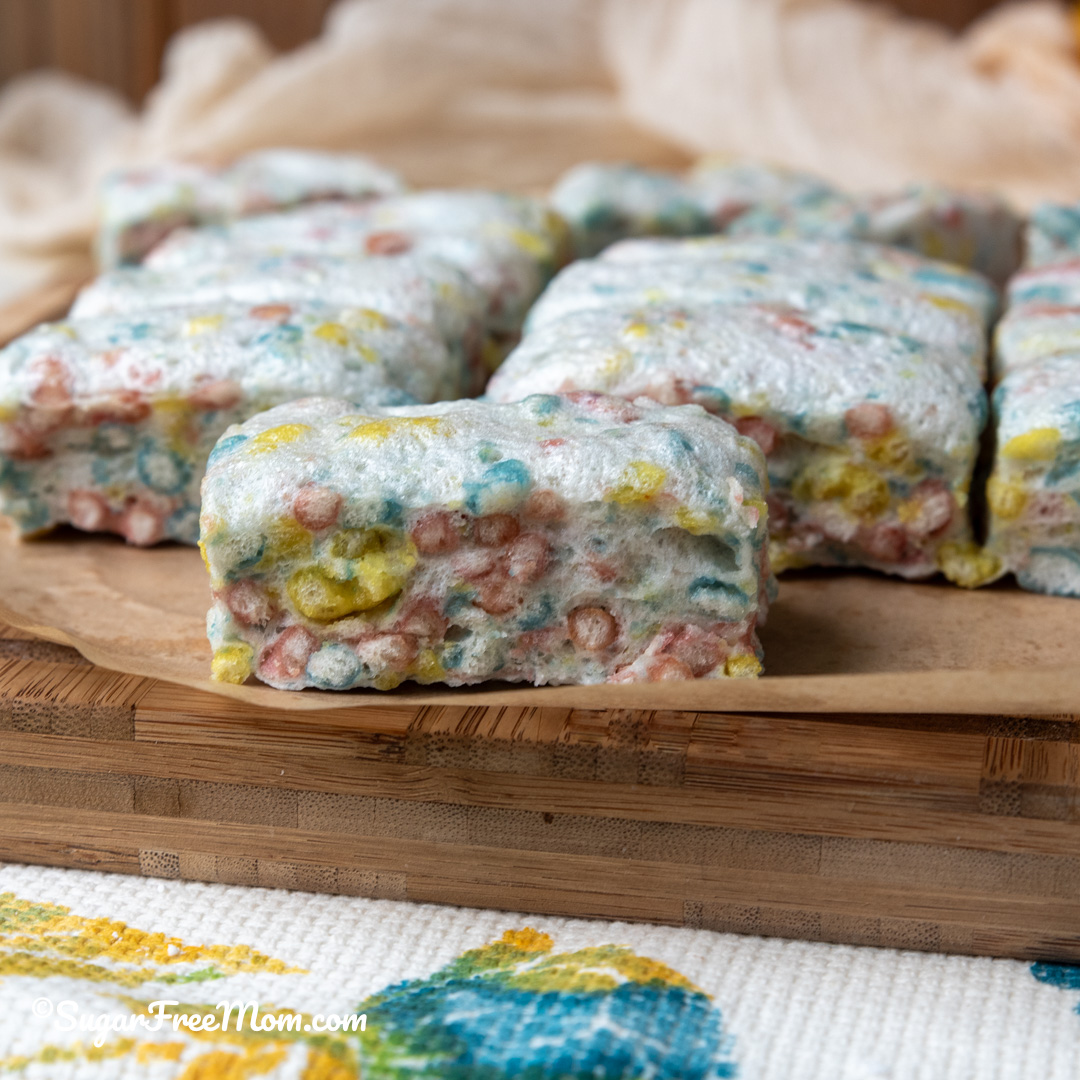
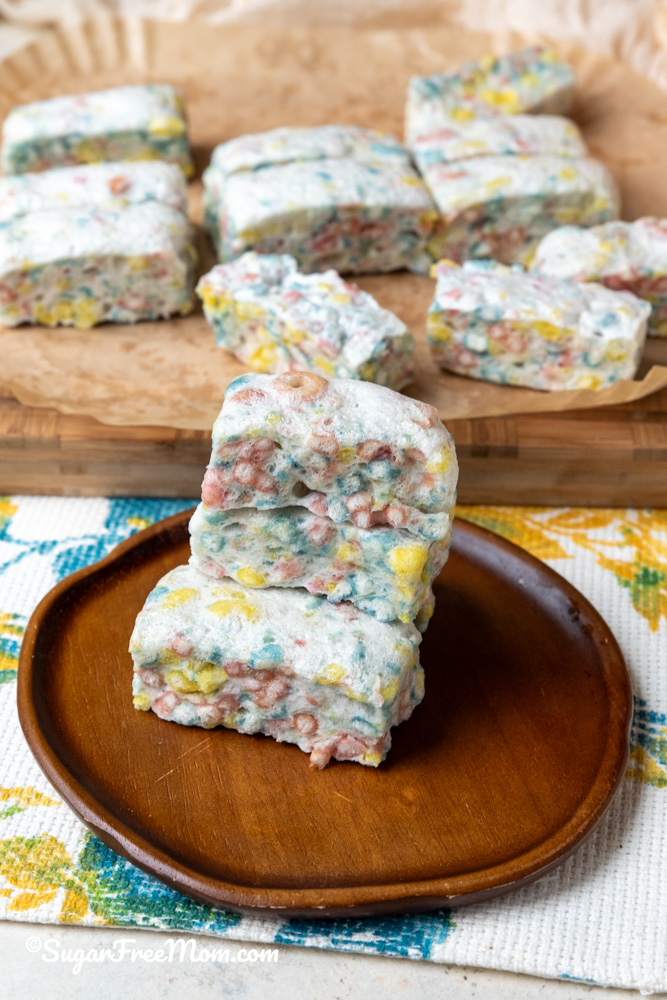
This recipe makes a delicious low-carb version by replacing traditional marshmallows and rice cereal with sugar-free ingredients and keto cereal. The result is a pan of chewy marshmallow treats that gives you the flavor and texture of the real thing without all the sugar.
These are not technically “rice” treats because they do not contain traditional rice krispies or puffed rice. However, they have the same satisfying combination of crispy cereal and a soft, sticky marshmallow mixture.
No Store-Bought Keto Marshmallows Required
You may have already seen my recipe for homemade keto marshmallows. They are fantastic on their own and can be used in many different sweet treats.
I did not make this recipe using a batch of my already-prepared keto marshmallows because we did not have any left! Instead, this recipe uses the same basic ingredients to create the marshmallow mixture directly in the pan.
That means you do not need to make your own sugar-free marshmallows first, wait for them to set, cut them, and then melt them again.
It also saves you from purchasing an expensive bag of keto marshmallows, such as Max Mallow or another specialty brand. Making the marshmallow base as part of the cereal mixture keeps the process simple and may be more cost effective.
Of course, the final cost depends on the cereal you choose. Keto protein cereal can be expensive. If you want to reduce the cost, try a less expensive keto cereal, a nut-free low-carb cereal, or crushed pork rinds.
Choosing the Best Keto Cereal
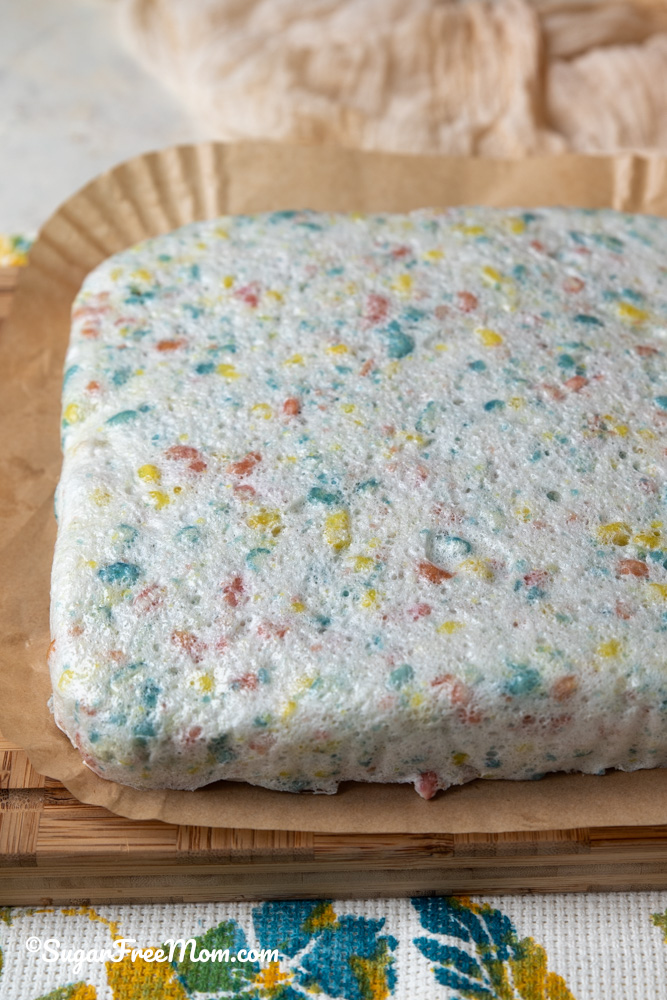
Magic Spoon cereal worked well in this recipe because it stayed crispy after being combined with the warm marshmallow mixture. I used the fruity flavor, which also gave the cereal bars some cheerful, festive colors.
Always check the nutrition label, even when a product is advertised as keto. The total grams of carbs, fiber, sugar alcohols, and net carbs can vary greatly among brands.
Also confirm that the cereal is safe for your family’s dietary needs. Many keto cereals and granolas contain almonds, pecans, cashews, or other tree nuts.
A Nut-Free Option for Our Family
I chose not to use keto granola because my youngest son has a tree nut allergy, and I wanted him to be able to enjoy these treats with the rest of us.
Nut allergies can make finding keto packaged foods difficult because almonds and other tree nuts are used in so many low-carb products. Even a product that does not include nuts as a main ingredient may have been processed in a facility that handles them.
If you are preparing these keto crispy treats for someone with an allergy, carefully read every package and check for possible cross-contact warnings. Choose a certified safe cereal based on that person’s specific needs.
You should also avoid adding peanut butter unless you know it is safe for everyone eating the treats. Peanut butter is not a tree nut, but some people, like my son, must avoid both peanuts and tree nuts.
Why You’ll Love These Keto Marshmallow Treats
These easy keto Rice Krispie treats are:
Sugar-free and made without corn syrup
Low in net carbs compared with traditional cereal bars
Gooey, crispy, and satisfying
Made without a store-bought bag of marshmallows
Easy to customize with different cereal flavors
A fun no-bake treat for children and adults
Simple enough for holidays, parties, or an everyday dessert
Easy to store in an airtight container
They are a great choice whenever the family wants something familiar and fun, but you do not want the grams of sugar found in traditional marshmallow treats.
Tips for Making Sugar-Free Cereal Bars
Sugar-free marshmallow mixtures can behave differently from melted traditional marshmallows, so a few simple tips will help you get the best results.
Prepare the Pan First
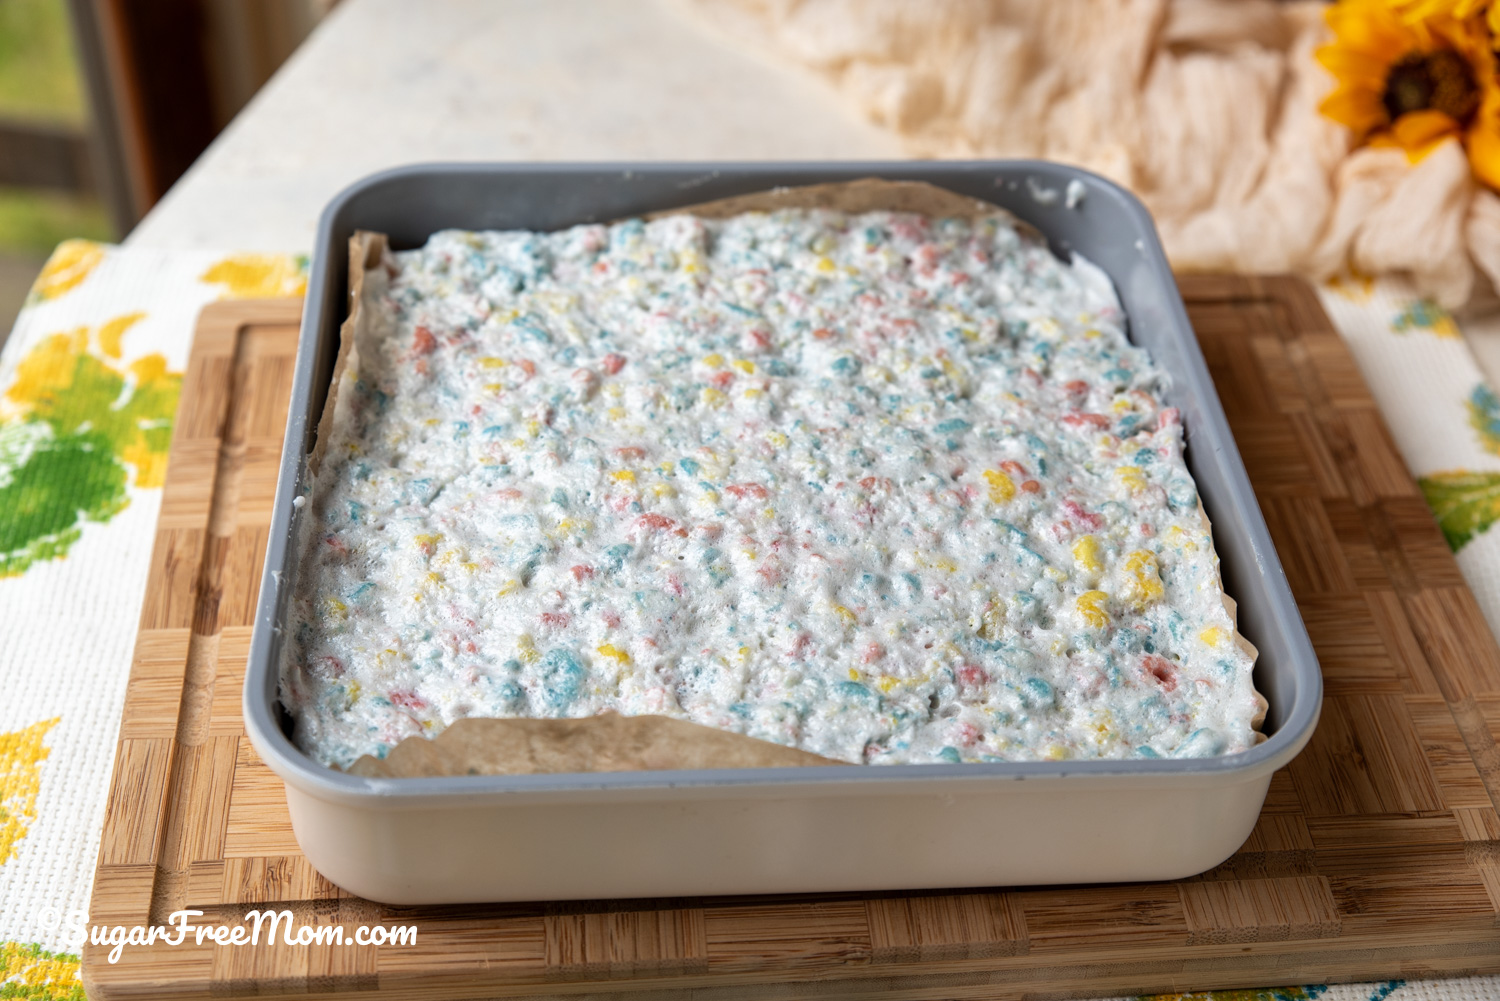
Line your baking pan with parchment paper or wax paper before beginning. Once the marshmallow base is ready, you will need to work fairly quickly.
A prepared pan makes it easy to transfer and shape the cereal mixture before it starts to set.
You can lightly coat the parchment paper with coconut oil. If you do not use coconut oil, another neutral option may work, but I generally avoid vegetable oil when possible.
Use a Large Mixing Bowl
Place your keto cereal in a large mixing bowl so you have enough room to fold everything together quickly.
You want the cereal coated with the marshmallow mixture, but you do not want to stir so aggressively that all those crispy pieces turn into crumbs.
Do Not Pack the Mixture Too Firmly
Transfer the cereal mixture to the prepared pan and gently press it into an even layer.
If you compress it too firmly, the finished cereal bars may become dense or hard. Light pressure creates treats with a better balance of crispy and chewy textures.
A lightly greased spatula works well. You can also place a piece of parchment paper or plastic wrap over the top and press gently with your hands.
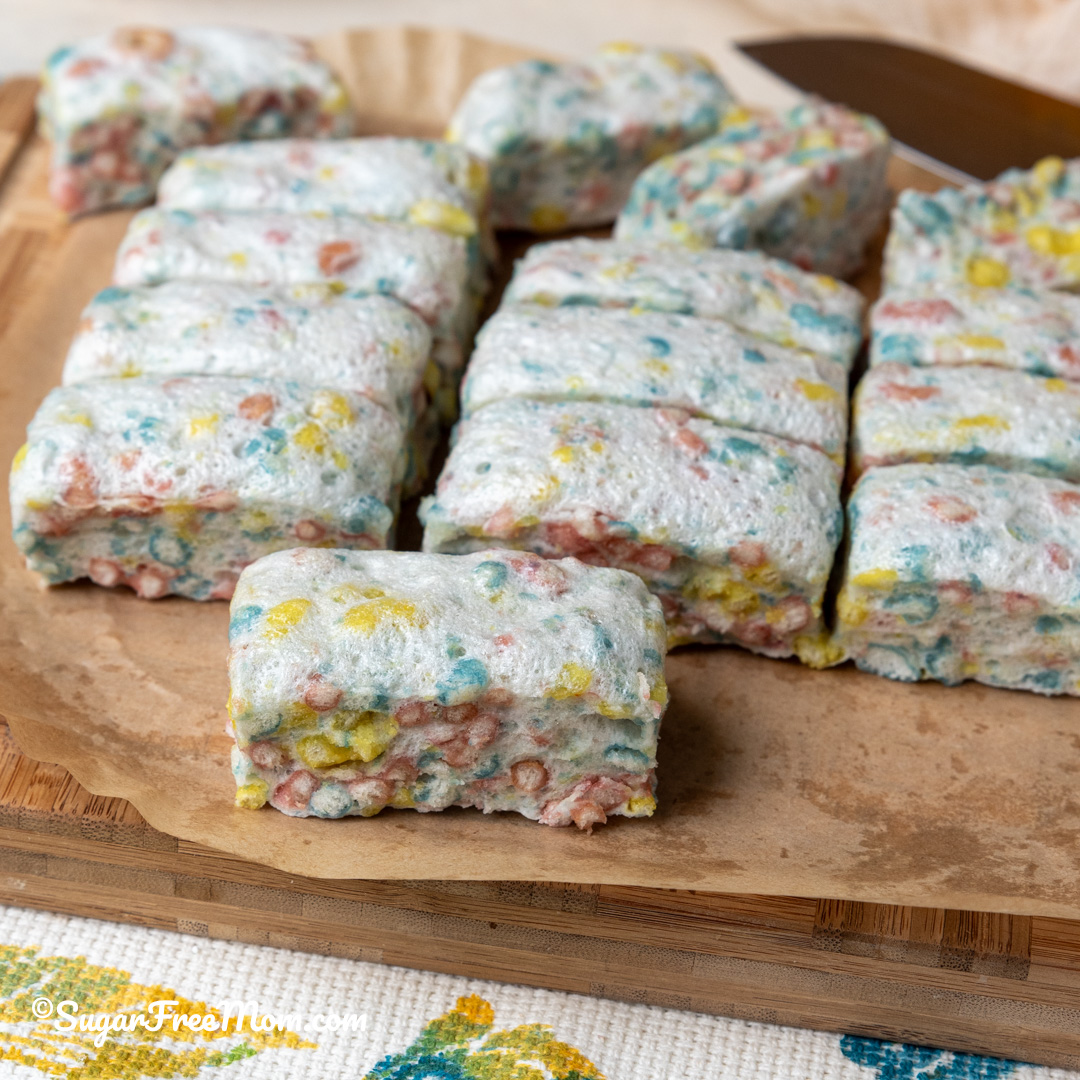
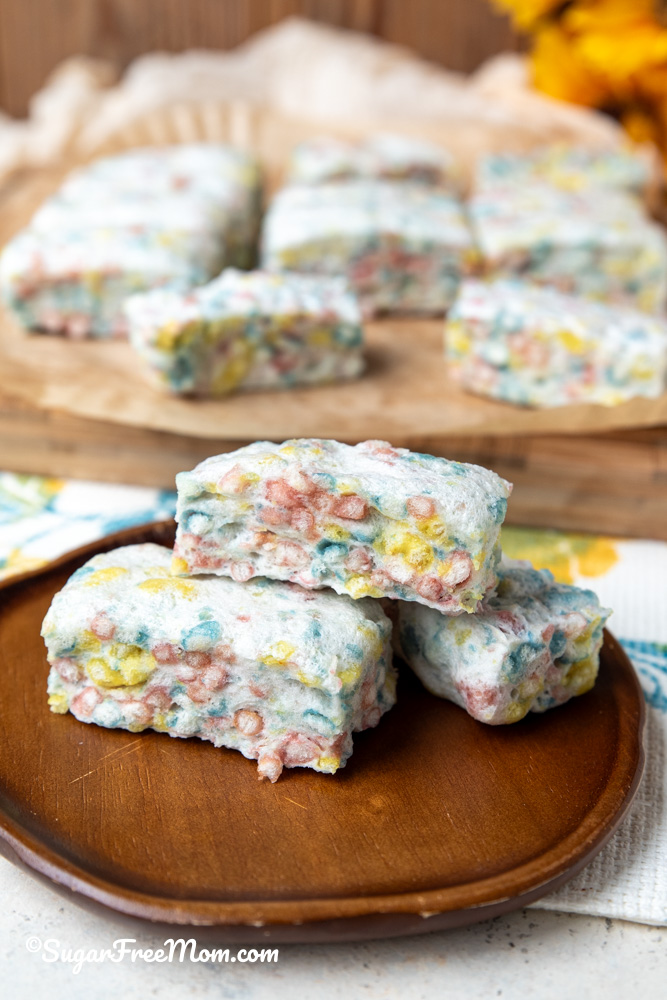
Let the Bars Set Before Cutting
Allow the treats to cool and firm up at room temperature before slicing. I let them sit overnight but even 6 hours should be good enough. Cutting them while they are still warm can cause them to fall apart.
For the cleanest pieces, use a large, sharp knife and wipe the blade between cuts.
Fun Flavor Variations
Once you have the basic recipe, these keto cereal bars are easy to customize.
Chocolate Keto Crispy Treats
Use cocoa protein cereal and add a small amount of unsweetened cocoa powder to the marshmallow mixture. You could also drizzle the cooled bars with melted chocolate.
The fruity flavor makes these bars look festive without needing traditional sugary cereal. If desired, you can add a small amount of natural food coloring to the marshmallow base, but it is not necessary.
White Chocolate Drizzle
Drizzle the bars with melted sugar-free white chocolate chips after they have cooled. Let the chocolate set completely before cutting or storing them.
Holiday Marshmallow Treats
Choose festive colors for the occasion or add keto-friendly sprinkles. These make adorable bake-sale-style treats even though they are actually no-bake treats.
Avoid regular sprinkles if you want the recipe to remain completely sugar-free.
Caramel-Inspired Treats
For a flavor similar to caramel Rice Krispie treats, add a keto-friendly caramel extract or a drizzle of my sugar-free caramel sauce.
Make sure any sauce you use fits your personal carb goals.
Can I Use Homemade Marshmallows?
Yes. If you already have a batch of homemade marshmallows ready, you can experiment with melting them for cereal bars.
However, that adds extra preparation because you must first make and set the marshmallows, then melt them down for the treats. The method in this recipe is easier because the sugar-free marshmallow mixture is prepared specifically for the bars.
Store-bought keto marshmallows may also work, but different brands contain different sweeteners and fibers. They may not melt exactly like traditional marshmallows, so the final texture can vary.
Monk fruit is a popular keto option, but products labeled monk fruit are often blended with erythritol or allulose. These blends are not interchangeable in every recipe.
Erythritol can sometimes produce a cooler flavor or a slightly firmer texture. Allulose generally keeps sugar-free treats softer, though it may brown more quickly when heated.
For the most reliable results, use the sweetener specified in the recipe rather than making a direct substitution. If you change sweeteners, you may need to adjust the quantity.
How to Store Keto Rice Krispie Treats
Store the sliced treats in an air-tight container at room temperature. Place parchment paper or wax paper between the layers so they do not stick together.
For individual portions, wrap each bar in plastic wrap or place it in a small Ziploc bag.
These bars are usually best when enjoyed within the first few days because the cereal will gradually lose some of its crisp texture. Refrigerating them may make them too firm, depending on the sweetener and fat used.
If your kitchen is very warm, you may need to refrigerate them briefly. Let refrigerated bars return to room temperature before serving for the best chewy texture.
Are These Healthy Rice Krispie Treats?
“Healthy” can mean something different to everyone, but these are certainly a lower-sugar alternative to traditional Rice Krispie treats.
They contain zero added sugar when prepared with appropriate sugar-free ingredients. They also have fewer grams of sugar and fewer net carbs than classic treats made with rice cereal and traditional marshmallows.
They are still a sweet treat, and serving size matters. Always calculate the nutrition using the exact cereal, sweetener, and other products you use, since brands can vary significantly.
For people watching blood sugar, individual responses to sugar alcohols, fibers, and protein cereal can differ. Check with your healthcare provider if you need advice for your personal medical needs.
Frequently Asked Questions
Can I use regular Rice Krispies?
You can, but the finished recipe will not be keto or very low in carbs. Regular rice cereal is made from rice and contributes a significant amount of carbohydrates.
For keto Rice Krispie treats, use a low-carb crispy cereal or one of the alternatives suggested above.
Can I use keto granola?
Yes, as long as the granola fits your nutritional needs. The texture will be different from crispy cereal, and many keto granolas contain tree nuts.
Can I use pork rinds?
Plain pork rinds could be used as an inexpensive, extremely low-carb substitute. Crush them into cereal-size pieces and make sure they are fresh and very crispy.
The flavor will not be exactly the same as cereal, but the sweet marshmallow mixture can help balance their saltiness.
Do I need keto marshmallows?
No. One of the best things about this recipe is that you do not need to buy or prepare keto marshmallows first. The homemade marshmallow base is created directly as part of the recipe.
Why are my cereal bars hard?
The mixture may have been cooked too long, pressed too firmly into the baking pan, or prepared with a sweetener that crystallizes as it cools.
Cook only as directed and press the mixture gently into the pan.
How do I keep the mixture from sticking?
Use a parchment-lined prepared pan, lightly grease your spatula with coconut oil, and work while the mixture is still warm.
Easy Keto Treats the Whole Family Can Enjoy
I love being able to recreate nostalgic recipes in a way that works for my low-carb lifestyle and my family’s needs.
These easy sugar-free keto marshmallow Rice Krispie treats give you that classic combination of gooey marshmallow and crispy cereal without traditional marshmallows, corn syrup, or added sugar.
The fruity Magic Spoon cereal was the winner in our house, but feel free to use whichever keto cereal you and your family enjoy. You can also try chocolate, peanut butter, or chocolate chip cereal—or use crushed pork rinds when you want a lower-cost option.
Just remember to check every ingredient carefully if you are cooking for someone with food allergies.
Scroll down to the recipe card for the exact ingredients, complete directions, nutritional information, total grams of carbs, and net carbs. If you make these keto marshmallow treats, leave a comment and let me know which crispy cereal and flavor you used!
These easy sugar-free keto marshmallow Rice Krispie treats give you that classic combination of gooey marshmallow and crispy cereal without traditional marshmallows, corn syrup, or added sugar.
Line a 9×9-inch pan with parchment and lightly grease. Set aside. If using a stand mixer, fit it with the whisk attachment. Have all your ingredients ready to go.Set aside a large bowl with the keto cereal. I used a metal masher to roughly chop the cereal but you could also leave it whole.
Pour the cold water (1/2 cup) into your stand mixer's bowl or a large glass bowl. Sprinkle the gelatin in and allow to bloom.
Pour the remaining water (2/3 cup) into a saucepan, and pour in the monk fruit allulose sweetener. Bring to a boil over medium heat, allowing the sweetener to completely dissolve.If you have a kitchen thermometer, heat the mixture until it reaches about 210°F (100°C). Don’t worry if you don’t have one—simply bring it to a rolling boil and let it cook for about 2 minutes. Unlike regular sugar, sugar alcohols don’t caramelize or reach the same high temperatures used in traditional candy making, so boiling for 2 minutes ensures the mixture is hot enough for the recipe to work properly.
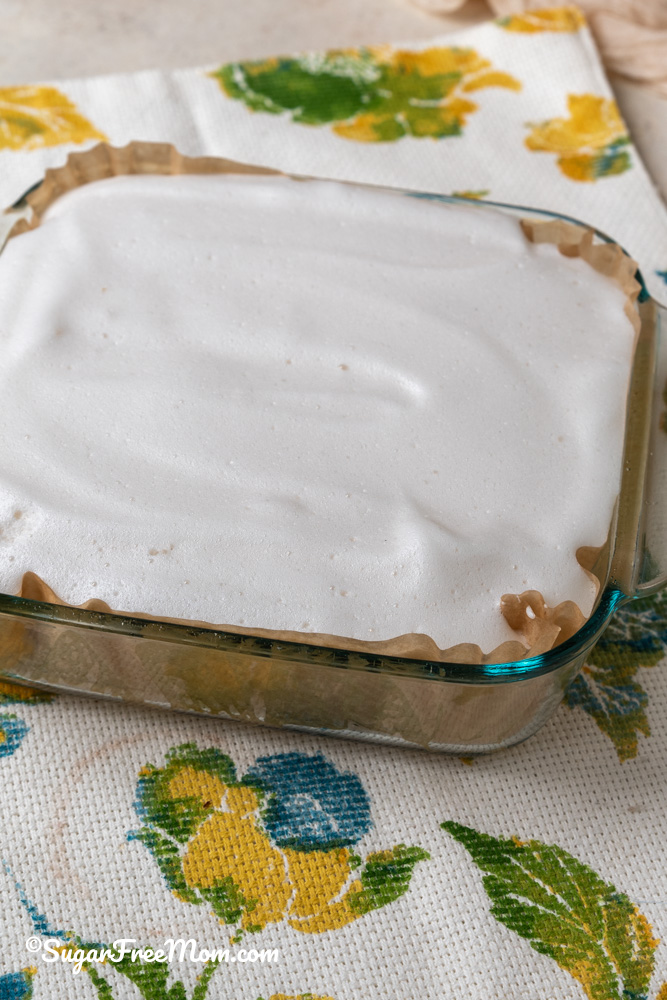
At this point, you’ll want to work fairly quickly so the mixture stays hot. Turn your stand mixer to low speed just long enough to break up the bloomed gelatin, then carefully pour the hot syrup into the bowl, aiming for the gelatin rather than the sides of the bowl to minimize cooling.Increase the mixer to high speed and whip continuously for about 15 minutes. Add the salt around the 8-minute mark, then the vanilla extract (and liquid stevia, if using) around 12 minutes. By the end of mixing, the marshmallow mixture should be thick, glossy, and fluffy, holding stiff peaks. If you’re using a glass mixing bowl, it should feel only slightly warm to the touch.
Turn off the mixer and immediately pour the marshmallow mixture into your prepared bowl with the cereal. Work quickly, as the mixture begins to set fast. Use a buttered silicone spatula to gently fold everything together. Transfer to your parchment-lined 9×9 pan. Lightly butter your hands or another piece of parchment and gently press it into an even layer.
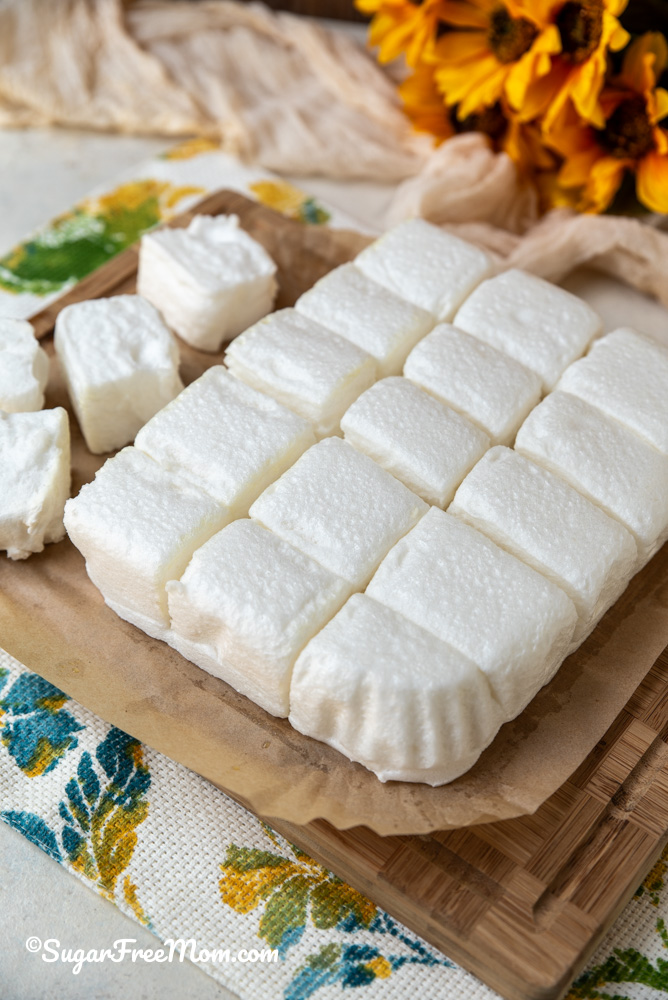
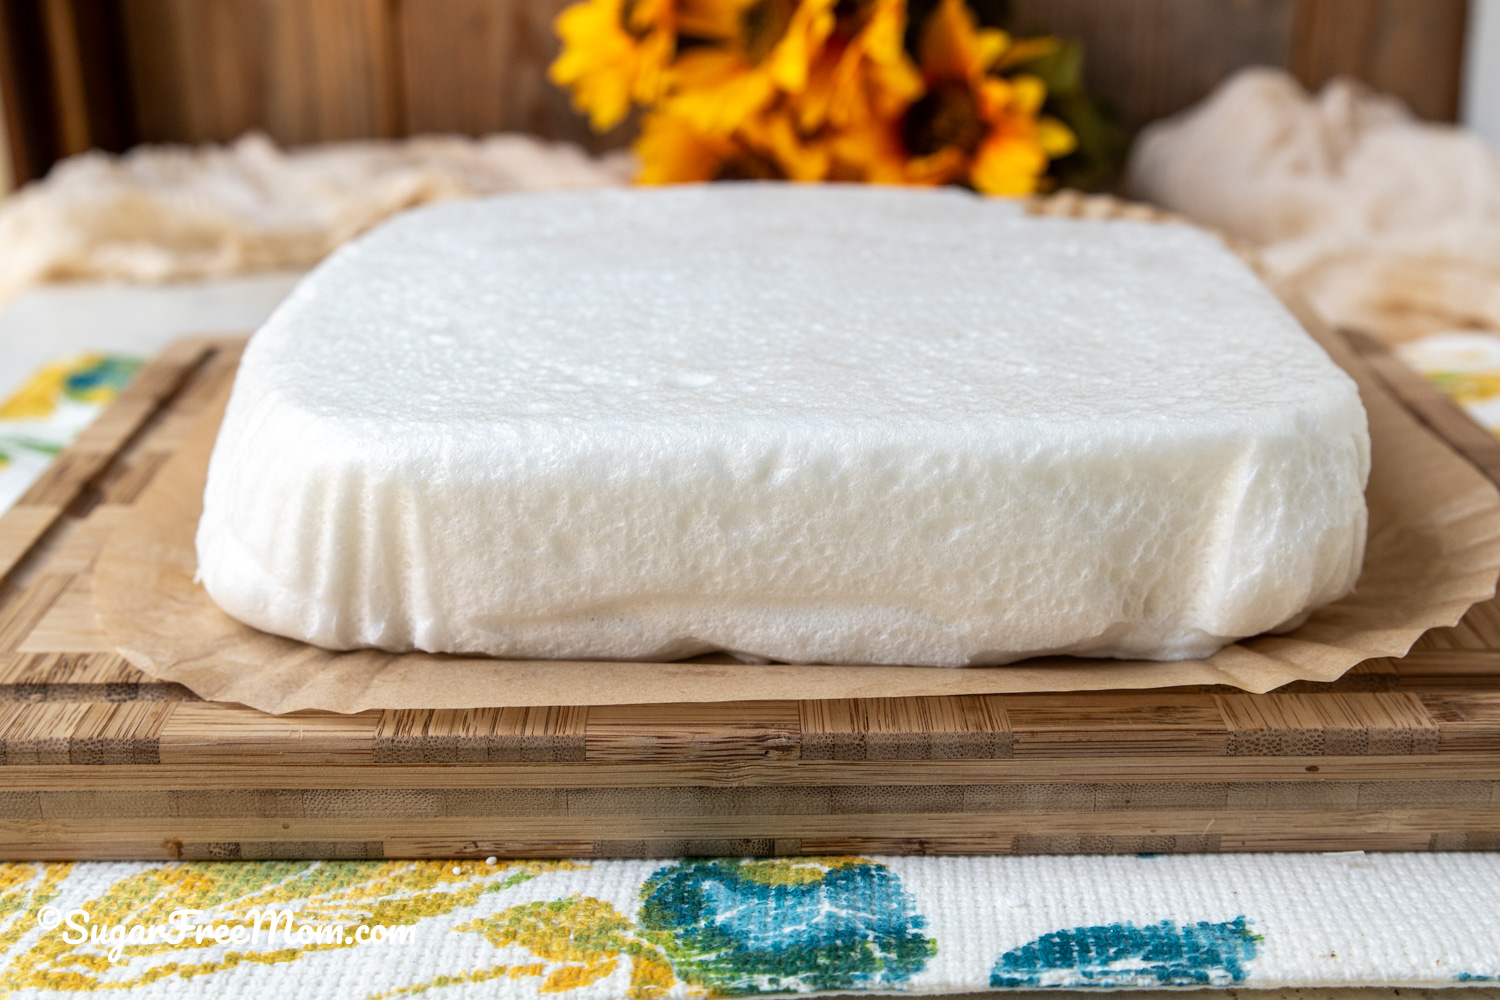
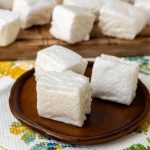
Allow the marshmallows to set uncovered at room temperature for at least 6 hours, or preferably overnight, until they are firm and easy to handle. Gently lift them out of the pan and cut into squares using a lightly greased knife for clean edges.Store the marshmallows in an airtight container in a cool, dry place for up to 2 weeks. For longer storage, freeze them for up to 3 months.
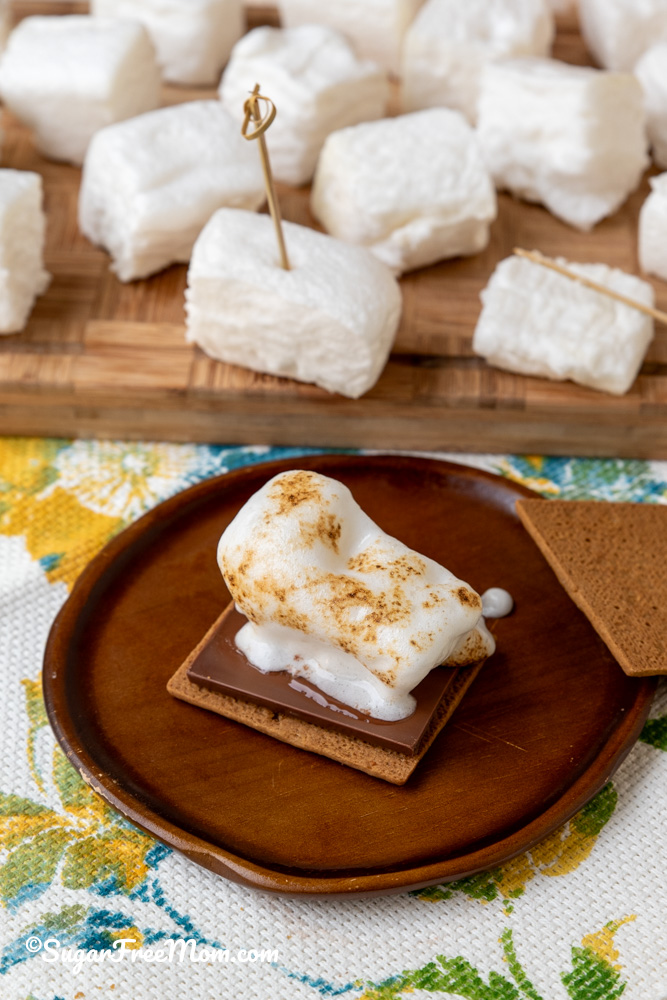
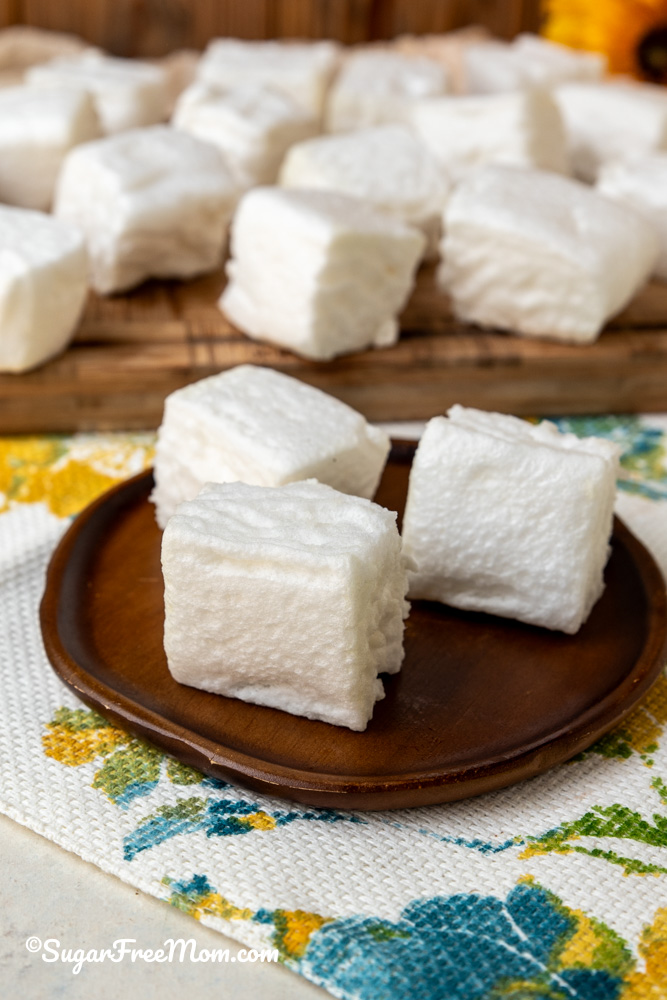
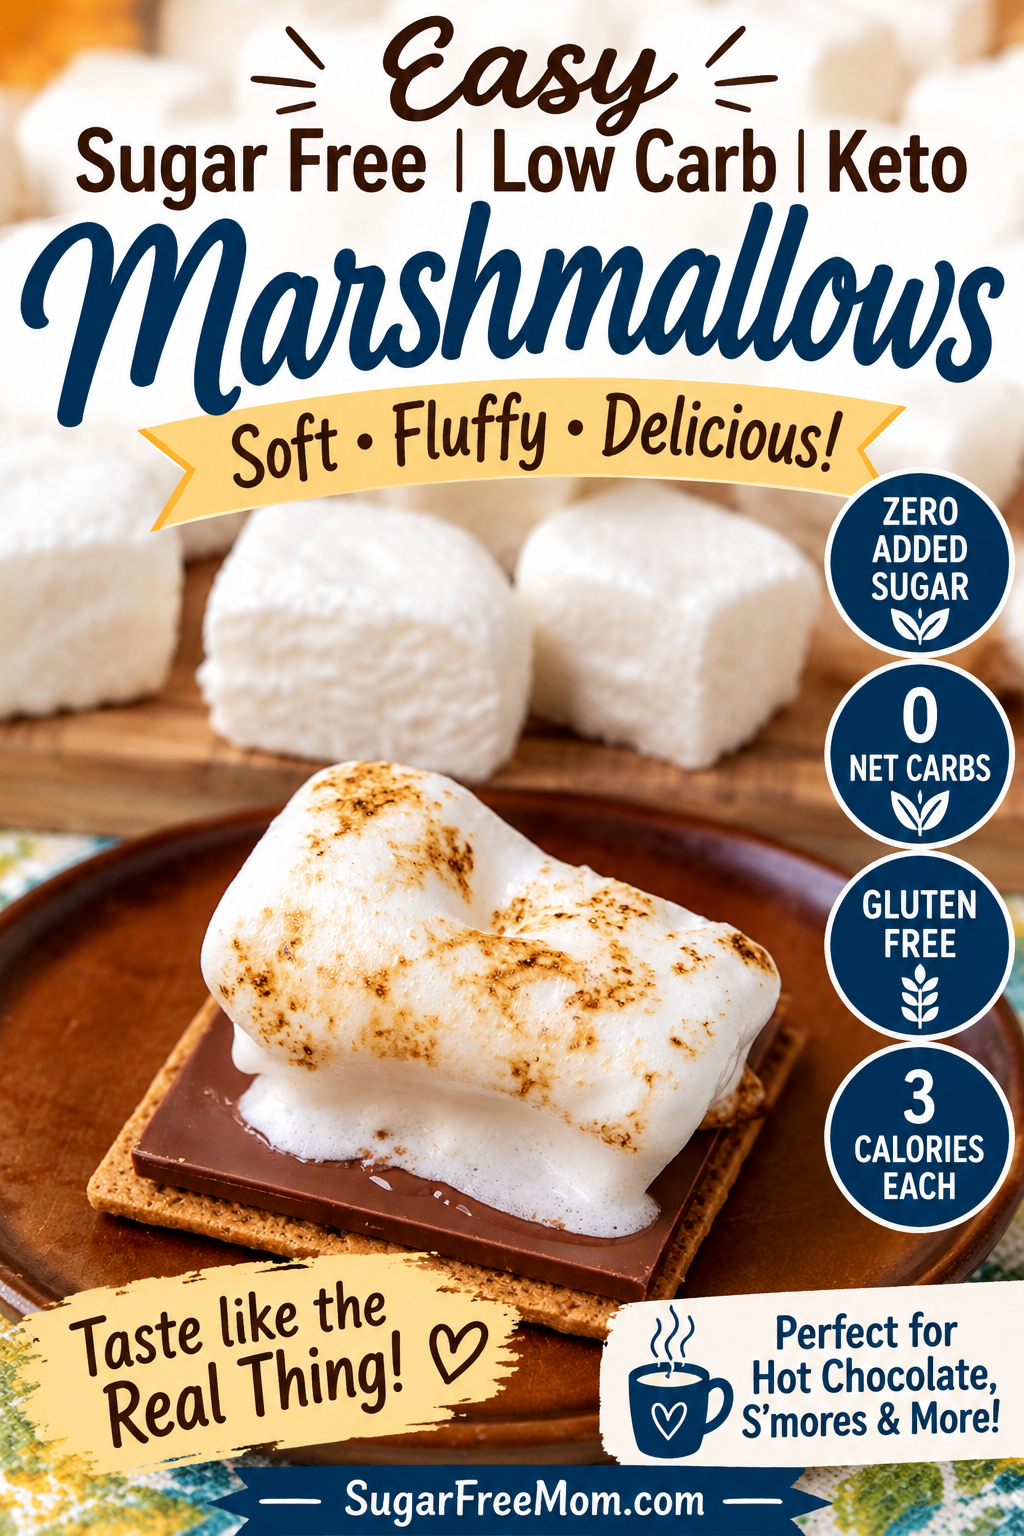
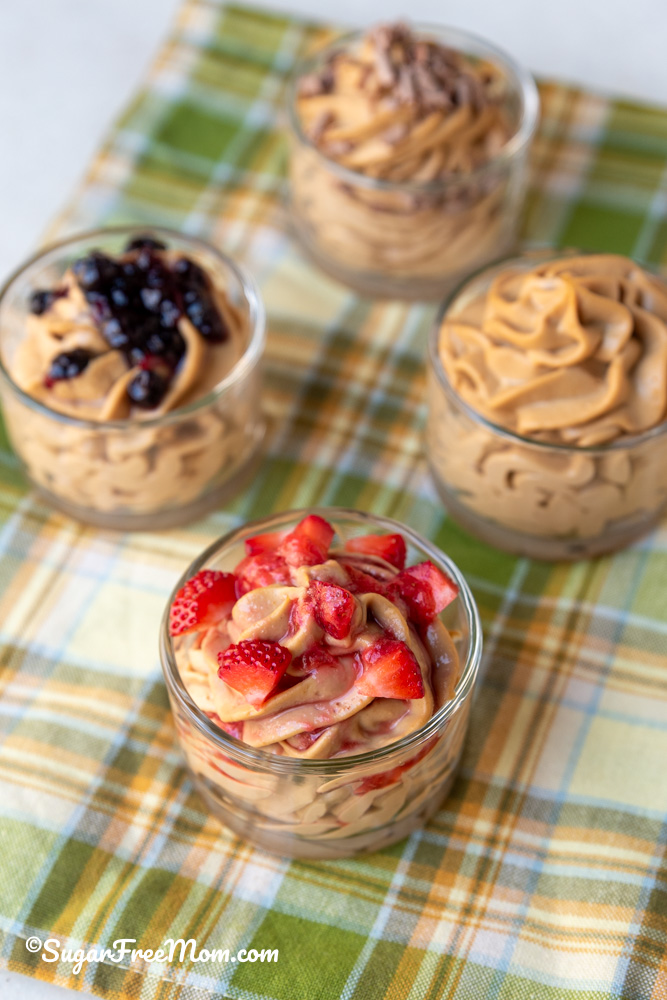
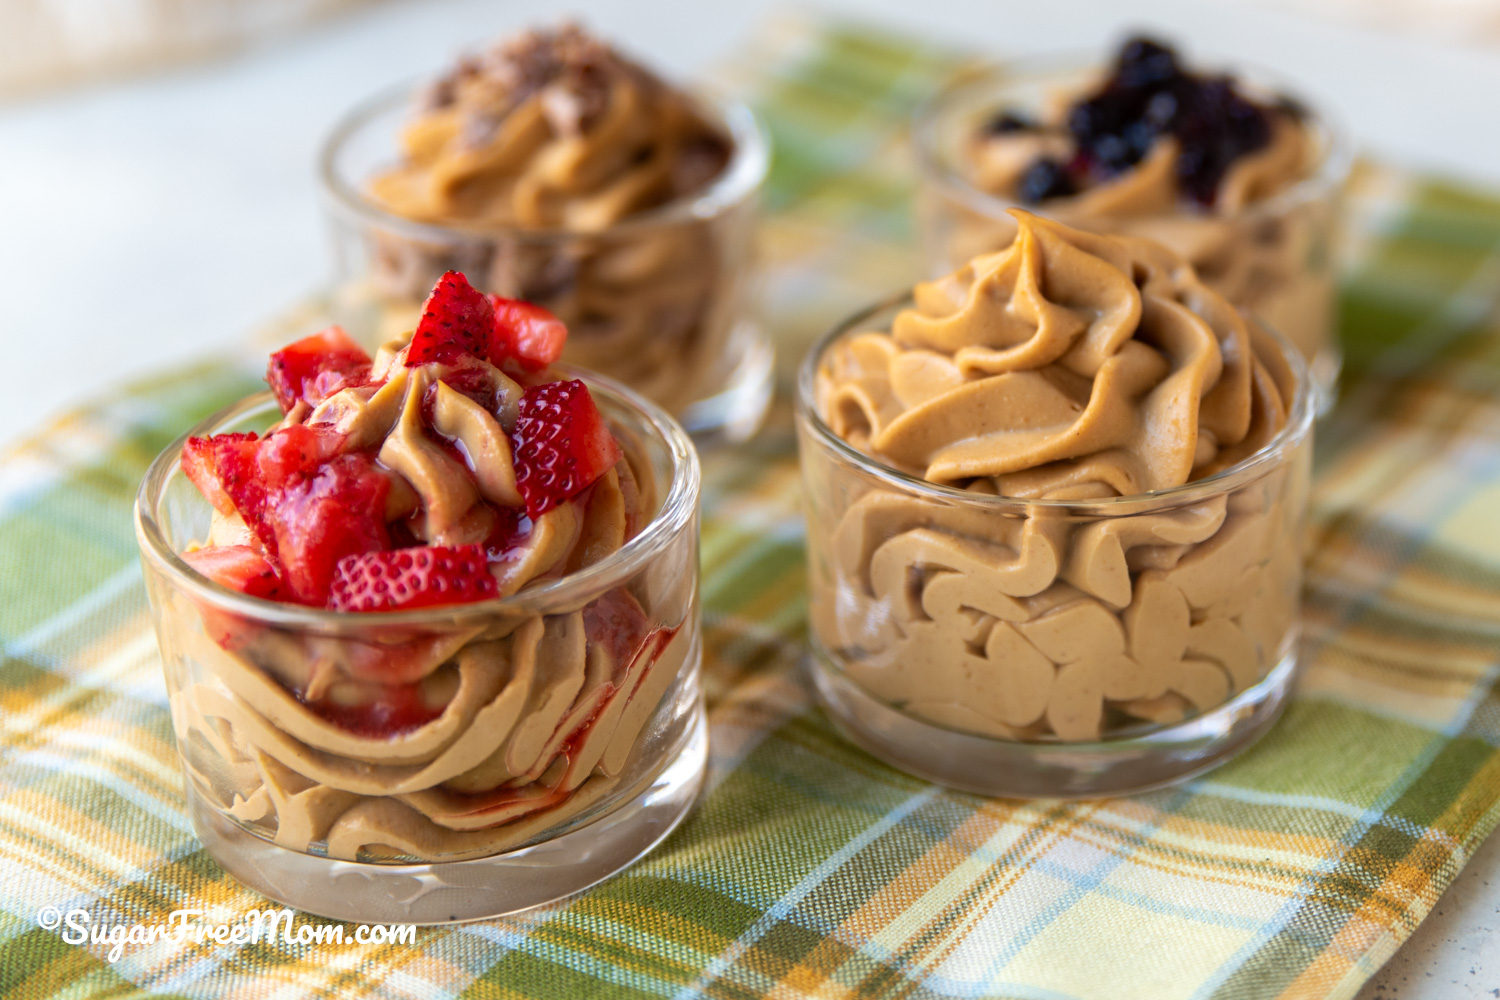
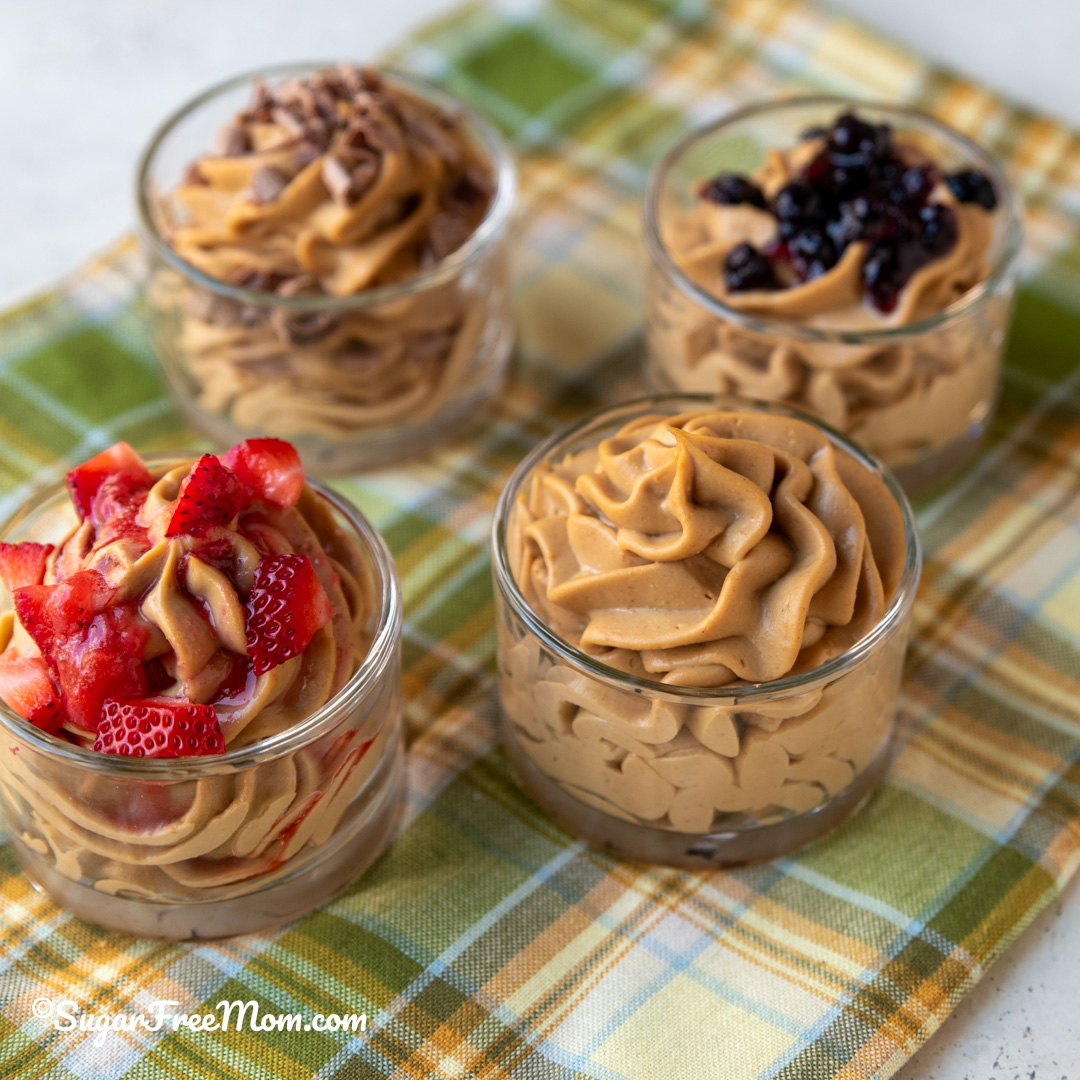
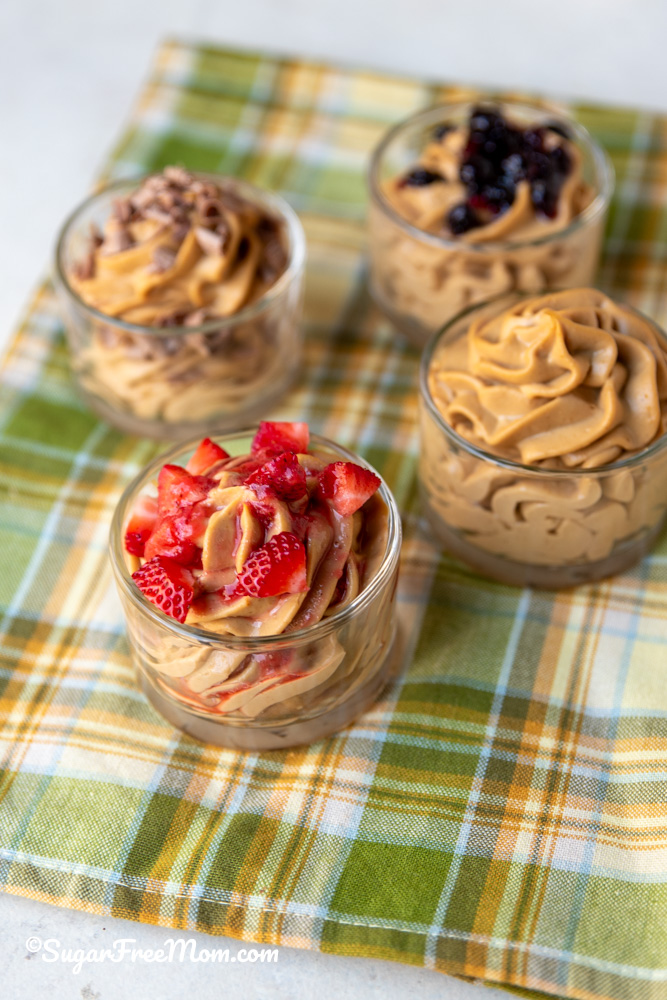
These easy sugar free low carb keto marshmallows recipe needs just 5 ingredients and tastes just like a traditional marshmallow!
Sugar Free Homemade Keto Marshmallows
If you’ve been following me for a while, you know I love a good recipe challenge. And let me tell you…this one has been sitting on my foodie bucket list for years.
I’ve made everything from keto breads and cheesecakes to sugar-free candy, but homemade keto marshmallows always intimidated me.
Traditional marshmallows rely on hot sugar syrup, corn syrup, and very precise candy-making techniques. Recreating that same fluffy texture without table sugar or corn syrup seemed almost impossible.
But after years of recipe testing, I finally felt confident enough to give these easy sugar-free marshmallows a try.
My very first batch wasn’t a complete failure, but it wasn’t exactly what I was hoping for either.
I used pure liquid allulose, and while the marshmallow mixture whipped beautifully and became bright white, it stayed just a little too soft. That’s when I realized the extra moisture from liquid allulose was preventing the marshmallows from setting as firmly as I wanted.
For my second attempt, I kept everything exactly the same except for one important change.
The marshmallow mixture whipped into thick, glossy stiff peaks, set beautifully at room temperature, and gave me the fluffy texture I’d been dreaming about. I also switched from an 8×8 pan to a 9×9 pan, which created the perfect marshmallow height.
I can honestly say these are everything I hoped they’d be.
Soft.
Fluffy.
Light.
And completely sugar free.
Why You’ll Love These Homemade Keto Marshmallows
Whether you’re following a keto diet, low carb diet, or simply trying to reduce your blood sugar spikes, these homemade marshmallows are an easy recipe you’ll want to make again and again.
They’re:
Zero added sugar
Low carb and keto friendly
Naturally gluten free
Only 3 calories each
Made without corn syrup
No egg whites required
Perfect for hot chocolate
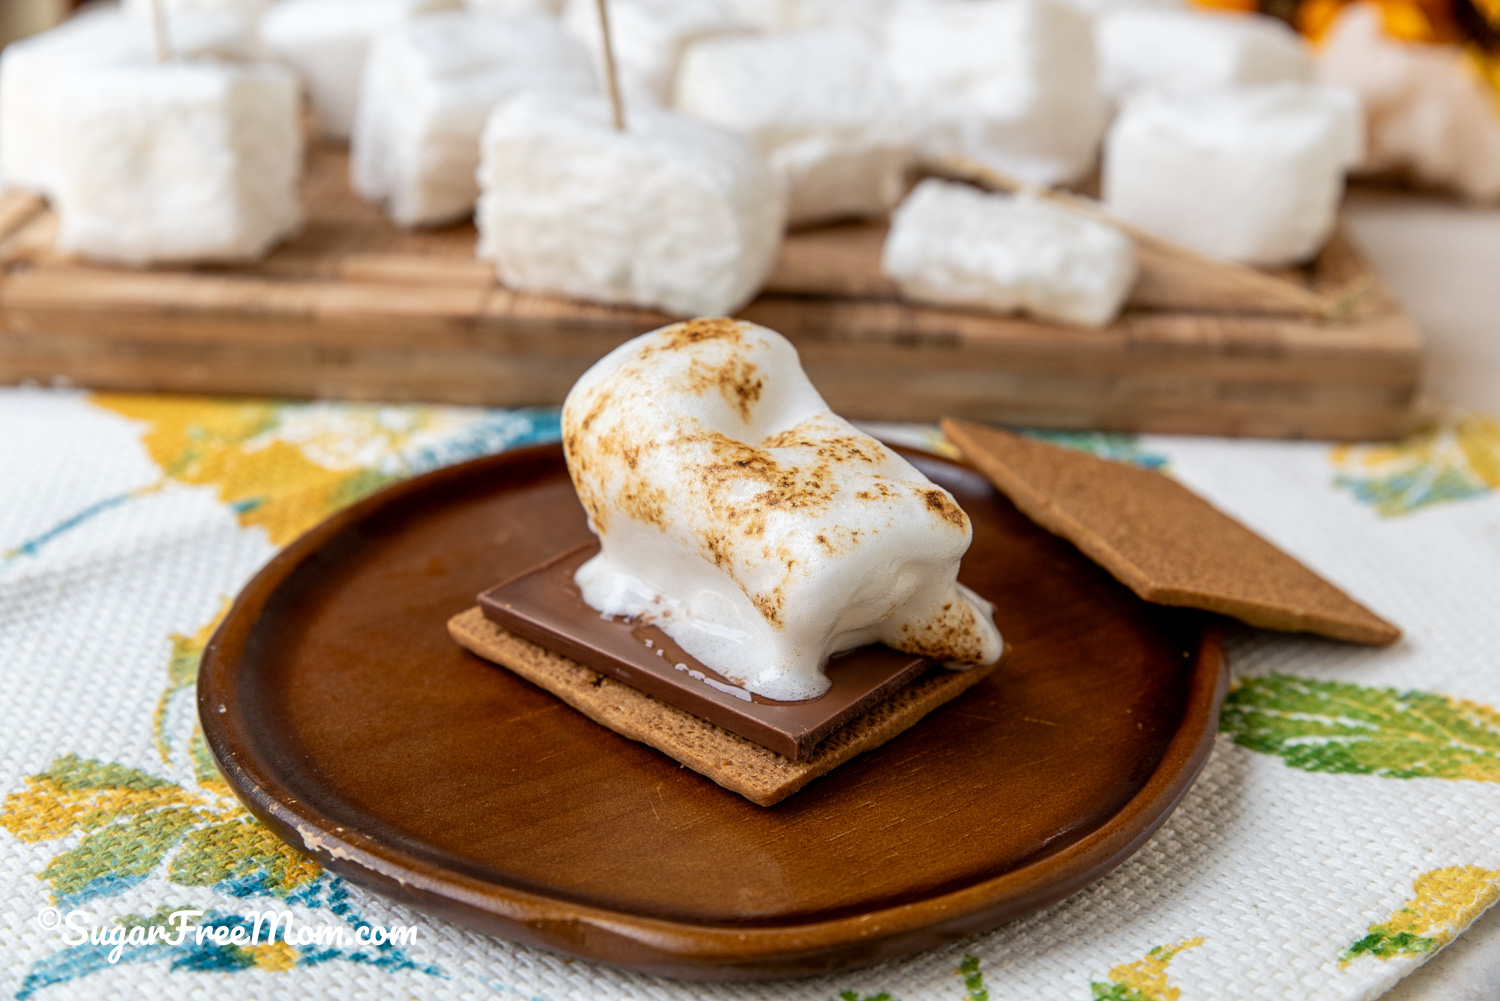
Great for s’mores
Delicious in protein shakes
Perfect sweet treat for holidays or everyday snacking
Unlike store-bought marshmallows, these contain simple ingredients you can actually pronounce.
Why I Use Grass-Fed Gelatin
One of the reasons I love making homemade marshmallows is that they’re actually a delicious way to enjoy one of my favorite functional ingredients, grass-fed gelatin powder.
I personally only use and recommend grass-fed beef gelatin because it comes from pasture-raised cattle rather than conventionally raised animals. While all gelatin provides collagen-building amino acids, choosing grass-fed sources gives me greater confidence in the quality of the finished product.
Gelatin is rich in amino acids like glycine, proline, and hydroxyproline, which are the primary building blocks of collagen.
These amino acids may help support:
Healthy skin elasticity
Strong hair and nails
Joint comfort
Bone health
Healthy digestion
A healthy gut lining
Better recovery after exercise
Muscle maintenance as we age
Glycine is especially interesting because it also plays a role in supporting relaxation and restful sleep, which makes these marshmallows a fun bedtime treat in a cup of sugar-free hot chocolate.
Of course, I’m not eating marshmallows as my primary collagen source, but I certainly don’t mind getting a little extra nutrition while satisfying my sweet tooth!
Ingredients You’ll Need
One of my favorite things about this marshmallow recipe is how incredibly simple it is.
Liquid allulose contains additional water, which can make the marshmallow mixture softer and delay setting.
The powdered monk fruit allulose blend dissolves quickly in the hot syrup while allowing the gelatin to create those beautiful fluffy stiff peaks.
Unlike regular sugar, keto-friendly sweeteners don’t caramelize exactly the same way, so you don’t need to cook them to the traditional 240°F soft-ball stage.
A simple rolling boil for about two minutes (or approximately 210°F if using a candy thermometer) worked perfectly during testing.
Tips for Perfect Keto Marshmallows
If this is your first time making marshmallows, don’t worry-they’re much easier than they seem.
A few helpful tips:
Bloom the gelatin completely before adding the hot syrup.
Use the whisk attachment on a stand mixer for the fluffiest texture.
Pour the hot syrup directly into the gelatin instead of along the sides of the bowl.
Whip on high speed for about 15 minutes.
Wait until the mixture forms stiff peaks before transferring it to your prepared pan.
Work quickly once mixing is finished because the marshmallow mixture starts setting almost immediately.
Allow them to dry uncovered at room temperature overnight for the best texture.
Use a lightly greased sharp knife for clean slices.
Frequently Asked Questions
Can I use liquid allulose?
I don’t recommend it.
My first test batch used liquid allulose, and while it whipped beautifully, the marshmallows remained softer because of the extra moisture.
Absolutely, but then these would simply become traditional marshmallows, and the nutrition information would change dramatically.
My goal was creating low carb marshmallows that taste like the real thing without affecting blood sugar the same way.
Can I use erythritol instead of the monk fruit allulose blend?
I don’t recommend it.
While many older keto marshmallow recipes use erythritol or erythritol-based sweeteners, I no longer develop recipes with erythritol because it doesn’t perform as well in many desserts and candy recipes.
Erythritol tends to recrystallize as it cools, which can leave marshmallows with a gritty or crunchy texture instead of the soft, fluffy texture you’re looking for. It also has a noticeable cooling sensation that can overpower the classic vanilla marshmallow flavor.
After extensive recipe testing, I’ve found that a monk fruit allulose blend creates a much smoother marshmallow mixture with a softer bite that’s much closer to traditional marshmallows.
If you have an erythritol-based sweetener like Swerve Confectioners, I don’t recommend substituting it in this recipe. For the best results, stick with the confectioners-style monk fruit and allulose blend listed in the recipe.
Do these taste like store-bought marshmallows?
Honestly, yes!
The texture of my low-carb marshmallows is surprisingly close to classic marshmallows, although they’re just slightly softer because they’re made without traditional sugar syrup.
Do I need a candy thermometer?
No.
A candy thermometer is helpful if you have one, but simply bringing the syrup to a rolling boil and cooking for about two minutes worked perfectly in my testing.
How should I store them?
Store your sugar-free marshmallows in an airtight container in a cool, dry place for up to two weeks.
For longer storage, freeze them for up to three months.
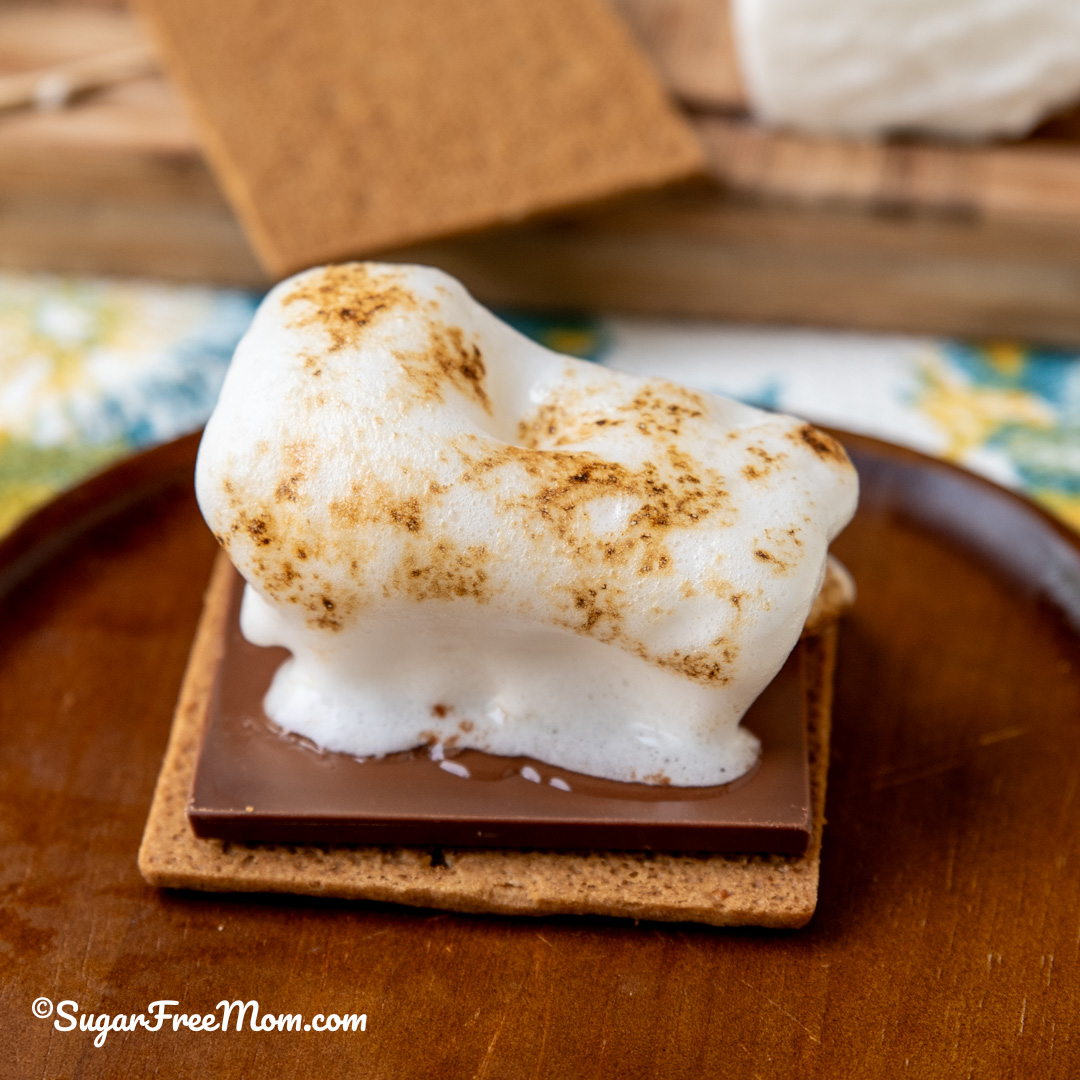
Can I roast these over a campfire?
Not exactly.
These low carb marshmallows taste remarkably similar to traditional marshmallows, but they won’t toast or caramelize the same way over an open flame. Regular marshmallows brown because the sugar caramelizes and melts.
Since these are made with a keto-friendly sweetener instead of table sugar or corn syrup, they don’t develop that golden, toasted exterior.
If you hold them over a flame too long, they’ll simply soften, melt, and eventually drip off the skewer rather than puffing up and turning golden brown like store-bought marshmallows.
Enjoyed as a sweet snack right out of the container
If you’d like a lightly toasted finish, a small kitchen or crème brûlée torch may lightly brown the outside. I recommend using quick passes with the flame rather than holding it in one spot, as keto-friendly sweeteners can melt faster than regular sugar. If you try this, let me know how it works for you!
After years of putting this recipe off, I’m so glad I finally checked homemade keto marshmallows off my foodie bucket list.
Sometimes the recipes that seem the most intimidating turn out to be some of the most rewarding. Once I swapped the liquid allulose for a confectioners-style monk fruit allulose blend, everything came together beautifully.
Whether you’re dropping one into hot chocolate, making sugar-free s’mores, adding them to protein shakes, or simply enjoying one as a little sweet treat, I think you’ll be amazed that something this fluffy can be completely sugar free, low carb, and keto friendly.
Line a 9×9-inch pan with parchment and lightly grease. Set aside. If using a stand mixer, fit it with the whisk attachment. Have all your ingredients ready to go.
Pour the cold water (1/2 cup) into your stand mixer's bowl or a large glass bowl. Sprinkle the gelatin in and allow to bloom.
Pour the remaining water (2/3 cup) into a saucepan, and pour in the monk fruit allulose sweetener. Bring to a boil over medium heat, allowing the sweetener to completely dissolve.If you have a kitchen thermometer, heat the mixture until it reaches about 210°F (100°C). Don’t worry if you don’t have one—simply bring it to a rolling boil and let it cook for about 2 minutes. Unlike regular sugar, sugar alcohols don’t caramelize or reach the same high temperatures used in traditional candy making, so boiling for 2 minutes ensures the mixture is hot enough for the recipe to work properly.
At this point, you’ll want to work fairly quickly so the mixture stays hot. Turn your stand mixer to low speed just long enough to break up the bloomed gelatin, then carefully pour the hot syrup into the bowl, aiming for the gelatin rather than the sides of the bowl to minimize cooling.Increase the mixer to high speed and whip continuously for about 15 minutes. Add the salt around the 8-minute mark, then the vanilla extract (and liquid stevia, if using) around 12 minutes. By the end of mixing, the marshmallow mixture should be thick, glossy, and fluffy, holding stiff peaks. If you’re using a glass mixing bowl, it should feel only slightly warm to the touch.
Turn off the mixer and immediately pour the marshmallow mixture into your prepared baking dish. Work quickly, as the mixture begins to set fast. Don’t worry about scraping every last bit from the whisk or bowl—trying to get it all can cause the marshmallow to firm up before you get it into the pan.
Allow the marshmallows to set uncovered at room temperature for at least 6 hours, or preferably overnight, until they are firm and easy to handle. Gently lift them out of the pan and cut into squares using a lightly greased knife for clean edges.Unlike traditional marshmallows, these keto marshmallows aren’t overly sticky, so there’s usually no need to coat them in powdered sweetener. If they do feel tacky, simply rub a tiny amount of coconut oil on your knife or hands to prevent sticking. In very warm or humid weather, you can lightly dust them with powdered allulose or your favorite powdered keto sweetener if desired.Store the marshmallows in an airtight container in a cool, dry place for up to 2 weeks. For longer storage, freeze them for up to 3 months.
Video
Notes
I greased my knife to slice into 4 columns and 5 rows making 20 total.
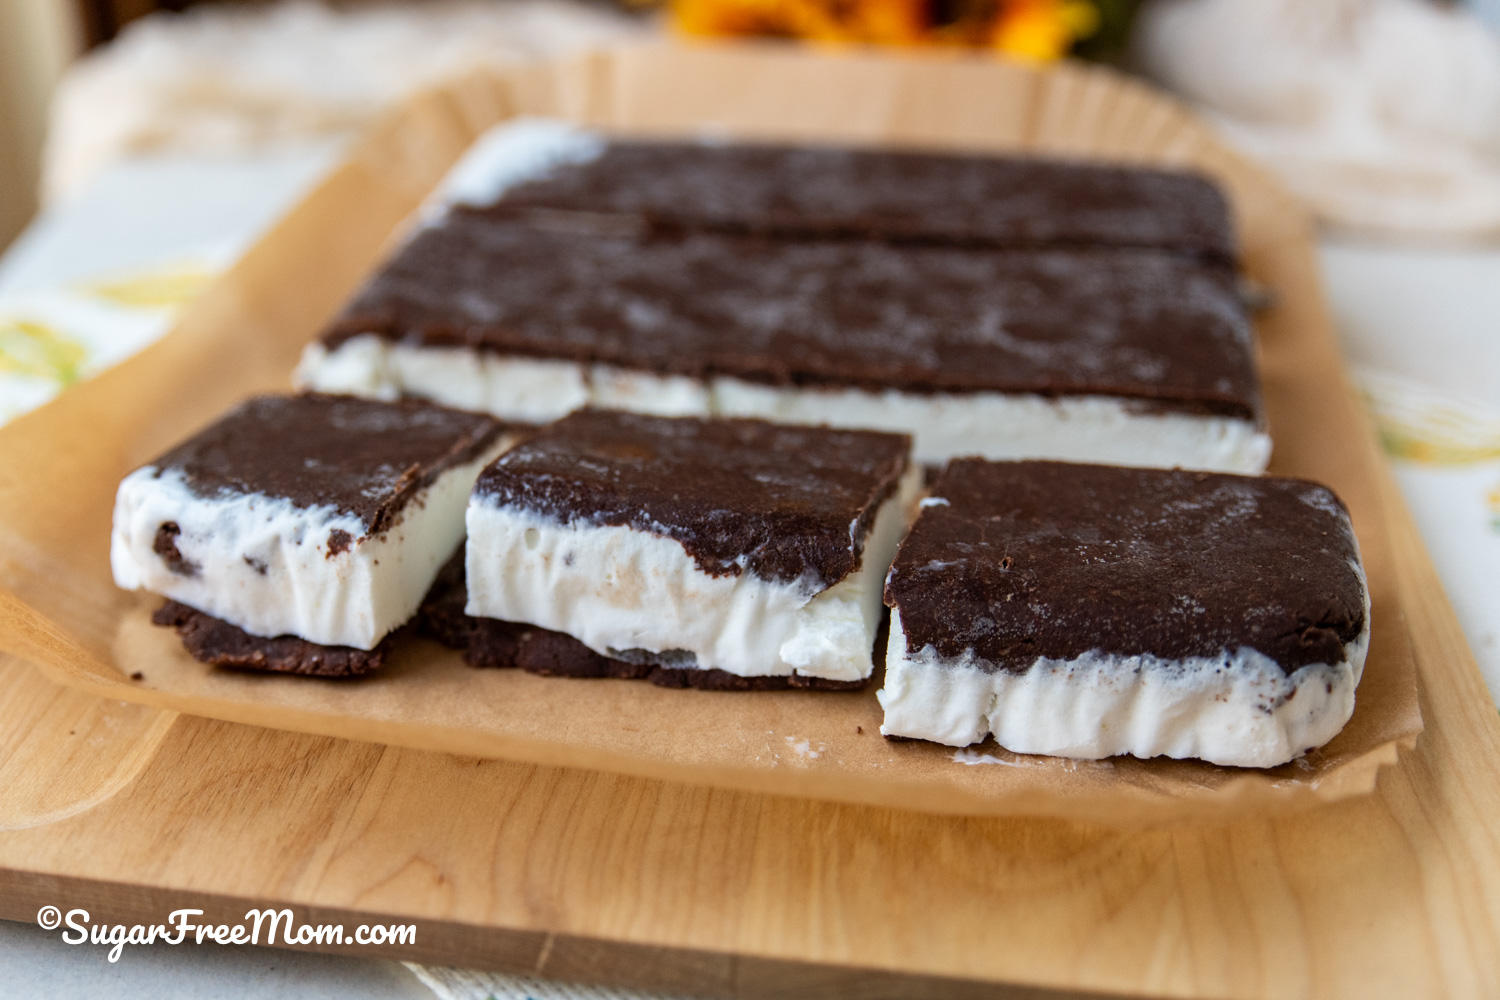
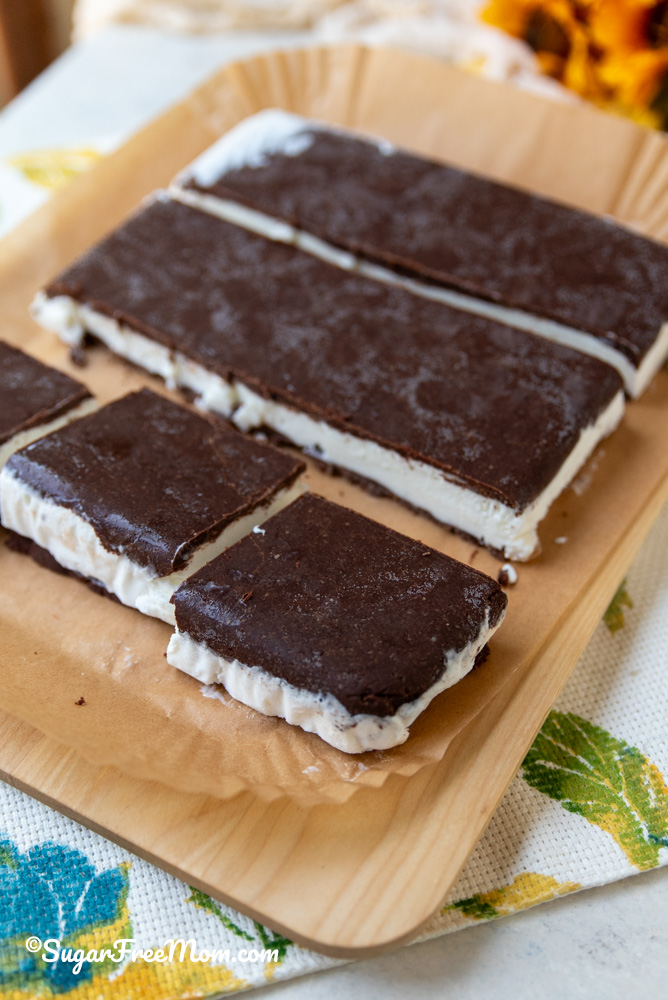
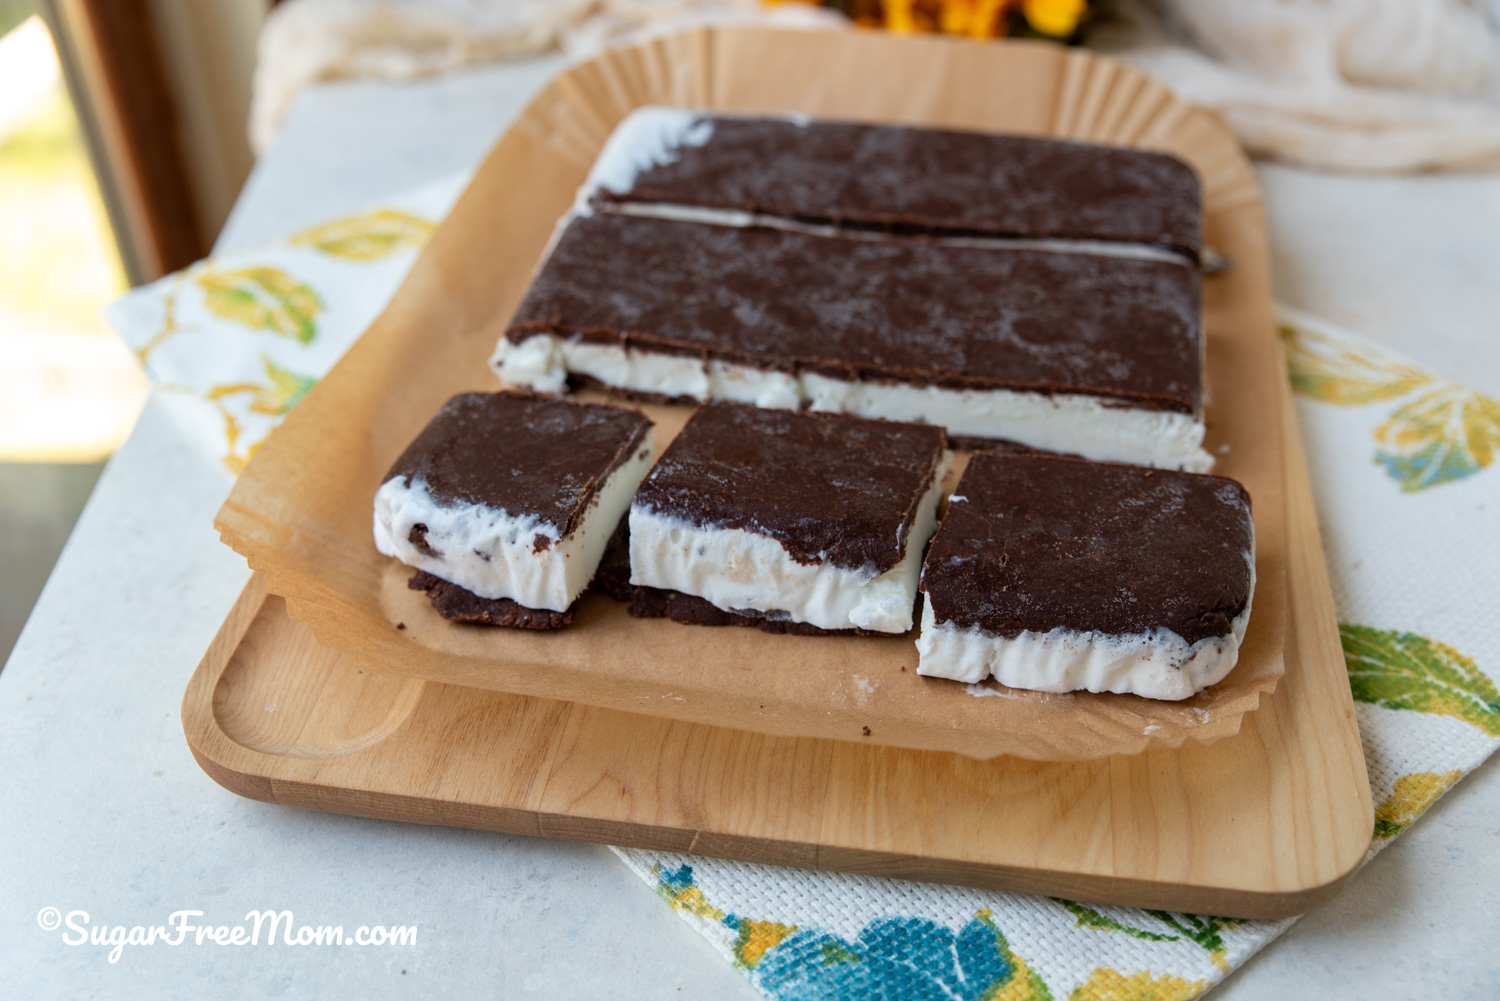
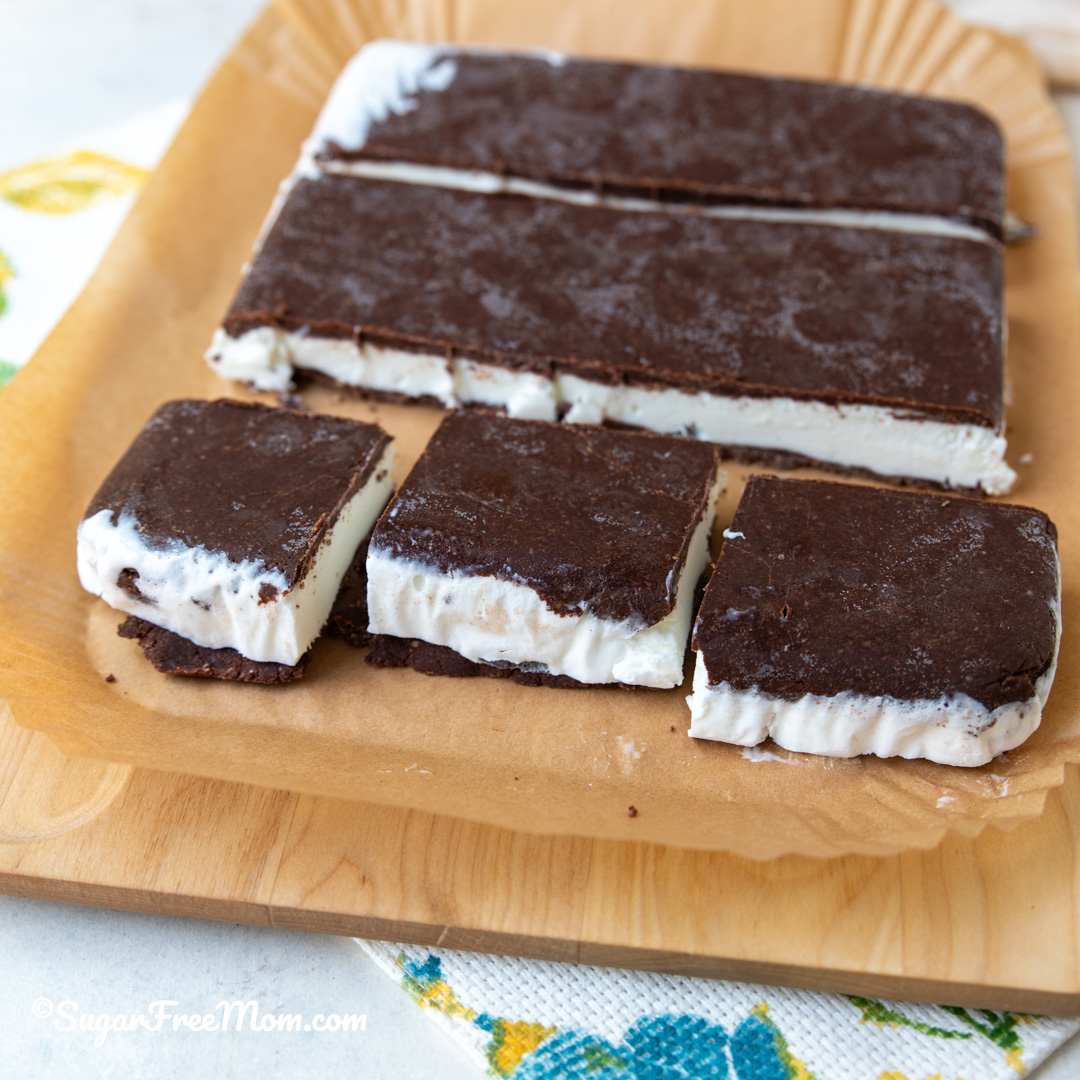
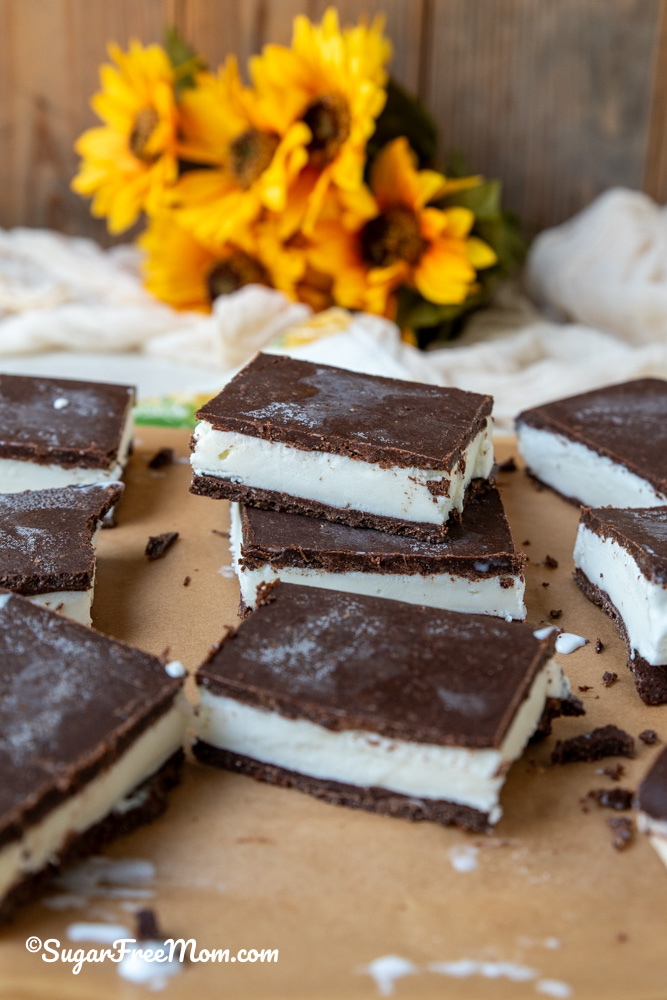
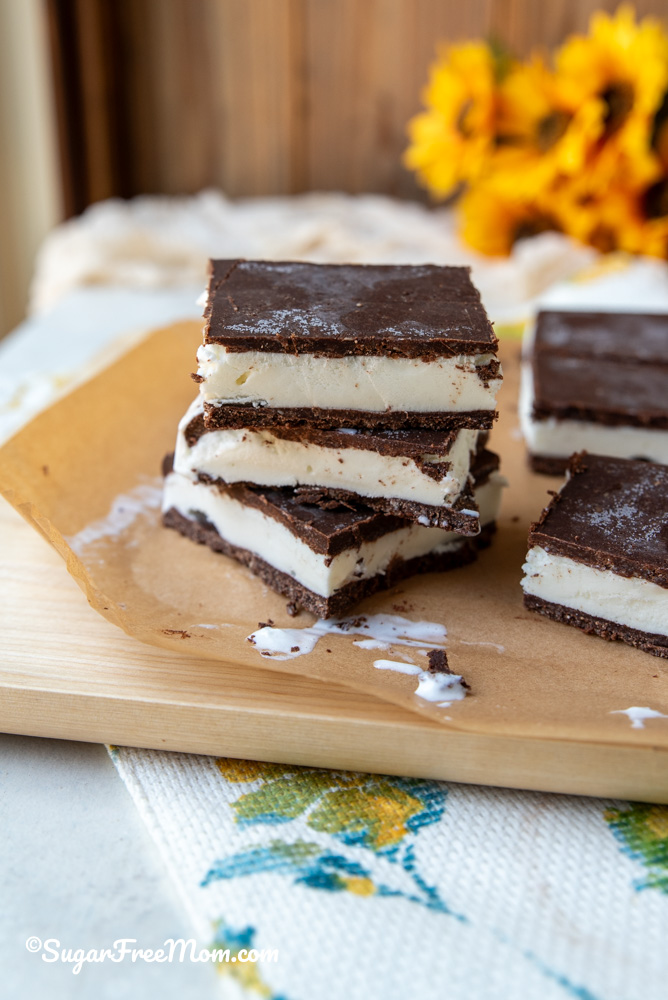
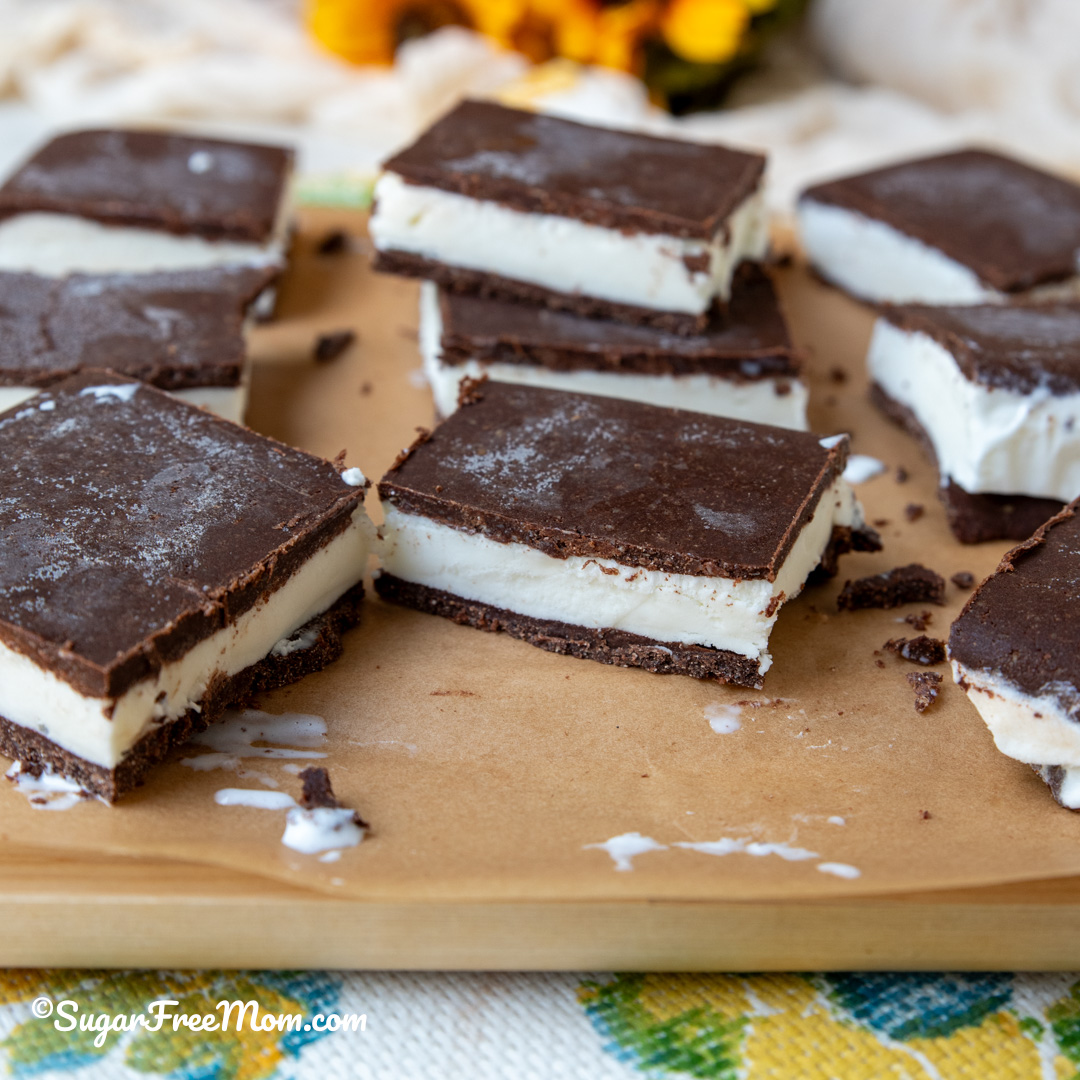
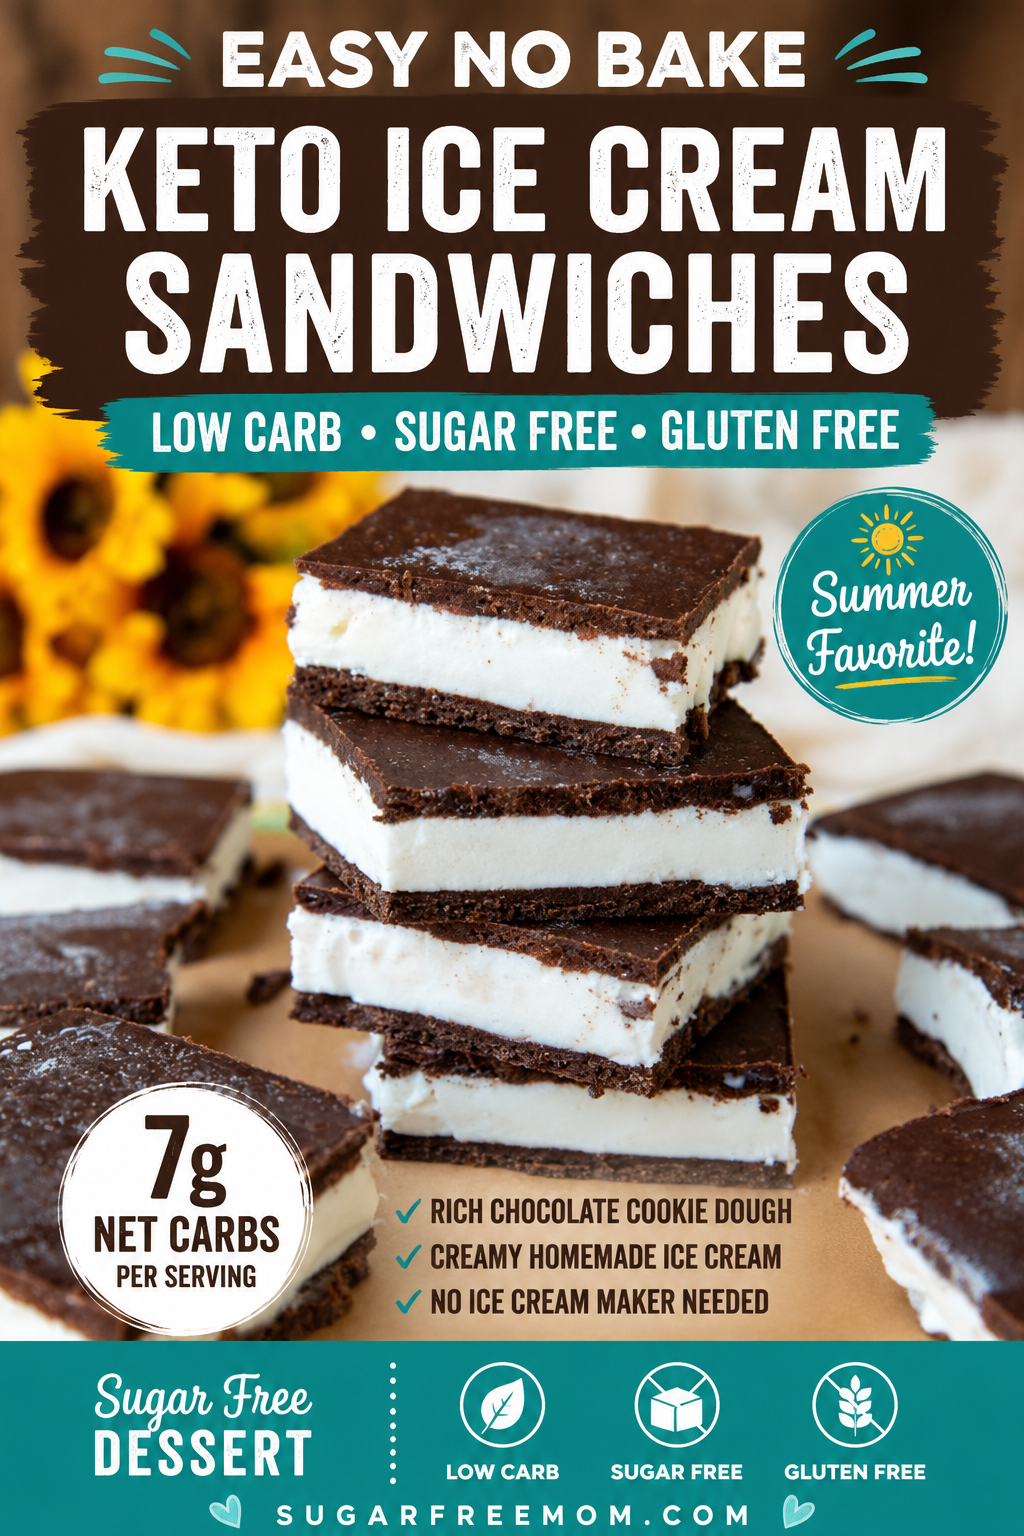
This easy keto ice cream sandwich recipe is a low carb, gluten free, sugar free ice cream recipe with no bake keto cookie dough that tastes amazing! It’s a guilt-free dessert using high-quality ingredients and is super satisfying!
Keto Ice Cream Sandwiches
There is nothing better on a hot summer day than biting into a thick, creamy ice cream sandwich. Traditional ice cream sandwiches are loaded with added sugars, refined flour, and enough sugar to send blood sugar soaring.
Thankfully, making a homemade keto ice cream sandwich is much easier than you might think.
This easy no bake keto ice cream sandwich recipe combines a rich chocolate cookie dough with my creamy homemade Ninja protein ice cream for the ultimate sugar-free dessert.
There is no baking, no ice cream maker, and no complicated steps. Just press the chocolate dough into a pan, layer with your favorite keto ice cream, freeze, and slice.
Whether you’re following a keto lifestyle, watching your carbs, living gluten-free, or simply looking for a healthier frozen dessert, this recipe tastes remarkably close to the real thing while containing just 7 grams of net carbs per sandwich. Nutritional Information is at the bottom of this page on the printable recipe card.
Why You’ll Love This Recipe
No bake recipe
Perfect for summer
Rich chocolate cookie dough
Creamy homemade keto ice cream
Gluten free
Grain free
Sugar free
No added sugars
Only 7 grams net carbs
Easy to customize with different flavors
Great make-ahead dessert
Stores well in the freezer for months
Ingredients you’ll need
The best part about these keto ice cream sandwiches is that every ingredient is simple and easy to find.
The combination creates a soft cookie dough that freezes beautifully while staying tender enough to bite into straight from the freezer.
Homemade Keto Ice Cream Recipes
I highly recommend using my Ninja Protein Ice Cream recipe as the ice cream base. It stays creamy, packs in extra protein, and has a fraction of the calories found in traditional vanilla ice cream.
One reason these sugar-free ice cream sandwiches taste so much like the real thing is using monk fruit instead of traditional sugar.
Unlike regular sugar, our sugar-free version tastes amazing using monk fruit sweetener which adds sweetness without added sugars or extra carbs, making it one of the best sweeteners for anyone following a keto lifestyle or low carb eating plan.
Add all cookie dough ingredients to a food processor.
Process until a soft dough forms.
Press dough between parchment paper into prepared pans.
Freeze briefly if needed.
Spread softened homemade keto ice cream evenly over one cookie layer.
Top with the second cookie layer.
Freeze for about one hour until firm.
Slice into sandwiches.
Individually wrap with parchment paper or plastic wrap for easy grab-and-go treats.
Tips for Success
Use room temperature butter for the smoothest cookie dough.
A food processor makes mixing incredibly easy.
If the ice cream becomes too soft, return it to the freezer for 10-15 minutes before assembling.
Press the cookie dough firmly so it doesn’t crumble.
Run a sharp knife under hot water before slicing.
Freeze the finished sandwiches before wrapping individually.
Store in an airtight container for up to two months.
Frequently Asked Questions
Can I make these without an ice cream maker?
Absolutely! My Ninja Protein Ice Cream recipe works wonderfully, but you can use any homemade ice cream or your favorite store-bought low carb ice cream.
Can I use almond flour?
Yes. Almond flour or almond meal both work well if you don’t have a nut allergy. Sunflower seed meal is an excellent nut-free option.
Why use coconut flour?
Coconut flour helps absorb moisture and gives the cookie dough structure without needing to bake it.
Can I use heavy cream?
If you’re making your own homemade ice cream from scratch, heavy cream creates an incredibly creamy texture. For this recipe, simply use your favorite prepared keto ice cream.
How long do they last?
When wrapped individually in parchment paper or plastic wrap and stored in an airtight freezer container, these homemade keto ice cream sandwiches stay fresh for up to 2 months.
More Frozen Keto Desserts You’ll Love
If you love this keto ice cream sandwich recipe, be sure to try these other reader favorites:
Place all ingredients into a food processor and process until smooth or a large bowl and mix until combined.
Press into two parchment lined 8 by 8 pans or one 9 by 13 pan.
If using two-8 by 8 pans: Divide the dough in half and press each half into each pan. Use another piece of parchment on top of the dough and press with hands or a flat measuring cup to make it even. Spread softened ice cream over one half. Top with the other dough.
If using the 9 by 13, remove cookie dough by lifting the parchment paper out of the pan and place onto a cutting board. Cut dough in half and reserve one half for top layer. Spread softened ice cream onto one half as evenly as you can, then top with the other layer.
Freeze for 1 hour, then slice into 12 sandwiches. Individually wrap with foil or parchment. Store in freezer for up to two months.
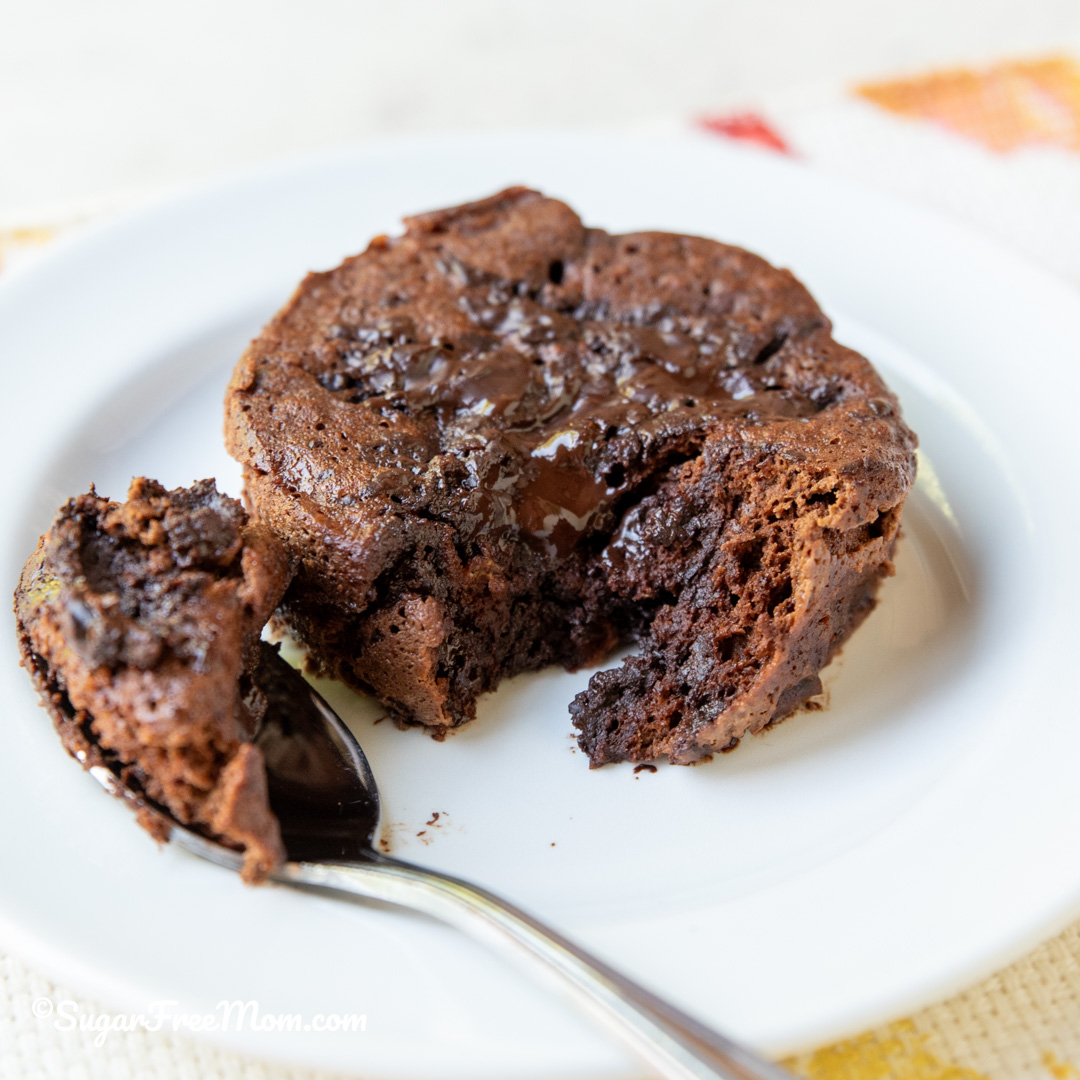
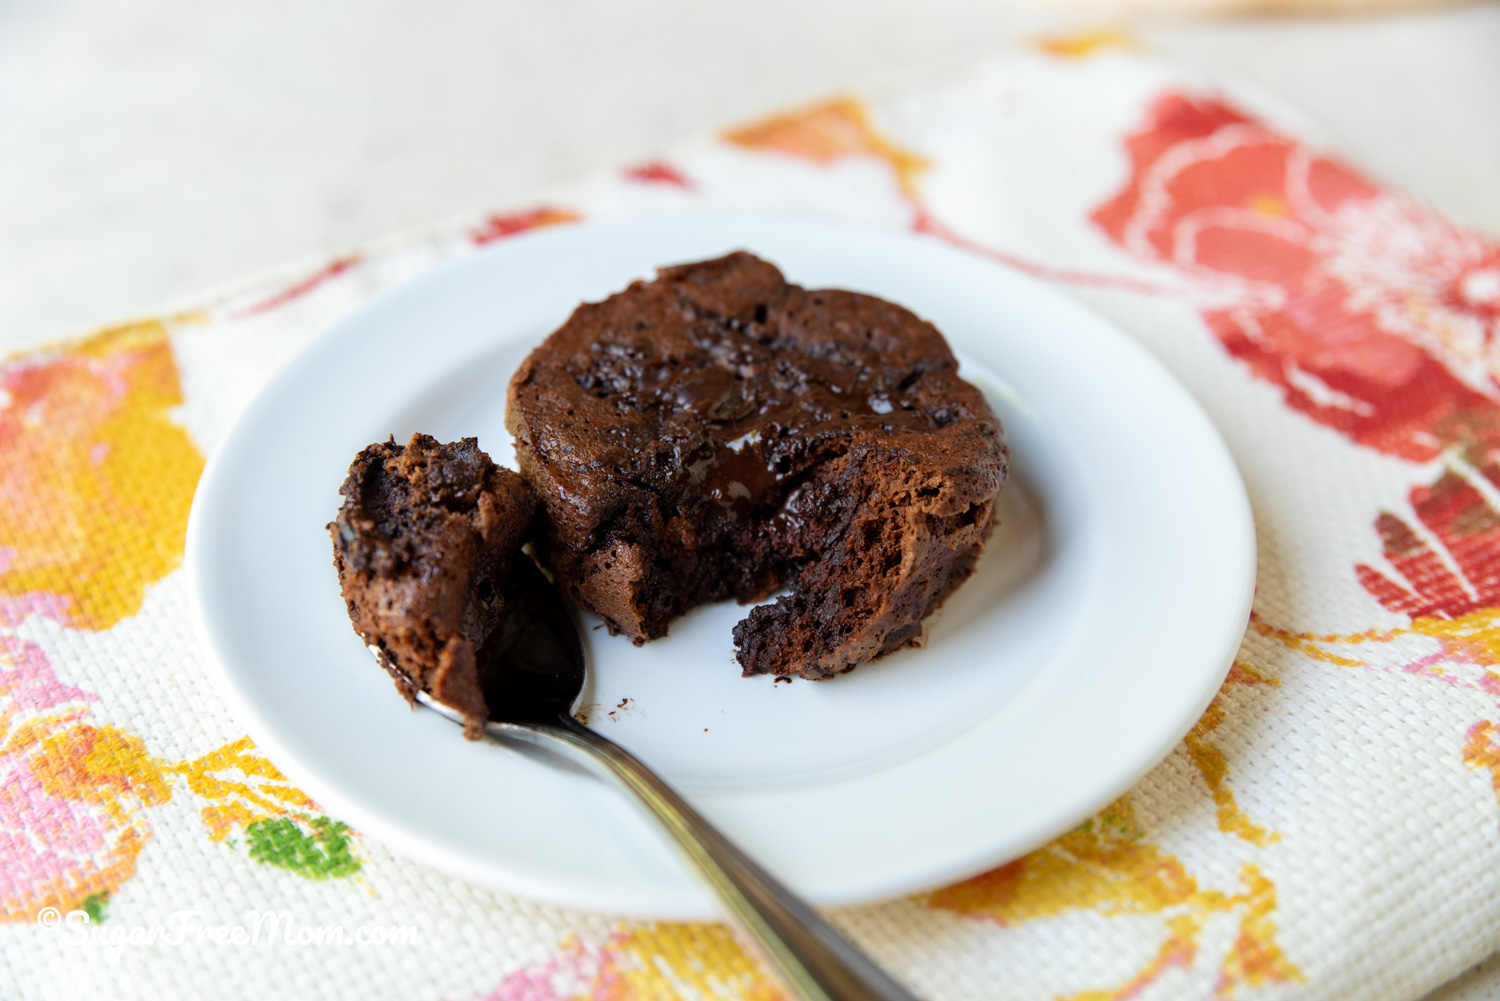
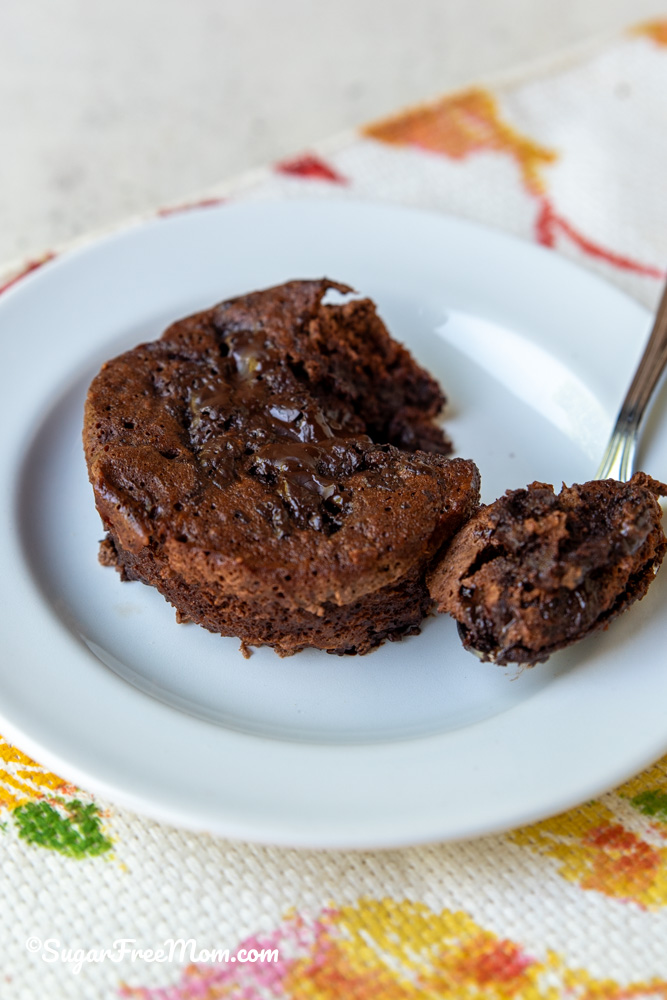
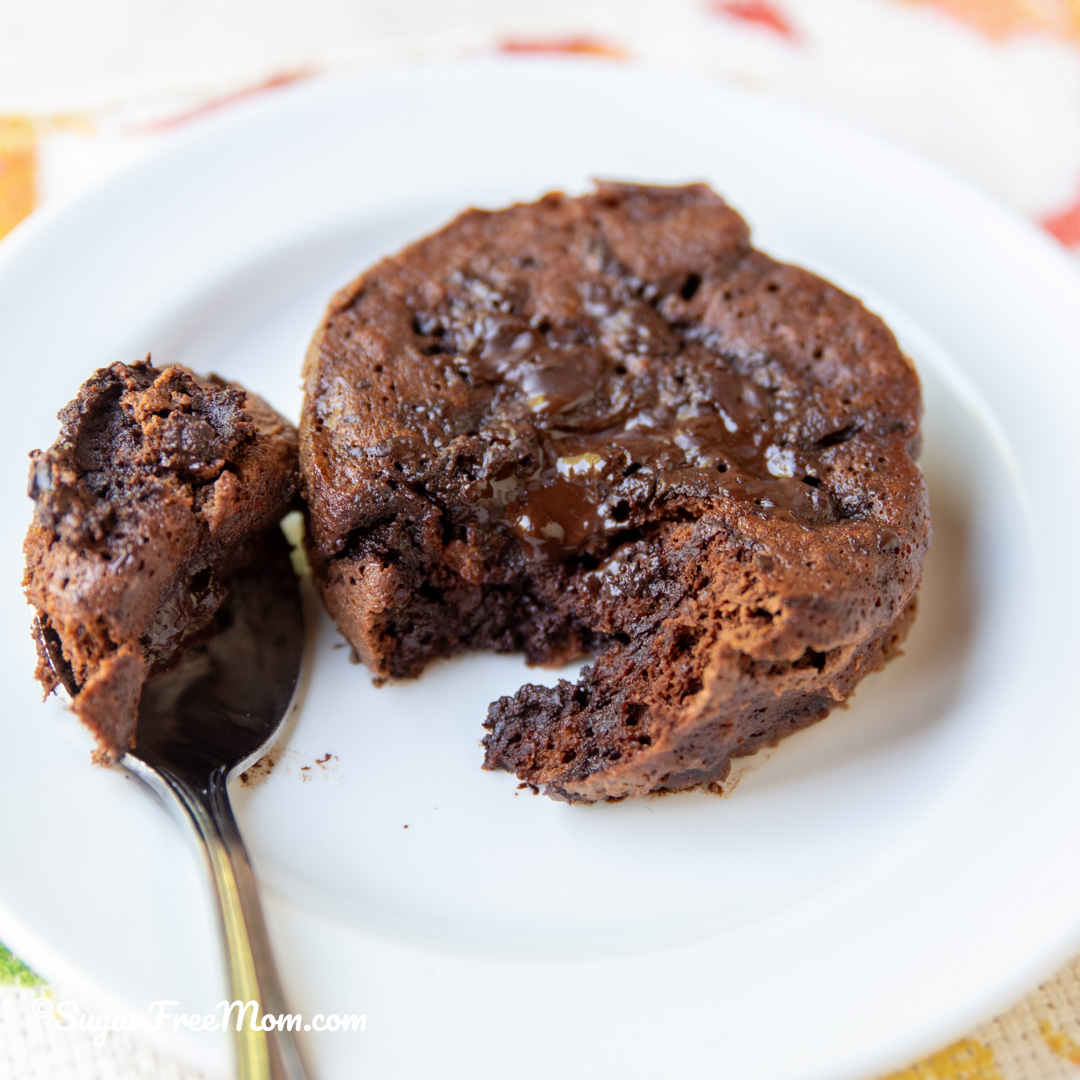
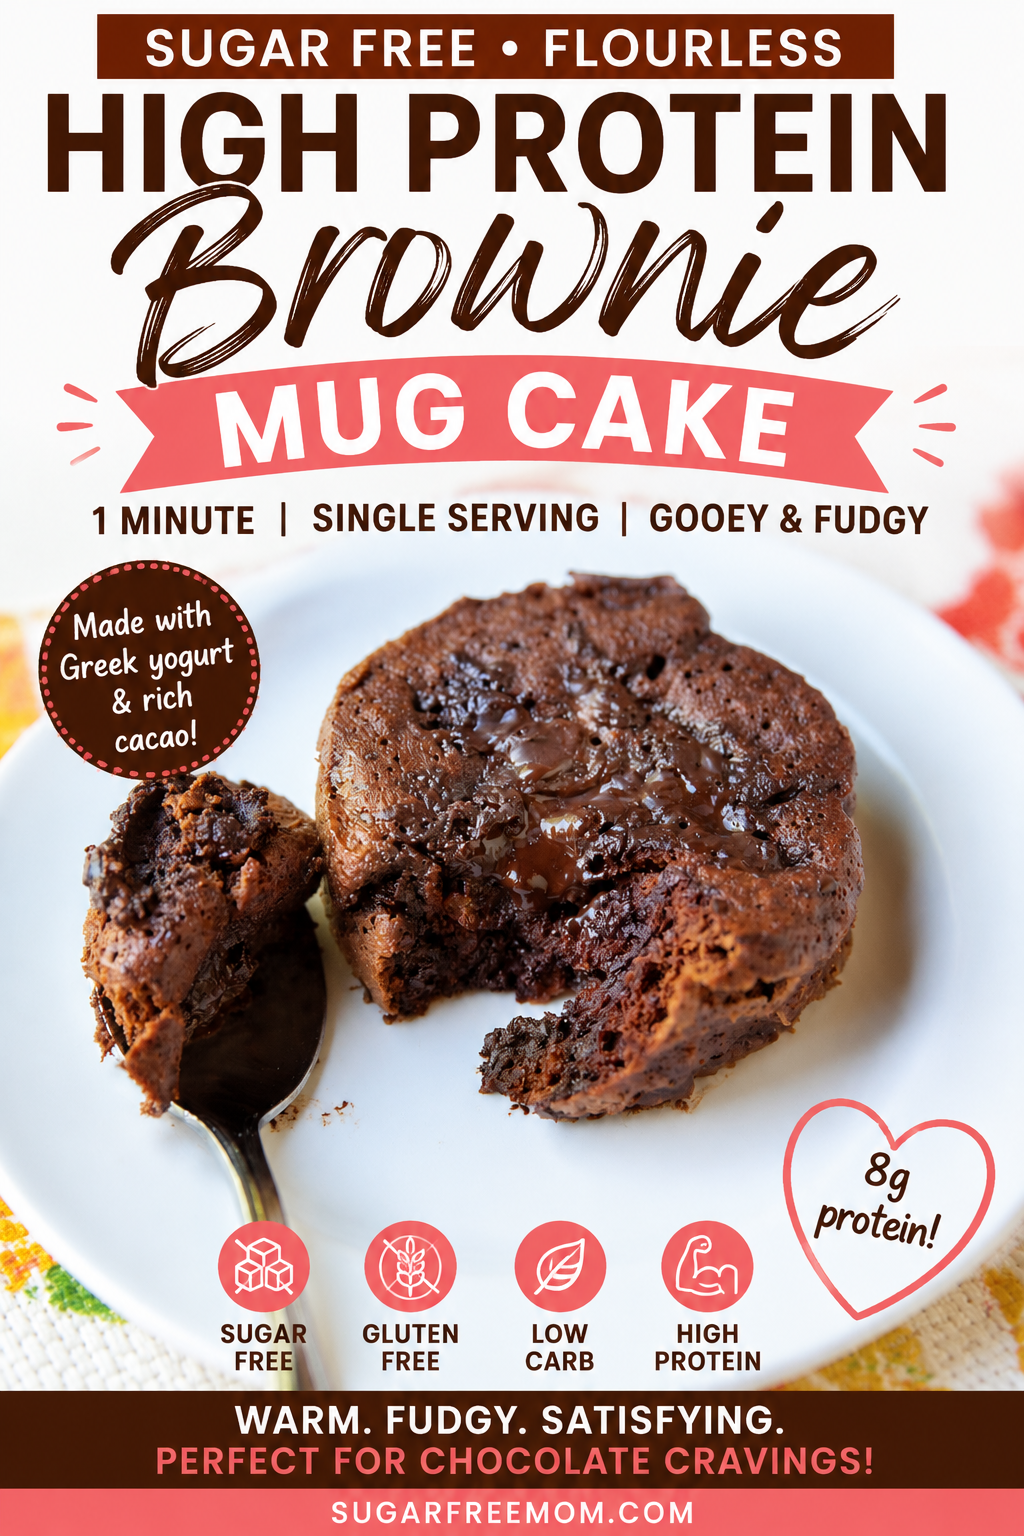
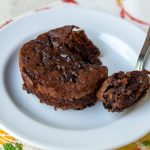
If you’ve ever wanted a warm, fudgy brownie without making an entire pan, this Sugar Free Flourless High Protein Brownie Mug Cake is the perfect solution. Made with simple ingredients like Greek yogurt, cacao powder, an egg yolk, and dark chocolate, this protein mug brownie is ready in about one minute in the microwave. A satisfying warm brownie and with 8 grams of protein!
Why You’ll Love This High Protein Brownie
Unlike many protein mug cake recipes that rely on chocolate protein powder or almond flour, this protein mug cake recipe has a rich chocolate flavor without any whey protein powder, flour, cottage cheese or added sugar.
The result is a soft, gooey center with plenty of chocolate flavor to satisfy a chocolate craving for a sweet tooth while keeping carbs low and with 8 grams of protein.
Ready in about 1 minute using the microwave brownie instructions.
Just a handful of simple ingredients.
Flourless, gluten free, sugar free, and low carb.
Naturally high in protein thanks to Greek yogurt and an egg yolk.
Rich chocolate flavor with a fudgy brownie batter texture.
No almond flour, coconut flour, or protein powder needed.
Perfect when you’re craving a sweet treat but don’t want leftovers tempting you.
Also includes oven and air fryer instructions.
What Makes This Mug Brownie Different?
Years ago I shared my Best Sugar Free Gluten Free Low Carb Keto Mug Brownie in my cookbook, The 30-Day Sugar Elimination Diet. That recipe makes two servings and uses sunflower seed flour along with a few more pantry ingredients.
After hearing from so many readers who wanted something even easier with less dry ingredients, I started experimenting with a single-serve brownie recipe using fewer ingredients. After several rounds of testing, I discovered that using just an egg yolk instead of a whole egg created the rich, fudgy brownie texture I was looking for.
The result is this Sugar Free Flourless High Protein Brownie Mug Cake. It’s made with minimal ingredients, has an incredibly gooey center, and it’s a quick fix to satisfy a chocolate craving in minutes.
Ingredient Notes
You only need a few pantry staples:
Egg yolk creates an incredibly rich, fudgy brownie instead of a rubbery texture.
Plain Greek yogurt adds moisture, protein, and keeps the brownie soft.
85% dark chocolate creates delicious pockets of melted chocolate throughout the brownie.
Recipe Tips for 1 Minute Protein Brownie
Microwave strengths vary, so begin checking around 45 seconds.
The top should look set while the center stays slightly soft.
Allow the brownie to rest for 2 to 3 minutes after cooking. It continues cooking as it cools, giving you the perfect gooey brownie texture.
Overcooking is the biggest reason mug cakes become dry or rubbery.
Easy Ingredient Swaps
Need to customize this recipe? Here are a few simple substitutions.
Dairy-Free
Replace the Greek yogurt with your favorite unsweetened dairy-free yogurt. Unsweetened coconut yogurt or almond milk yogurt both work well. Keep in mind the protein content will be lower.
Natural cocoa powder can be substituted for cacao powder if that’s what you have on hand. Cacao powder simply provides a slightly richer chocolate flavor.
Chocolate
The chopped 85% dark chocolate or higher is optional, but highly recommended if you love pockets of melted chocolate. You can also use your favorite sugar-free chocolate bar.
Frequently Asked Questions
Can I make this ahead of time?
This recipe is best enjoyed warm immediately after cooking while the center is still soft and fudgy.
Why only use the egg yolk?
The yolk adds richness and helps create a moist, fudgy brownie. Using a whole egg can make small mug cakes slightly more cake-like and less dense.
Can I use protein powder?
I don’t recommend it for this recipe. Protein powder absorbs a lot of moisture and changes the texture. This recipe gets its protein naturally from the Greek yogurt and egg yolk.
Can I bake this instead of microwaving?
Yes! I’ve included microwave, oven, and air fryer instructions so you can choose whichever cooking method you prefer.
More Single-Serve Desserts You’ll Love
If you love easy desserts and chocolate-y treats made with wholesome ingredients that are single-serve recipes, be sure to check out these favorites:
Sugar Free Flourless High Protein Brownie Mug Cake
This easy High Protein Brownie Mug Cake is flourless, gluten free, sugar free, and low carb. Made with Greek yogurt, rich cacao, and dark chocolate, it’s a single-serving dessert that’s ready in about one minute.
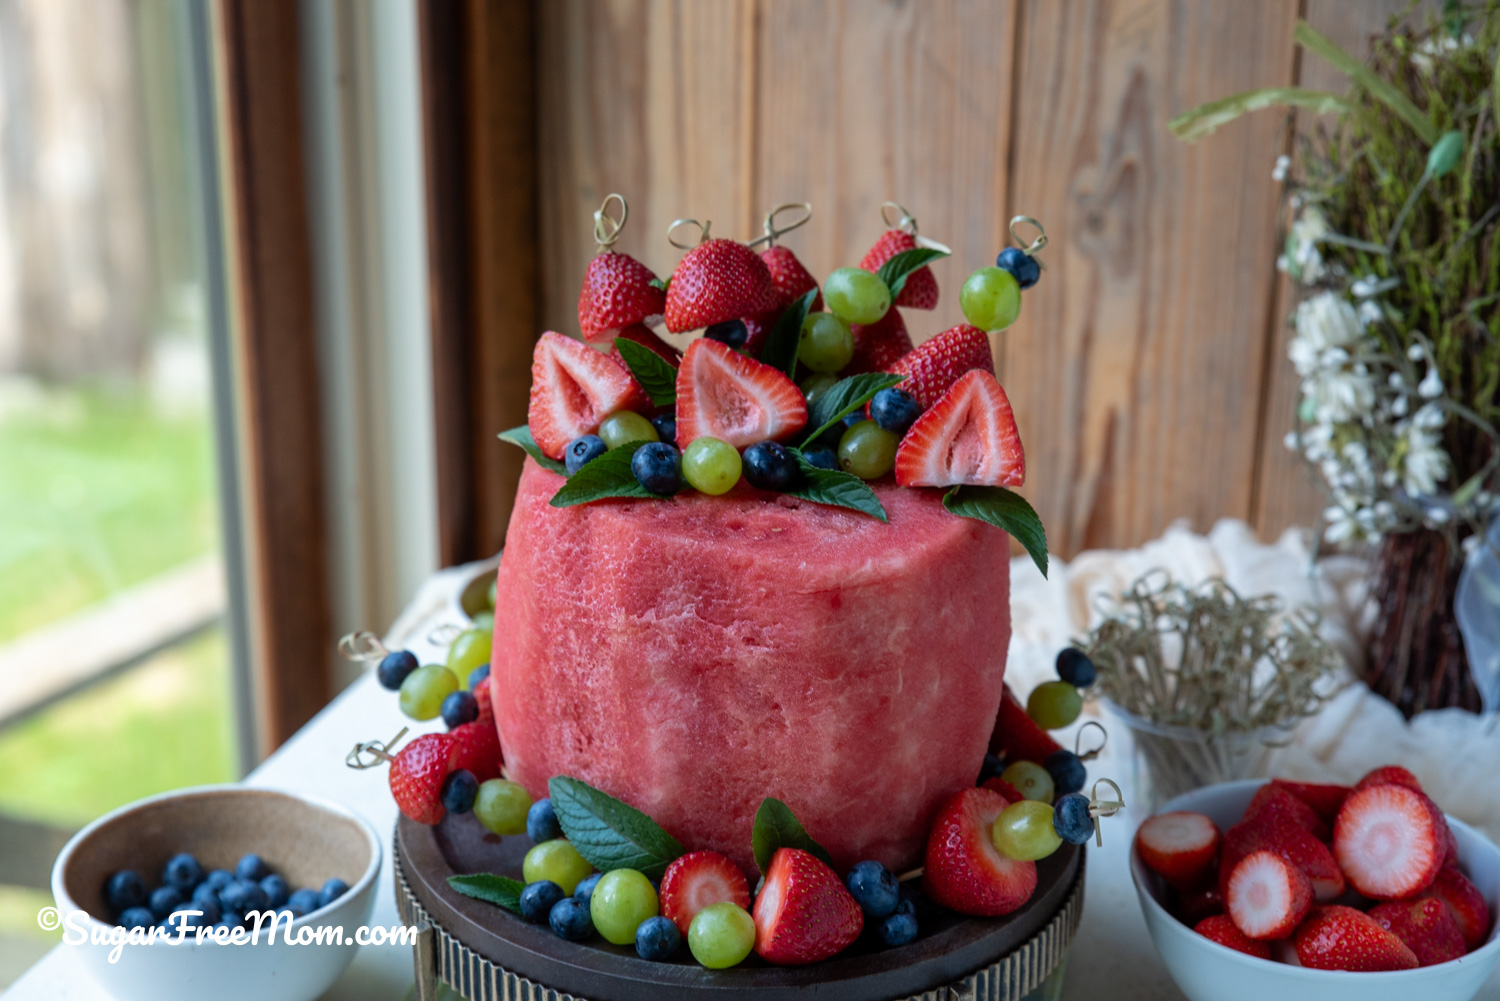
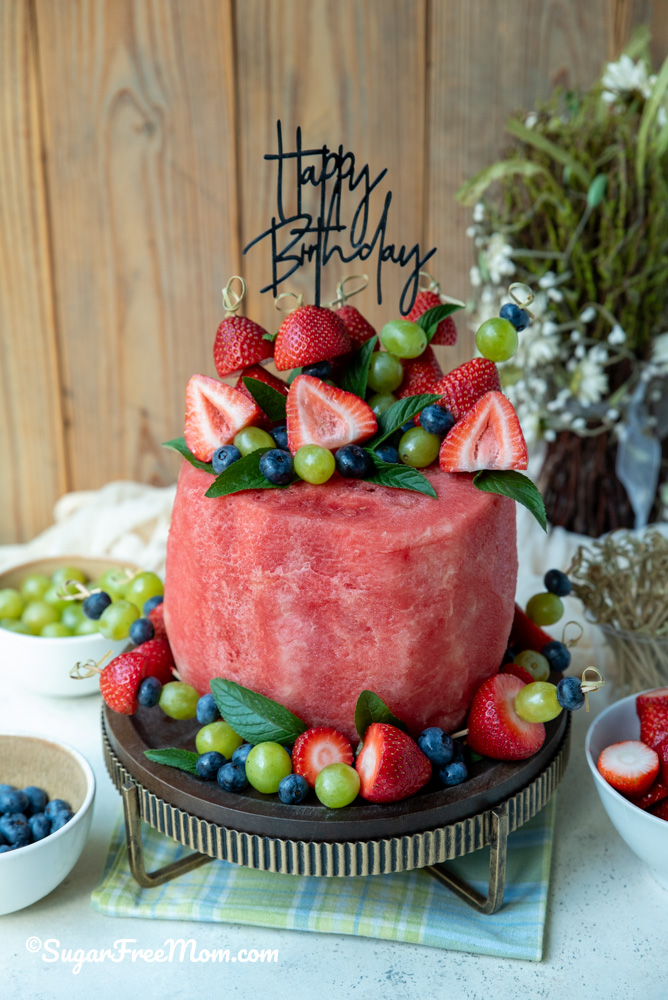
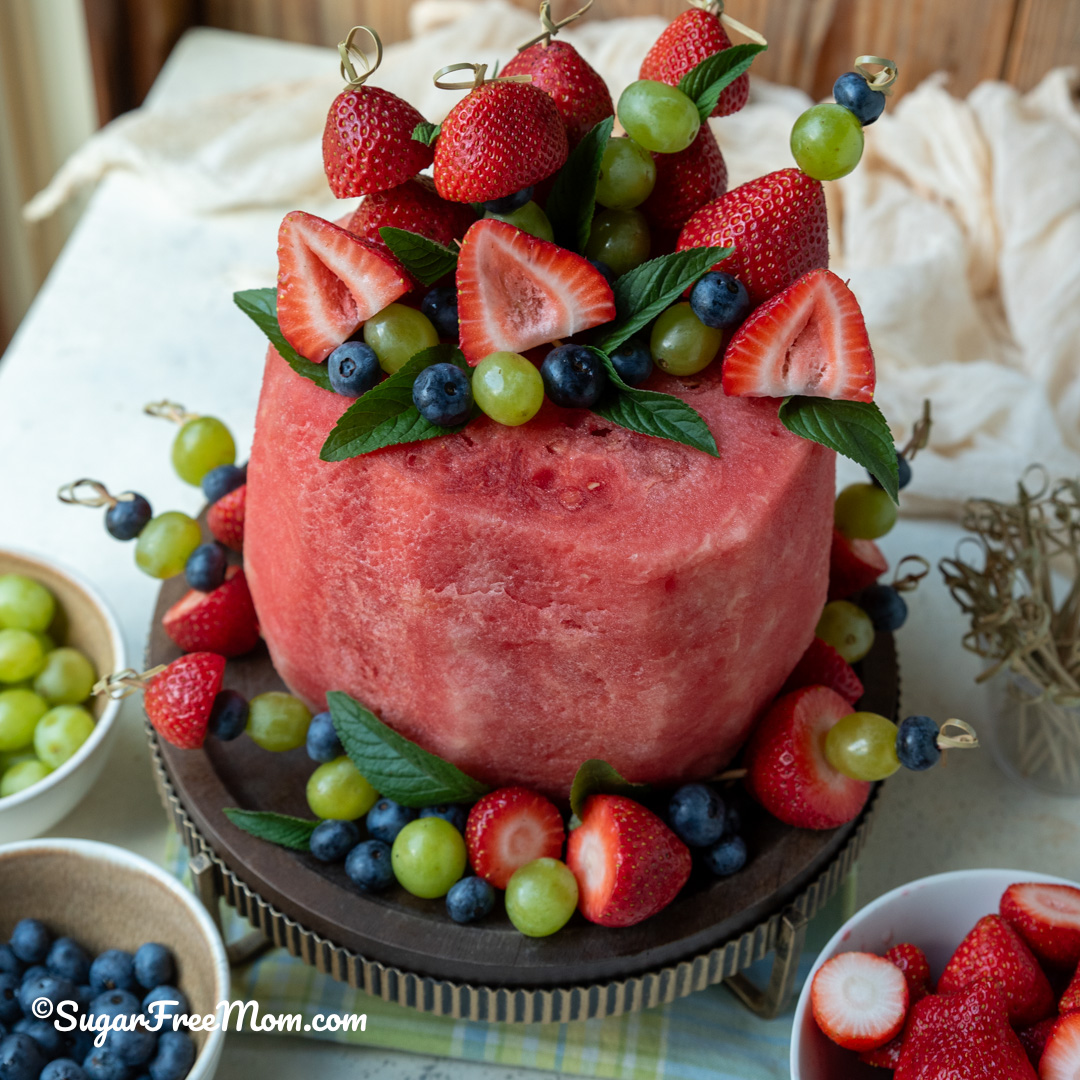
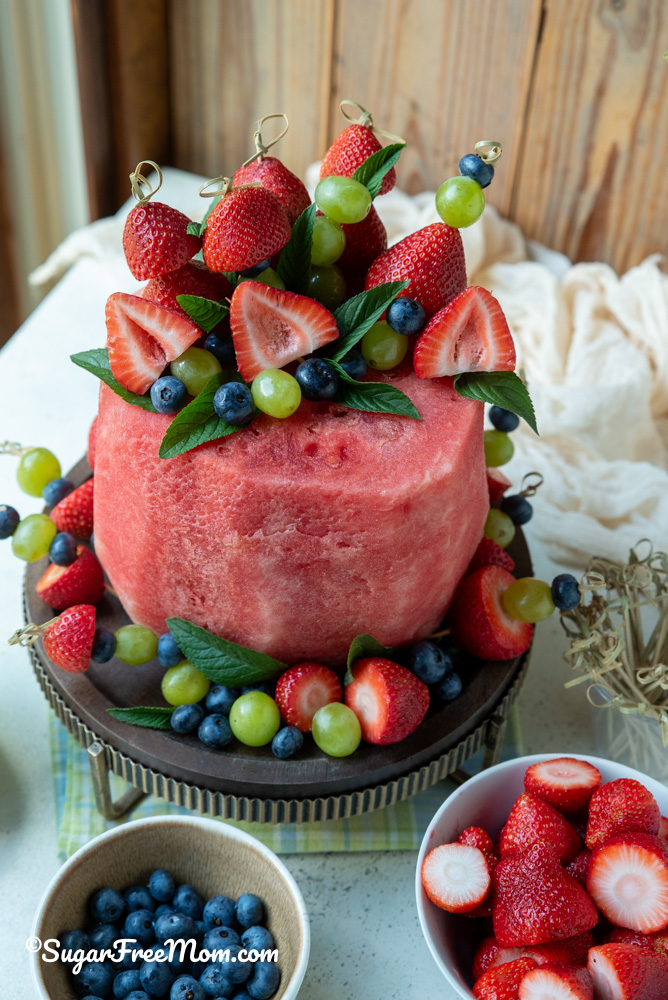
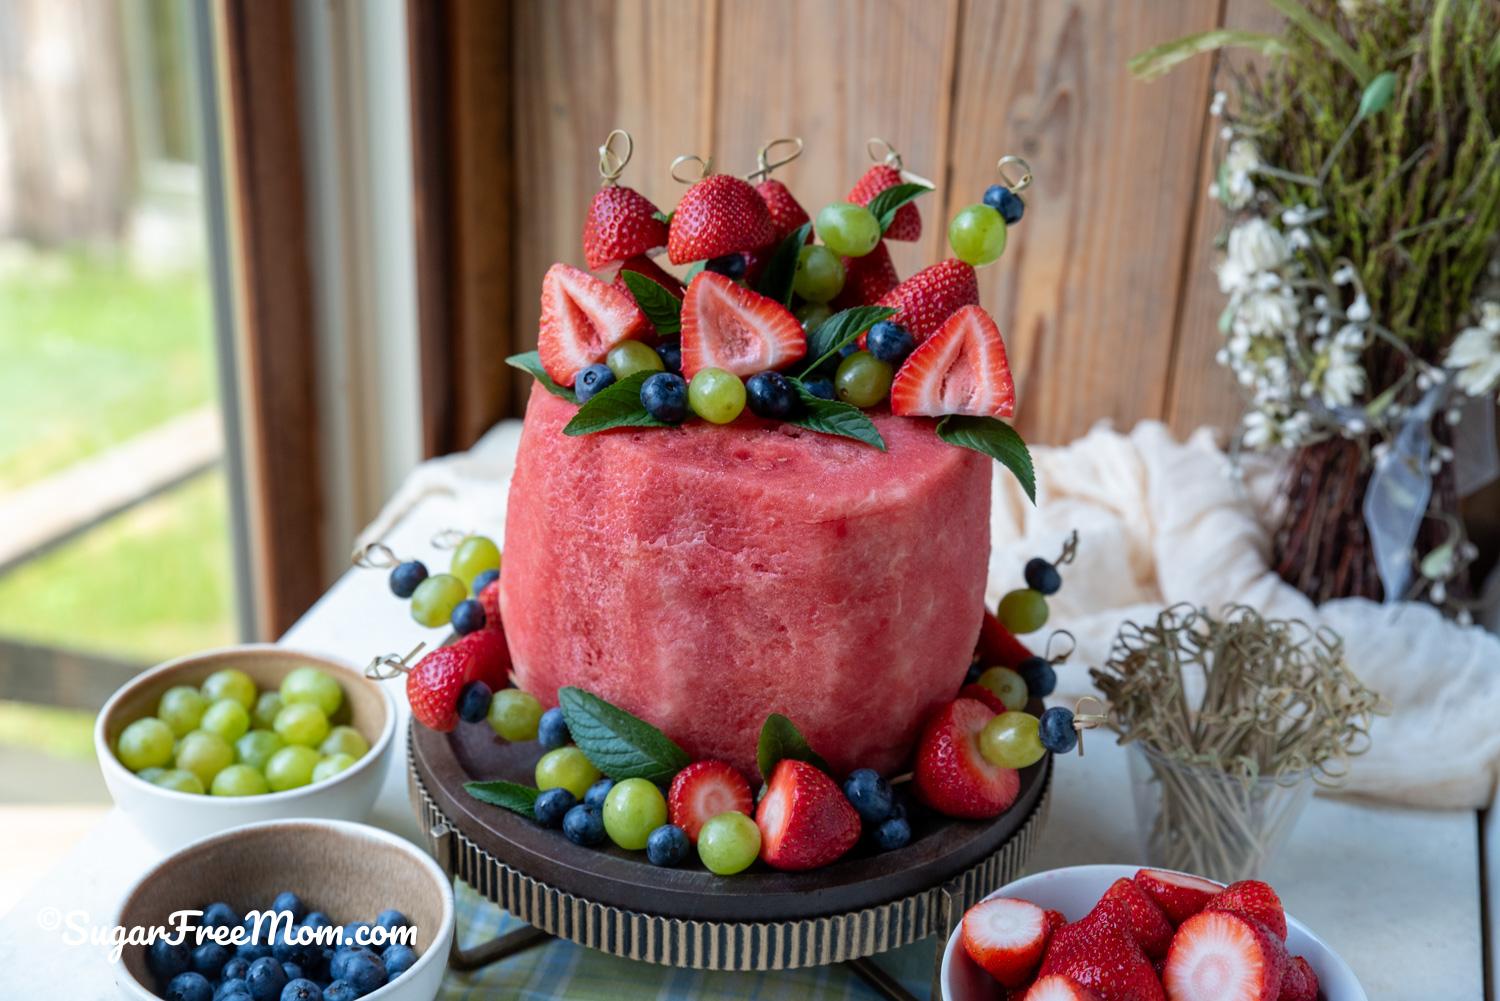
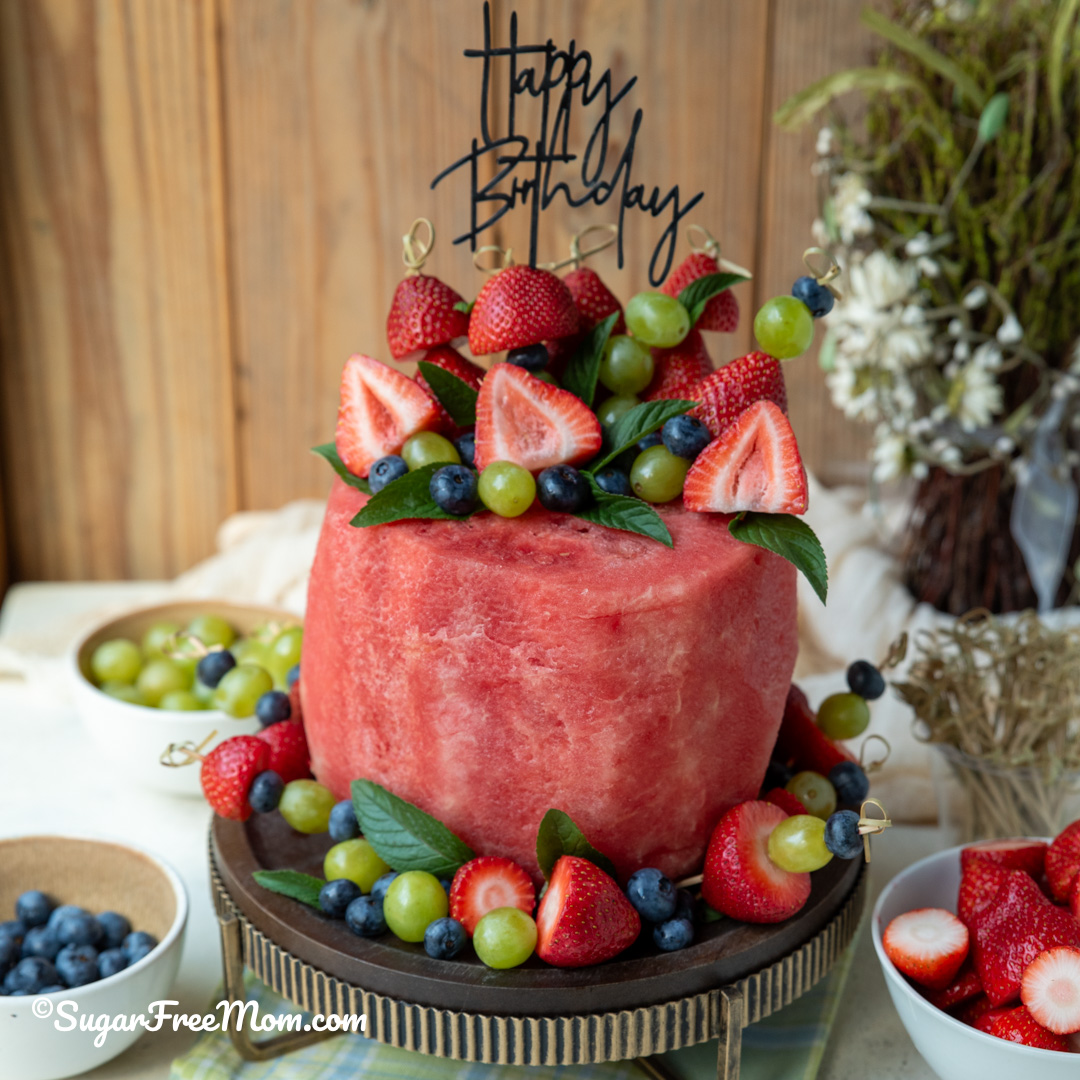
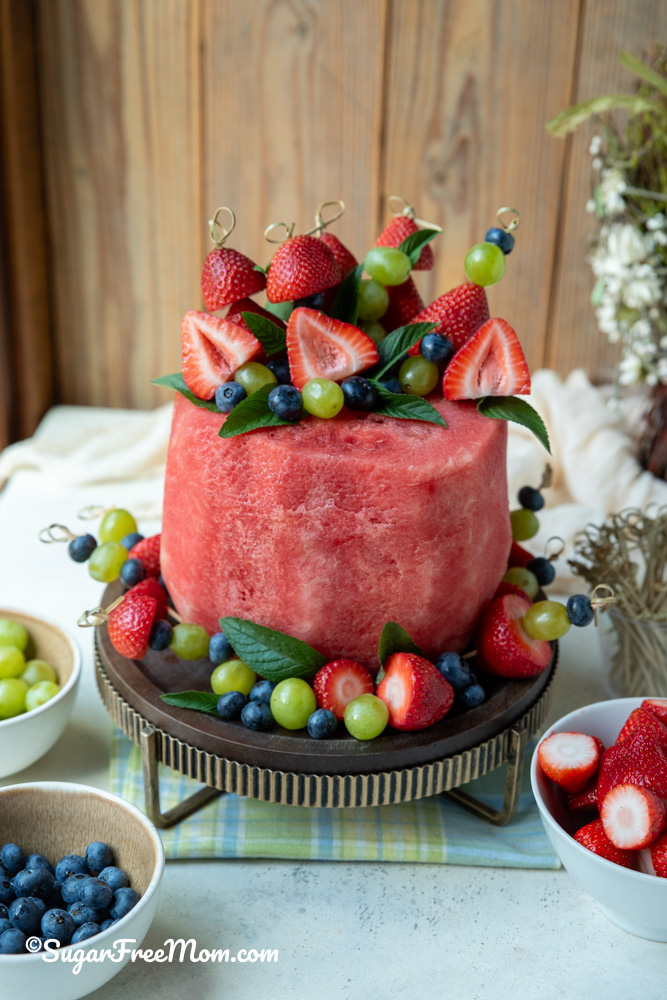
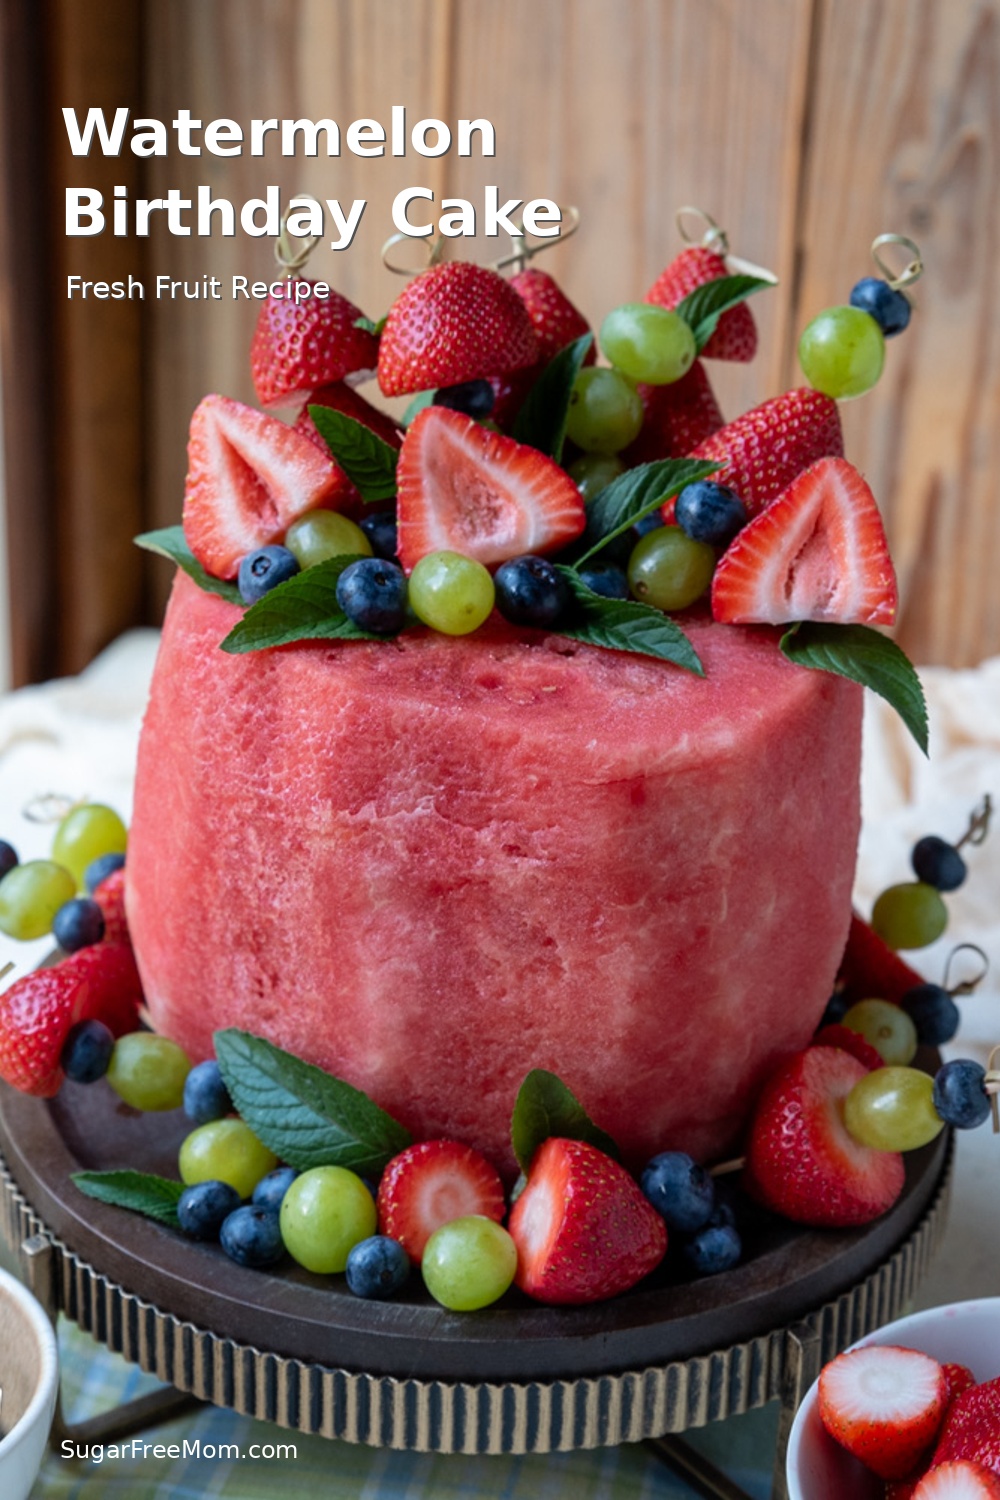
Looking for a beautiful birthday cake made with fresh fruit instead of flour, frosting, and sugar? This Easy Flourless Fresh Fruit Watermelon Cake Recipe is the perfect centerpiece for summer birthdays, baby showers, graduation parties, cookouts, and special occasions.
Fresh Watermelon Cake Recipe
If you’re looking for a unique birthday dessert that’s made with real food ingredients, this Easy Flourless Fresh Fruit Watermelon Cake Recipe is the perfect solution.
Unlike a traditional white cake or chocolate cake, there’s no cake batter, cake flour, purpose flour, granulated sugar, icing sugar, unsalted butter, sour cream, heavy cream, or cream frosting required. Instead, this beautiful watermelon birthday cake is made entirely from fresh fruit and takes far less time to prepare than a traditional layer cake.
I originally made this fresh fruit cake recipe for my sister-in-law’s birthday. Since she prefers eating whole foods and seasonal fruit, I knew a regular birthday cake, even one of my sugar free low carb cake recipes, wouldn’t be nearly as exciting as a giant watermelon cake decorated with fresh berries and fruit skewers.
The reaction was priceless.
As soon as she saw it, she was over the moon excited. Instead of feeling pressured to eat a keto flour-filled dessert, she had a birthday cake she genuinely wanted to enjoy.
After we sang Happy Birthday and she blew out the candle, everyone immediately started grabbing the fruit skewers around the cake base. Then I sliced the whole cake into wedges and served it alongside a bowl of sugar-free whipped cream for anyone who wanted it.
It turned out to be one of the easiest birthday desserts I’ve ever made.
The Best Way to Make a Watermelon Birthday Cake
Many watermelon cake recipes online use multiple cake layers stacked on top of one another to create a layer cake effect. While those are beautiful, I wanted the easiest way possible.
Instead of creating multiple cake layers, I simply transformed a seedless watermelon into a single cake shape.
The result was a gorgeous cake with a simple naked look that was easy enough for anyone to recreate at home.
Since watermelon is one of summer’s most refreshing juicy fruits, it naturally becomes the star of the show.
The combination of:
Fresh strawberries
Green grapes
Blueberries
Fresh mint leaves
Creates a stunning presentation without needing complicated decorating skills.
Why You’ll Love This Watermelon Cake
Ingredients Found at Any Local Grocery Store.
One of my favorite things about this recipe is how accessible it is. You don’t need specialty ingredients, expensive equipment, or a trip to multiple stores. Everything can be found at your local grocery store.
No baking required
Naturally sweet from fresh fruit
Perfect for summer parties
Gluten-free and flourless
Easy to customize with seasonal fruit
Beautiful presentation with minimal effort
Can be made ahead of time
Great for guests who prefer whole foods
Ingredients You’ll Need
This fresh fruit cake uses simple ingredients you can find at any local grocery store:
Why This Fresh Fruit Cake Recipe Works for So Many Different Diets
One reason I think this fresh fruit cake recipe is becoming so popular is because it works well for guests following different eating styles.
Many people today are trying to eat more whole foods and fewer processed ingredients.
Others may be avoiding flour, limiting desserts, reducing added sugars, or simply trying to include more fresh berries and seasonal fruit in their diet.
Unlike traditional fruit cake recipes made with dried fruit, sugar syrup, cake batter, and loaf cake ingredients, this version celebrates real fruit in its most natural form.
It’s naturally:
Flourless
Gluten-free
Dairy-free
Vegetarian
Whole food based
For guests who want something extra, serving sugar-free whipped cream on the side is a wonderful option.
How to Create a Beautiful Cake Shape
The most important step is creating the cake base.
Start by cutting both ends off your watermelon so it sits securely on a flat surface.
Using a large sharp knife, carefully remove the rind.
Continue trimming around the sides of the cake until you create a smooth cylinder shape.
Don’t worry about making it perfect.
In fact, I love the slightly rustic naked look because it highlights that this is made from real fruit rather than cake sponge and frosting.
Once shaped, use paper towels to pat the outside dry.
This helps the fruit decorations stay in place and prevents excess moisture from collecting on the serving platter.
Decorating the Top of the Cake
The top of the cake is where you can really have fun.
I kept mine simple by using a combination of:
Whole strawberries
Halved strawberries
Grapes
Blueberries
Fresh mint leaves
Instead of carving elaborate fruit pieces, I simply arranged the fruit naturally.
The fresh berries added beautiful color while the mint created contrast against the bright red watermelon.
For added height, I threaded fruit pieces onto decorative skewers and inserted them into the center of the cake.
Whether you’re serving guests who prefer whole foods, avoiding restrictive diets, or simply looking for a fun summer dessert, this Easy Flourless Fresh Fruit Watermelon Cake Recipe is a beautiful alternative to traditional birthday cake. With its fresh berries, juicy fruits, simple cake shape, and colorful presentation, it’s guaranteed to be the centerpiece of your celebration.
Cut both ends off the watermelon and stand it upright on a cutting board.
Using a sharp knife, carefully remove the rind and white portion of the watermelon.
Shape the watermelon into a smooth cylinder resembling a cake.
Pat the outside dry with paper towels.
Transfer the watermelon to a serving platter or cake stand.
Arrange whole and halved strawberries, grapes, blueberries, and mint leaves around the top and one half of the watermelon.
Thread additional fruit onto small skewers and insert several into the top of the cake for height and decoration.
Place more fruit skewers around the base of the cake for guests to enjoy.
Insert a Happy Birthday topper into the center of the cake if using.
Refrigerate until ready to serve.
Slice the watermelon into wedges and serve with sugar-free whipped cream if desired.
Video
Notes
Serving Size: Approximately 1 slice watermelon cake with assorted berries and grapes (about 290g).– Decorate up to 24 hours in advance.– Store leftovers covered in the refrigerator.– Save extra watermelon pieces for fruit salad or smoothies.Midlife Macro ApprovedWatch my video tutorial on Pinterest.
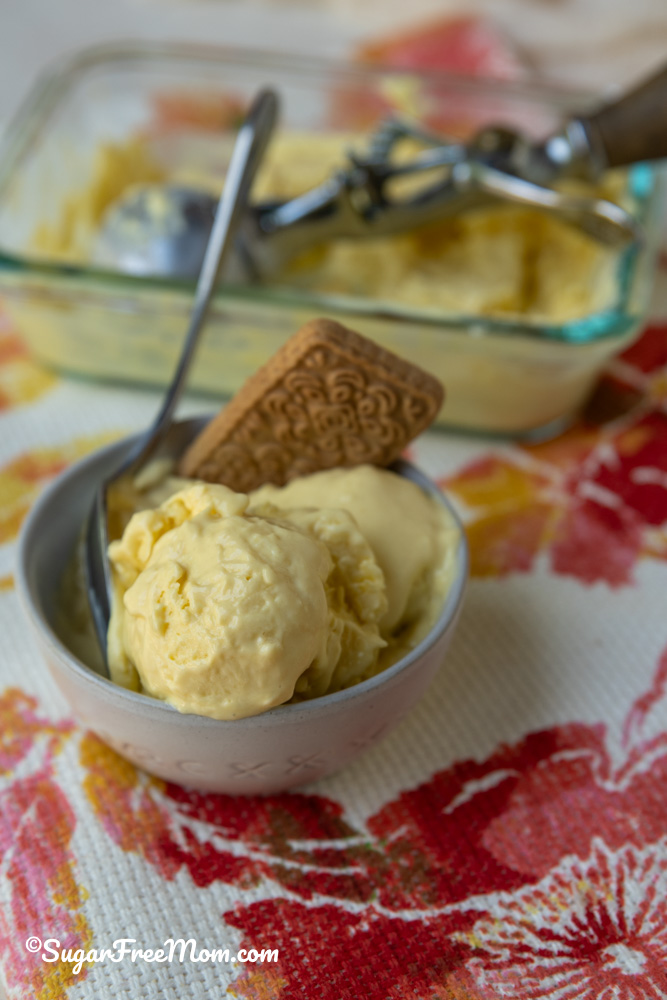
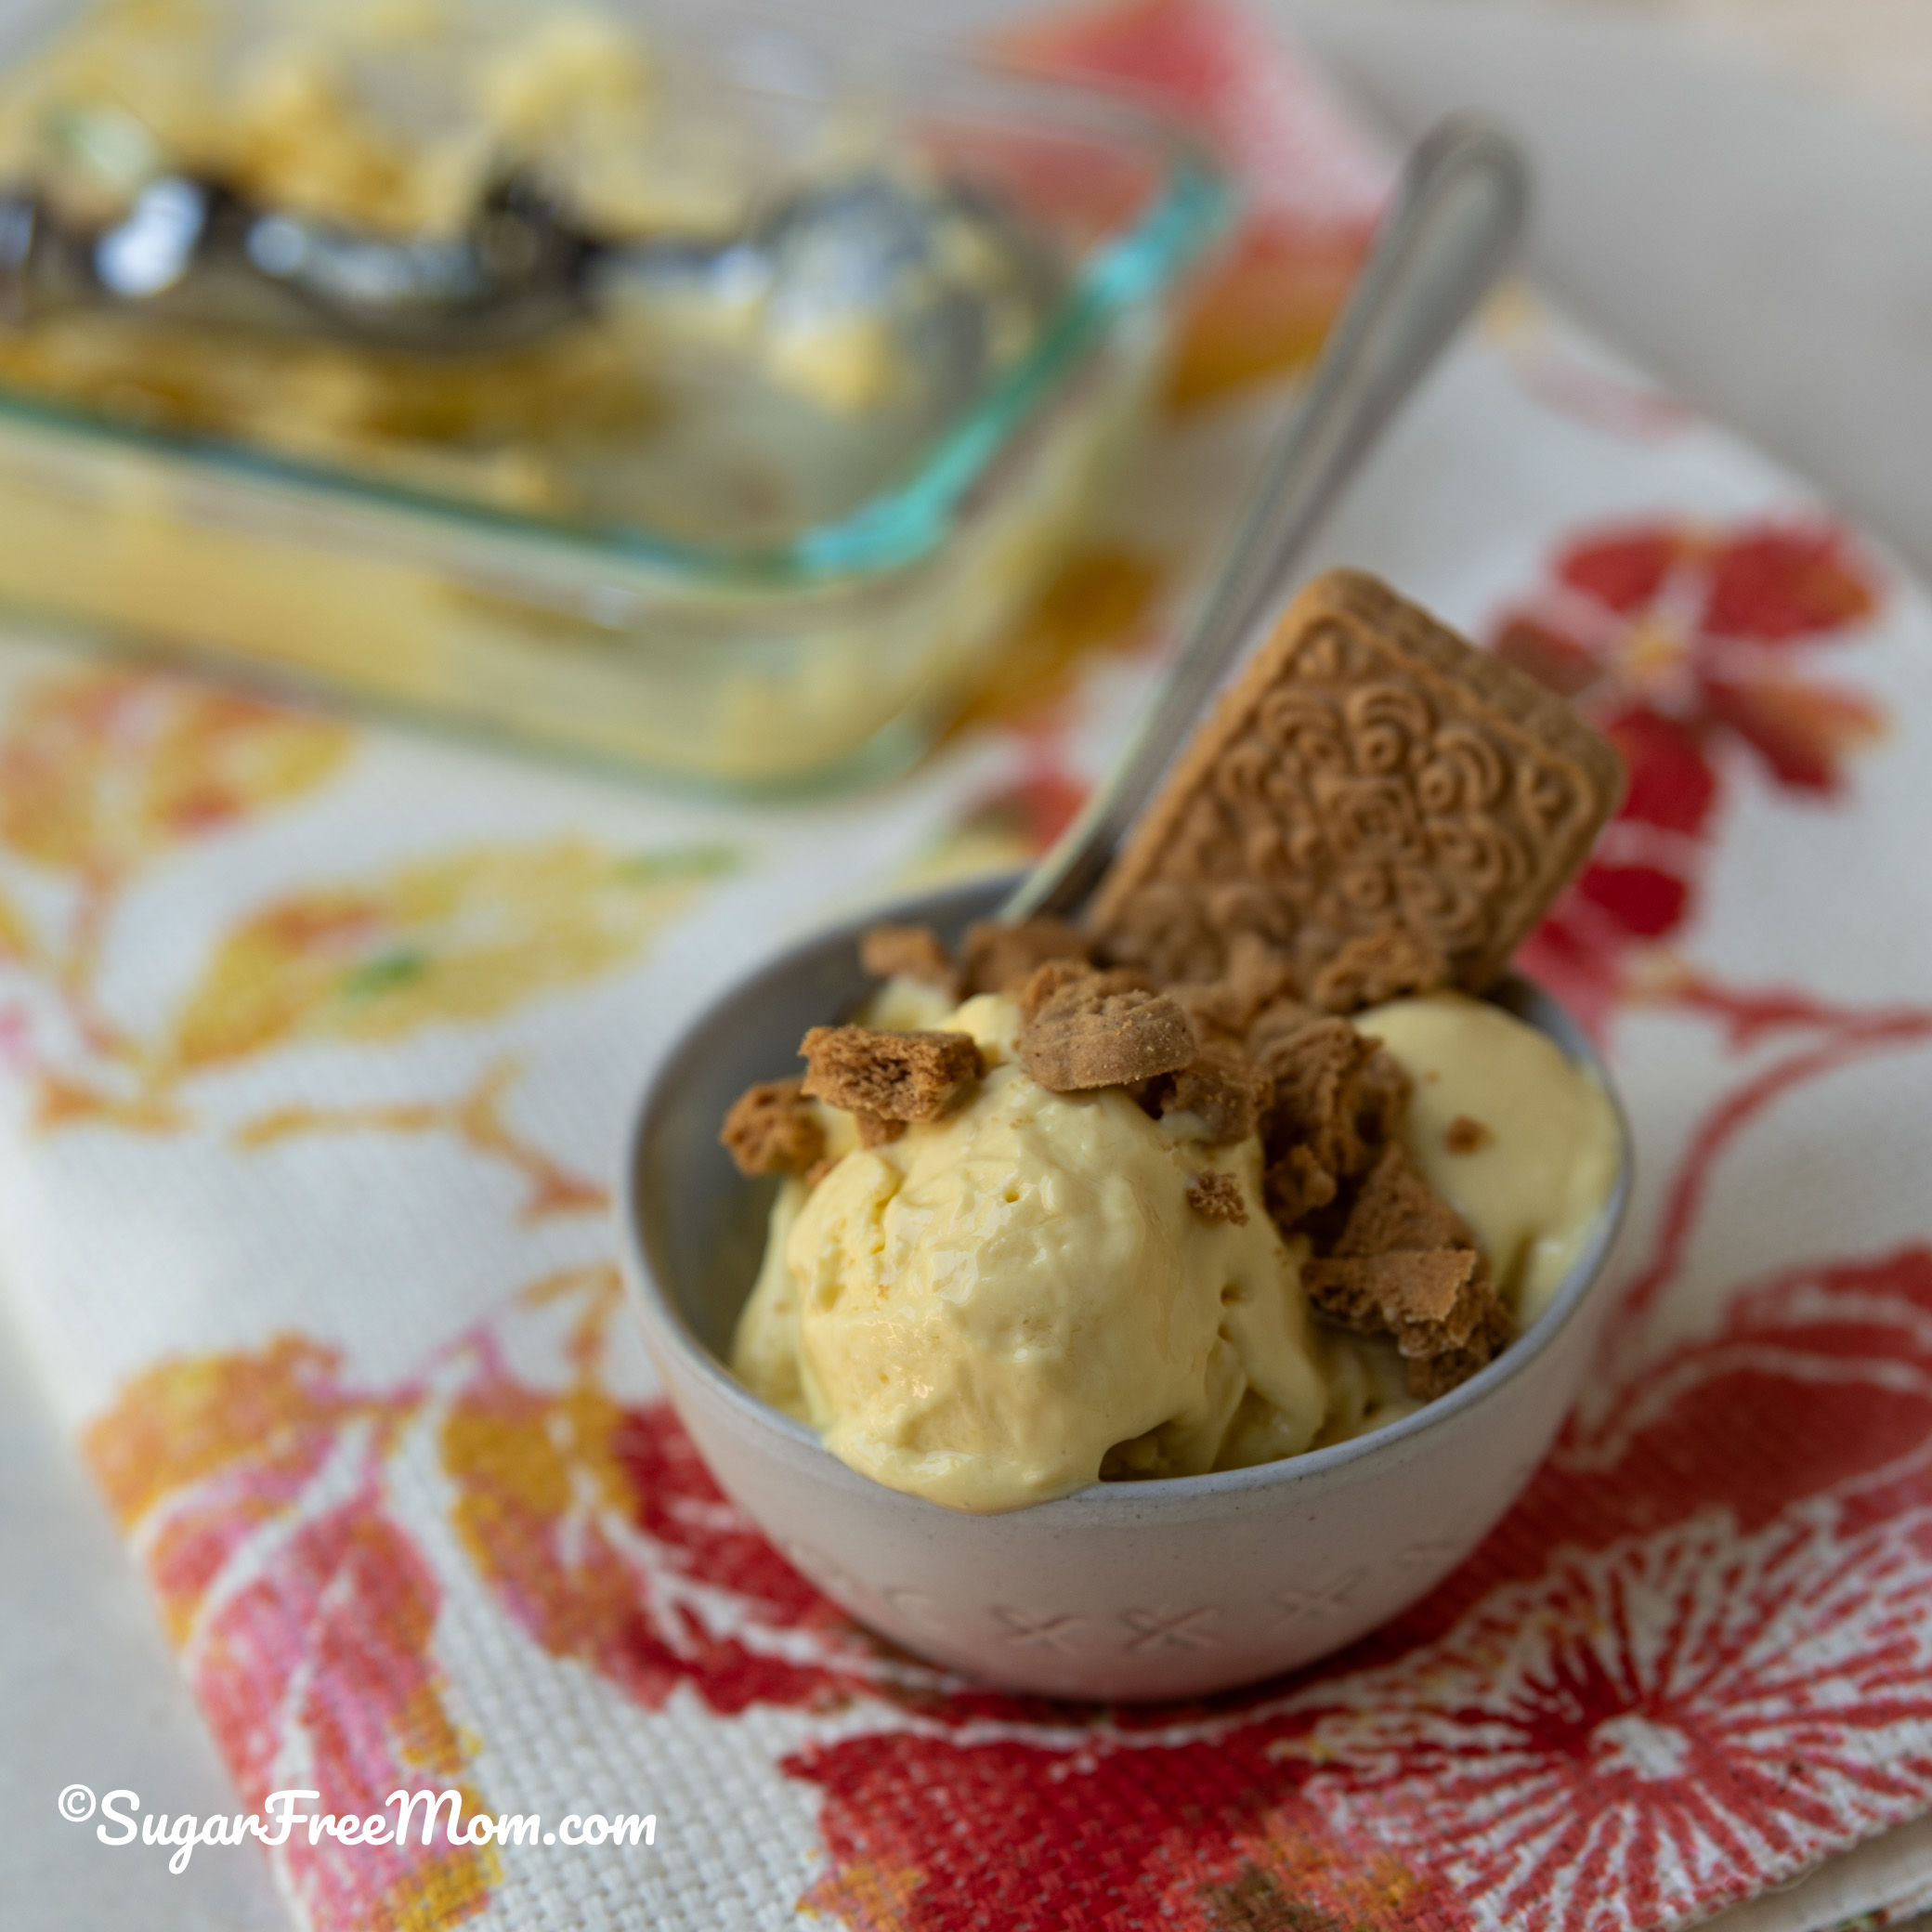
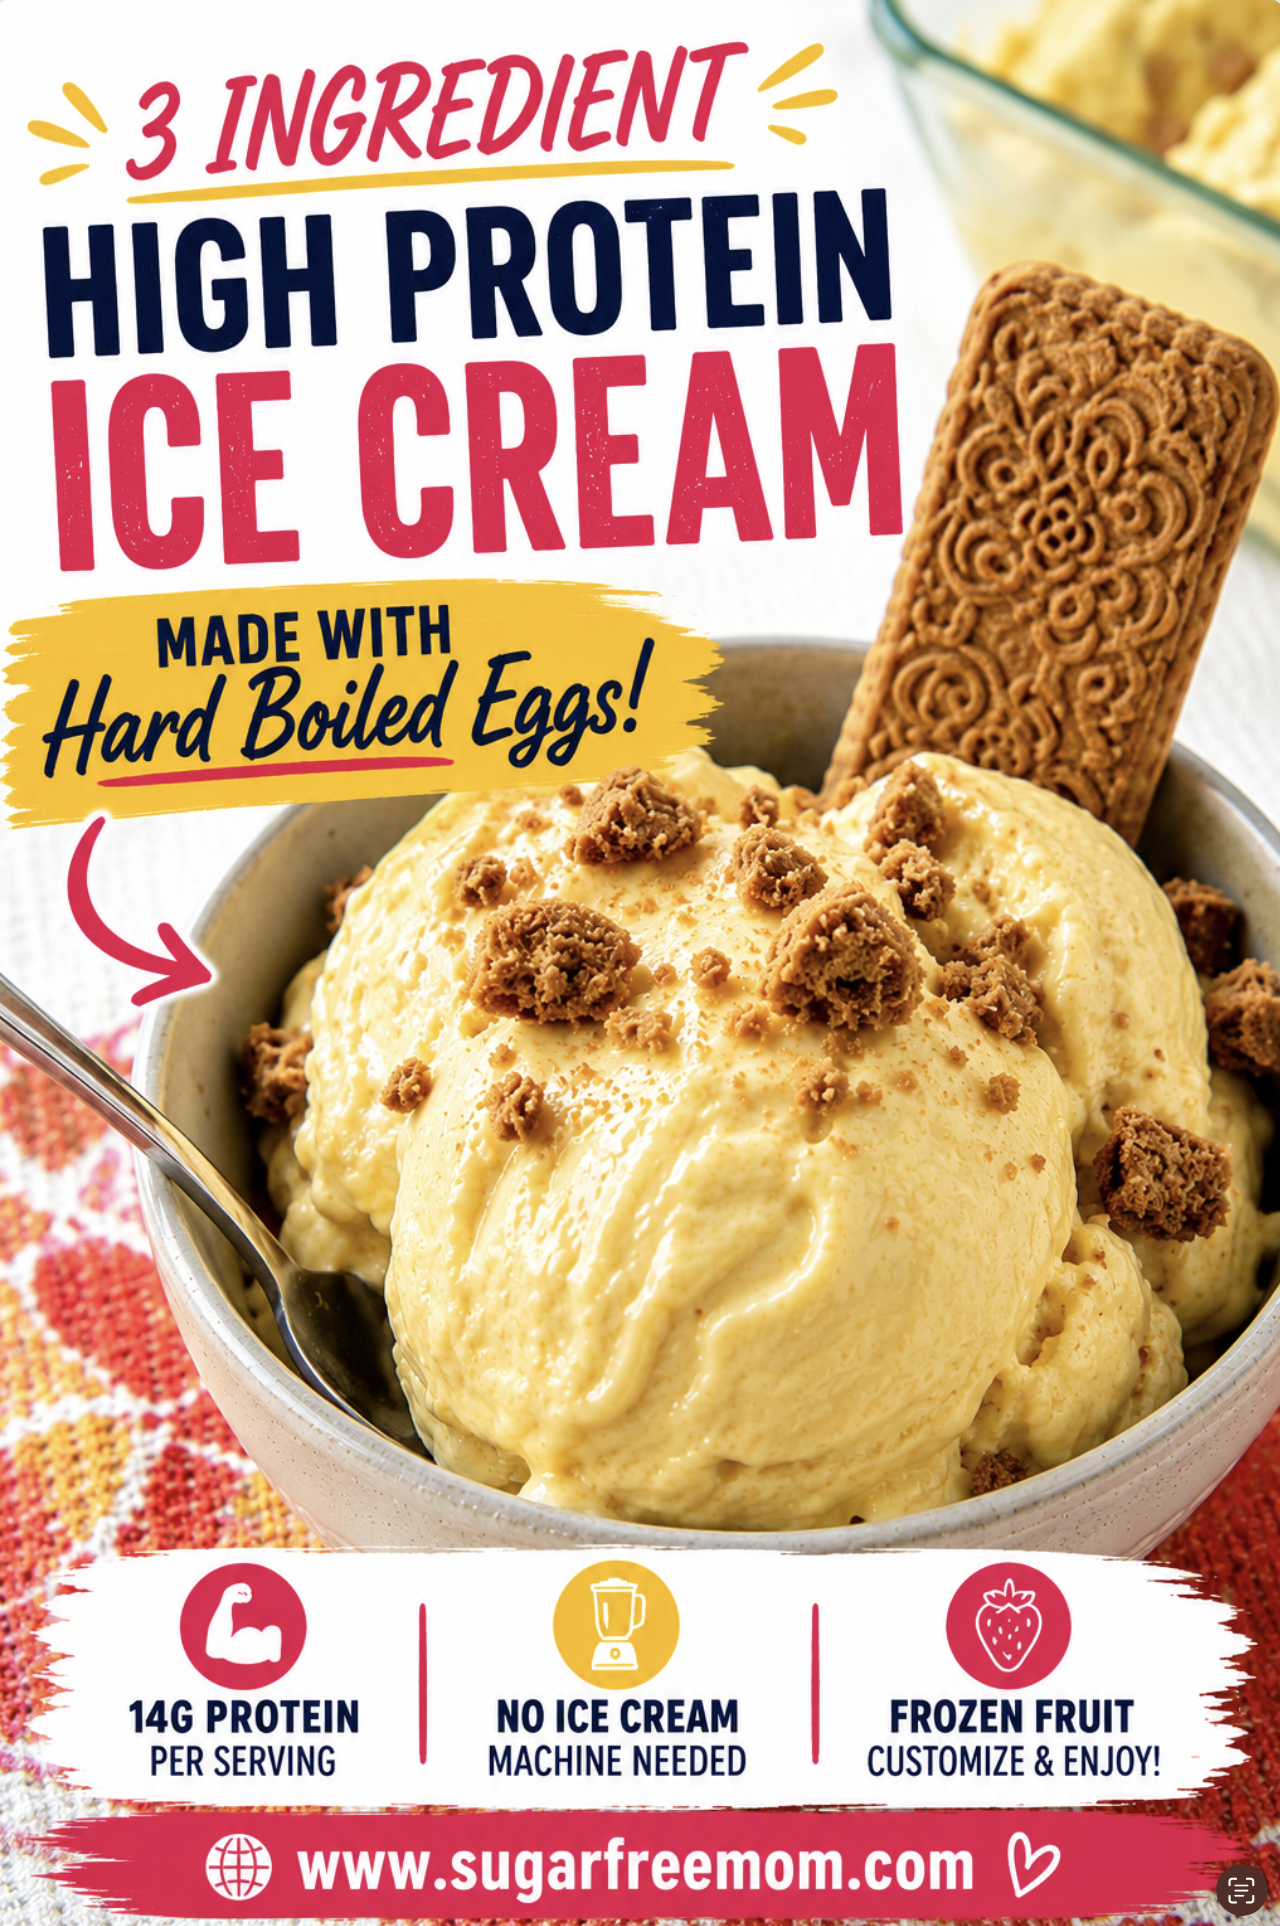
This Easy Creamy Instant Low Carb Boiled Egg Ice Cream uses just 3 simple ingredients and comes together in less than 5 minutes. No ice cream machine, no Ninja Creami, no cooking, and no waiting overnight.
Instant Low Carb Boiled Egg Ice Cream
If you’ve been around here for a while, you know I love finding creative ways to boost protein without sacrificing flavor. But I have to admit, even I was surprised by this one!
The secret ingredient? Hard boiled eggs!
Before you scroll away, trust me-you do not taste the eggs. Instead, they create an incredibly creamy texture that reminds me of a soft-serve consistency.
Combined with frozen fruit and Greek yogurt, this simple recipe makes a delicious high protein treat that’s perfect for hot summer days.
Whether you’re following a low carb lifestyle, looking for a healthier dessert, or simply want a quick high protein snack, this egg ice cream recipe might become your new favorite.
Why You’ll Love This Boiled Egg Ice Cream
There are so many reasons this simple recipe has quickly become a staple in my kitchen:
The best part is that you can create different flavors simply by changing the frozen fruit.
What Does Egg Ice Cream Taste Like?
If you’ve ever had a traditional custard ice cream made with egg yolks, you’ll understand why eggs work so well in homemade ice cream.
Unlike many homemade keto ice cream recipes that rely on heavy cream, coconut cream, guar gum, xanthan gum, or an ice cream machine, this recipe uses whole hard boiled eggs to create a naturally creamy texture.
The result is more like a frozen yogurt meets soft serve consistency than traditional hard ice cream.
These fruits typically have fewer net carbs than mango.
Frequently Asked Questions
Can I Use Raw Eggs?
I don’t recommend raw eggs in this recipe.
Hard boiled eggs provide the creamy texture while keeping the recipe simple and safe.
Can I Make This Without an Ice Cream Machine?
Yes!
That’s what makes this recipe so special. No traditional ice cream maker, Ninja Creami, or additional cost is required.
Can I Meal Prep This Recipe?
Yes, but the texture is best immediately after blending.
If frozen, allow it to soften before serving.
Does It Taste Like Eggs?
Not at all.
Most people would never guess there are whole eggs in this recipe.
Is This Good for Weight Loss?
This high protein dessert can fit into a weight loss plan when your macros allow. Protein helps support satiety and may help you stay satisfied longer than traditional ice cream. If you’re following my Midlife Macro Meal plans or Method, this is approved.
Can I Use a Ninja Creami or Ice Cream Machine?
Absolutely!
The beauty of this recipe is that it’s delicious right after blending, but you can also adapt it for a Ninja Creami or traditional ice cream maker if you prefer a firmer, scoopable ice cream.
Process using the Lite Ice Cream or Sorbet setting.
If the mixture looks crumbly after the first spin, add 1-2 tablespoons of milk, almond milk, coconut milk, or water and use the Re-Spin Cycle.
Because this recipe is naturally lower in fat than traditional ice cream, a re-spin may help achieve a creamier texture.
For a Traditional Ice Cream Machine
Blend the ingredients until smooth, then pour the mixture directly into your ice cream machine. I have an attachment for my Kitchenaid.
Churn according to your manufacturer’s instructions.
Enjoy immediately for a soft-serve consistency.
Freeze for 2-4 hours for a firmer texture.
Which Method Is Best?
Honestly, I prefer this recipe blended and eaten immediately.
Since the frozen fruit already creates a soft serve consistency, there’s no waiting, no freezing point issues, and no need for additional ingredients like xanthan gum, guar gum, heavy cream, condensed milk, or egg yolks that many homemade ice cream recipes require.
But if you already own a Ninja Creami or traditional ice cream maker, both methods work well and can give you a more traditional hard ice cream texture.
My Favorite Method
For busy days, I simply blend:
2 hard boiled eggs
Greek yogurt
Frozen fruit
Then enjoy immediately.
Five minutes later, I’m eating ice cream instead of waiting 24 hours for a Ninja Creami pint to freeze!
This high protein ice cream recipe proves that sometimes the most unexpected ingredients create the best results. With a creamy texture, high protein, and simple ingredient list, it’s a healthier alternative to traditional ice cream that’s ready in minutes.
Add the frozen fruit and yogurt to the blender. Blend on high until smooth. Taste and decide if you need to add any sweetener. If not, add the hard boiled eggs and blend again until smooth. Enjoy immediately as soft serve or store in an airtight container and place in the freezer for 2-3 hours for hard ice cream.
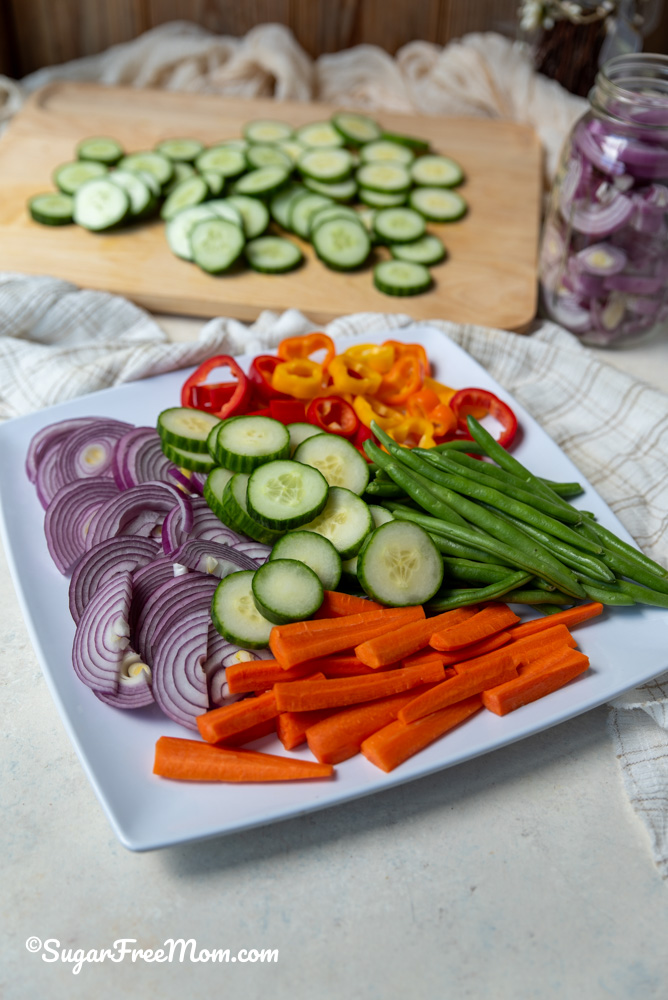
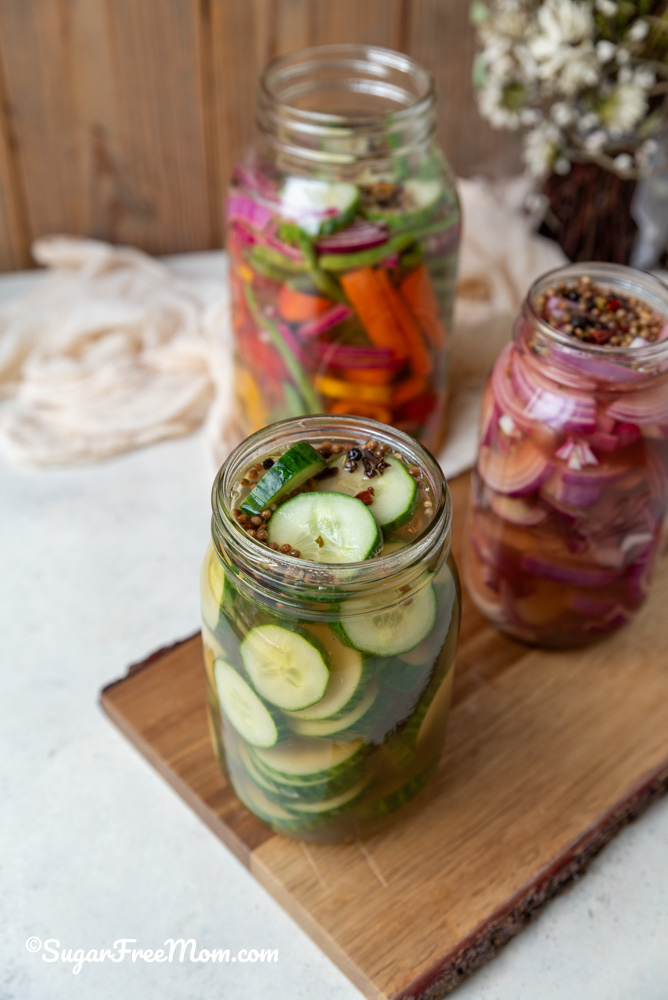
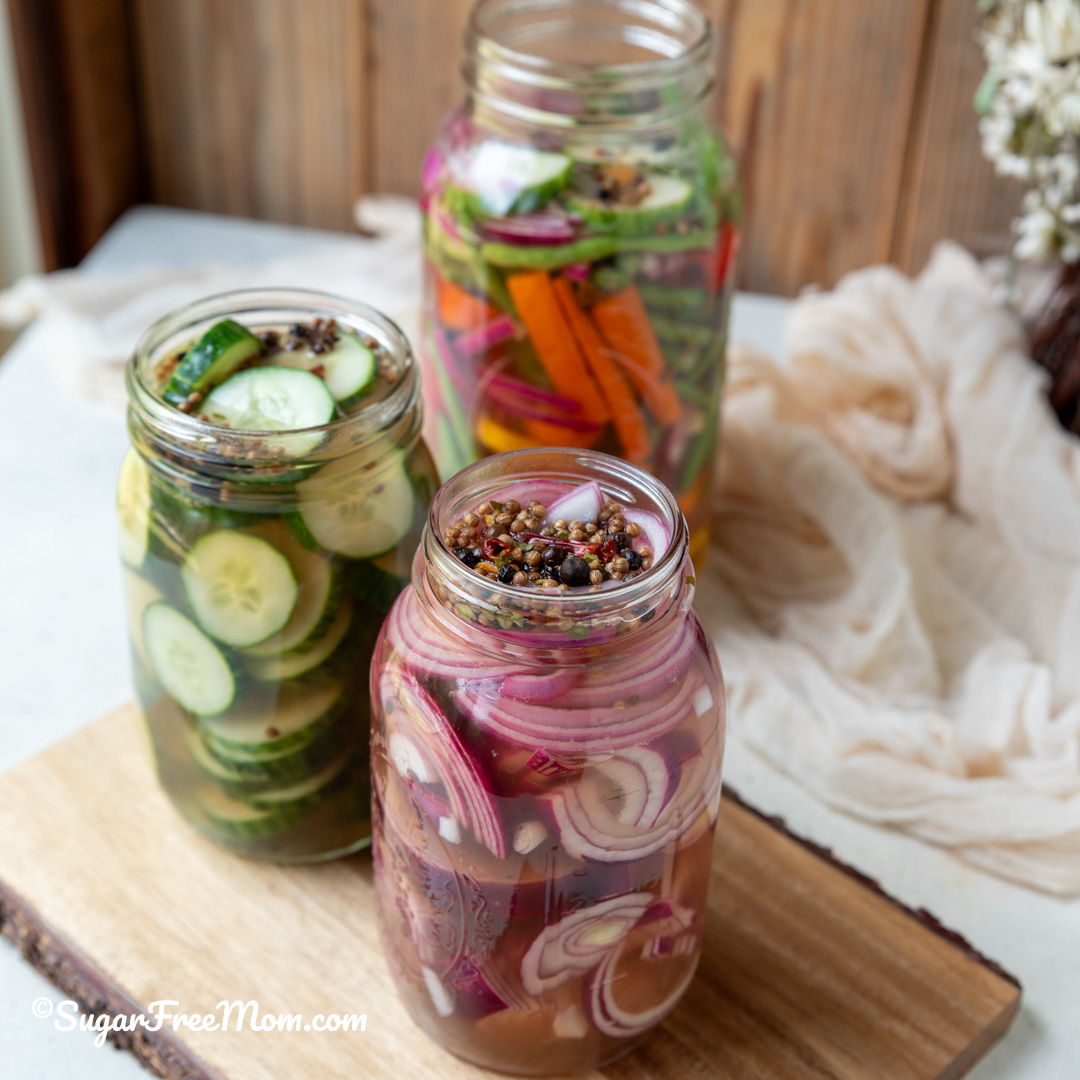
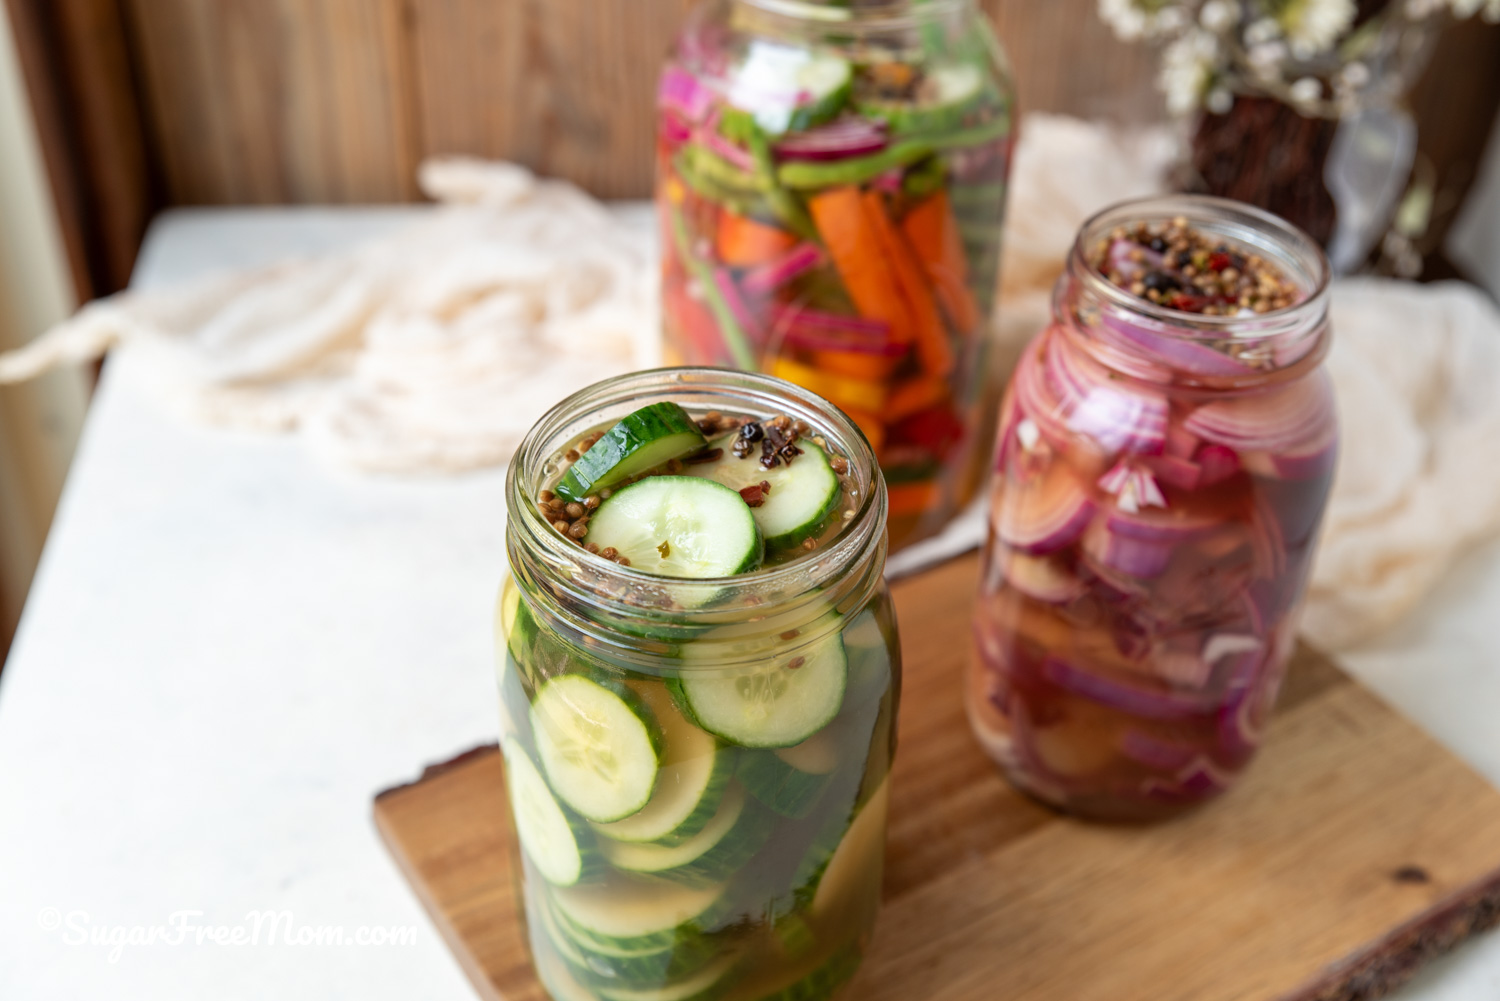
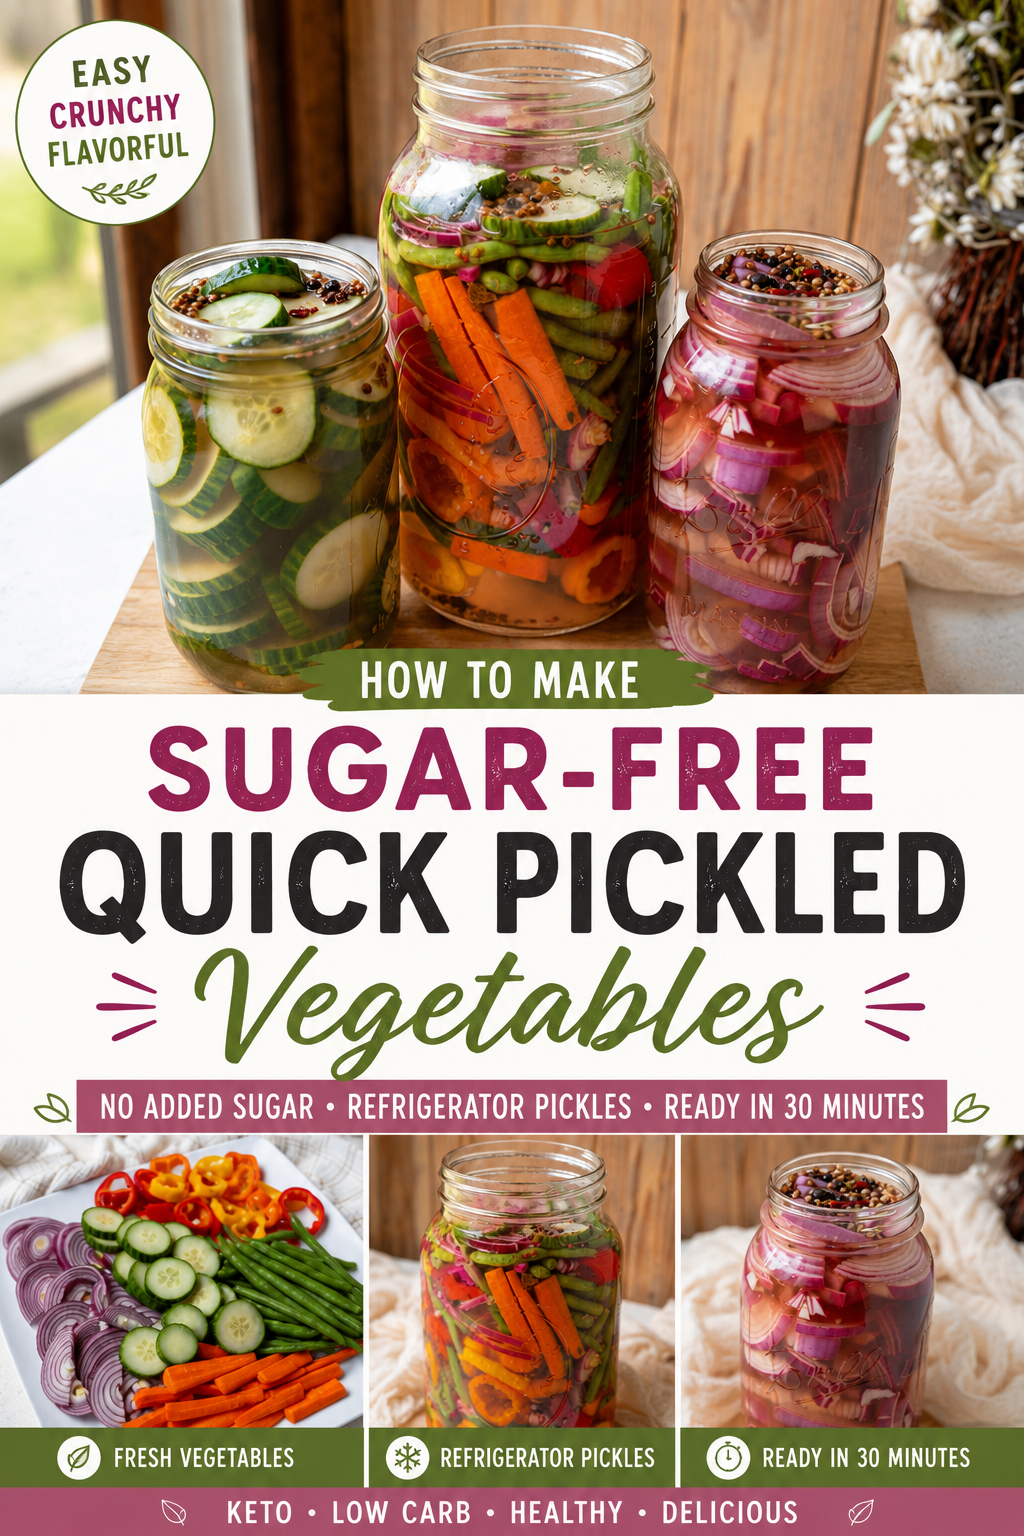
Looking for an easy way to add bold flavor to your meals without extra sugar? These easy sugar-free quick pickled vegetables are crisp, tangy, colorful, and ready in as little as 30 minutes. Unlike traditional pickling recipes that often contain added sugar, this simple refrigerator pickle recipe relies on vinegar, fresh vegetables, herbs, and spices to create delicious flavor with no sweeteners needed.
Quick Pickle Vegetables
Whether you’re making quick pickled red onions, pickled cucumbers, green beans, cauliflower, radishes, or a colorful mix of fresh veggies, this quick pickle brine is one of the easiest ways to preserve vegetables and add a burst of flavor to salads, burgers, sandwiches, tacos, grain-free bowls, and more.
Quick pickling is one of the best kitchen skills to learn because it requires no special equipment, no canning process, and very little hands-on time. Just a jar, a sharp knife, a few pantry staples, and your refrigerator.
Why You’ll Love These Sugar-Free Refrigerator Pickles & Veggies
No added sugar
No canning required
Ready in as little as 30 minutes
Great way to use up fresh vegetables
Naturally low carb and keto-friendly
Easy to customize with fresh herbs and spices
Perfect for meal prep
Adds flavor without extra calories
Unlike traditional sweet pickles or bread-and-butter pickles, these refrigerator pickles let the natural flavor of the vegetables shine through while providing that classic tangy crunch.
What Are Quick Pickles?
Quick pickles, also called refrigerator pickles, are vegetables soaked in a vinegar-based brine rather than undergoing a traditional fermentation process. They are stored in the refrigerator and become flavorful within hours instead of days or weeks.
The biggest difference between traditional fermented pickles and quick pickles is that quick pickles use vinegar for acidity and preservation rather than relying on beneficial bacteria to create lactic acid during fermentation.
Best Vegetables for Quick Pickling
One of the great things about quick pickling is that almost any vegetable works.
Try:
Red onions
Cucumbers
Green beans
Radishes
Cauliflower florets
Bell peppers
Jalapeños
Carrots
Cabbage
Asparagus
Turnips
Quick pickled red onions are especially popular because they turn a beautiful bright pink color after soaking in the brine.
These taste similar to classic dill pickles without any added sugar.
Pickled Green Beans
A crunchy addition to charcuterie boards and salads.
Mixed Pickled Vegetables
Combine:
Cauliflower
Carrots
Red onions
Bell peppers
Green beans
This colorful combination makes a great side dish or snack.
How Long Do Refrigerator Pickles Last?
Because these are quick refrigerator pickles and not canned pickles, they must remain refrigerated.
Stored properly in an airtight container, most quick pickled vegetables stay fresh for 2 to 4 weeks.
Can Quick Pickled Vegetables Support Gut Health?
While quick pickled vegetables made with vinegar are not fermented and don’t contain the beneficial bacteria found in traditional fermented foods like sauerkraut, kimchi, or naturally fermented pickles, they can still support a healthy gut in several ways.
1. They Help You Eat More Vegetables
Most Americans fall short on vegetable intake. Adding tangy quick pickled vegetables to meals makes vegetables more appealing and can help increase your daily fiber intake.
Fiber acts as a prebiotic, feeding the beneficial bacteria already living in your gut.
2. Vinegar May Support Digestion
The vinegar used in quick pickling, especially apple cider vinegar, contains acetic acid, which may help support digestion and healthy blood sugar balance when consumed with meals.
3. Herbs and Spices Offer Additional Benefits
Many common pickling ingredients contain plant compounds that support digestive health:
Fresh dill provides antioxidants and may help soothe digestion.
Garlic contains prebiotic fibers that feed beneficial gut bacteria.
Mustard seeds contain compounds that may support digestion.
Coriander seeds have traditionally been used to ease digestive discomfort.
4. Pair Them With Fermented Foods
For even greater gut health benefits, serve quick pickled vegetables alongside fermented foods such as:
Sauerkraut
Kimchi
Plain kefir
Unsweetened yogurt
Fermented pickles
This combination provides both prebiotic fibers and probiotic bacteria.
Tips for the Best Quick Pickles
✔ Use fresh vegetables for the best crunch.
✔ Choose vinegar with at least 5% acidity. I used a combo of apple cider and white vinegar.
✔ Store only in the refrigerator.
✔ Let vegetables sit at least 30 minutes before serving.
✔ Experiment with fresh dill, garlic, mustard seed, and coriander.
✔ Use glass jars rather than plastic containers for best flavor.
Frequently Asked Questions
Can I make quick pickles without sugar?
Absolutely. This recipe is completely sugar-free and still delivers plenty of flavor thanks to vinegar, salt, herbs, and spices.
What’s the best vinegar for quick pickling?
White vinegar provides a clean, classic pickle flavor while apple cider vinegar offers a slightly milder, sweeter taste. Both work well.
Can I pickle different vegetables together?
Yes! Mixed vegetable pickles are a great way to use up produce before it spoils.
Do quick pickles need to be canned?
No. Refrigerator pickles are specifically designed to skip the canning process and be stored in the refrigerator.
Making easy sugar-free quick pickled vegetables is one of the simplest ways to add flavor, crunch, and color to your meals. With no added sugar, minimal ingredients, and endless customization options, this refrigerator pickle recipe is perfect for anyone following a low-carb, keto, or sugar-free lifestyle.
Whether you’re making quick pickled red onions, dill pickles, green beans, or a colorful mix of fresh vegetables, you’ll love having a jar ready in the refrigerator to instantly elevate any meal.
Are Quick Pickled Vegetables Probiotic?
No. Most quick pickled vegetables are made with vinegar and do not undergo fermentation, so they generally do not contain live probiotic bacteria.
However, they can still support gut health by encouraging vegetable intake, increasing fiber consumption, and providing flavorful variety that makes healthy eating more enjoyable.
How to Make Easy Sugar Free Quick Pickled Vegetables
These easy sugar-free quick pickled vegetables are crisp, tangy, colorful, and ready in as little as 30 minutes. Unlike traditional pickling recipes that often contain added sugar, this simple refrigerator pickle recipe relies on vinegar, fresh vegetables, herbs, and spices to create delicious flavor with no sweeteners needed.
Wash and dry your vegetables thoroughly. Using a sharp knife, slice vegetables into thin, even pieces. Thin slices absorb the brine faster and create a crisp texture.
Pack vegetables tightly into a clean glass jar or mason jar. Add any fresh herbs or spices you enjoy.
Add the brine ingredients into a medium saucepan and bring to a low simmer. Turn off heat and pour brine over vegetables in the jar. Allow to cool for about 30 minutes then seal with a cover and refrigerate.
For best flavor: The longer they sit, the more flavorful they become.Red onions: 30 minutes to 1 hourCucumbers: 24 hoursMixed vegetables: 24–48 hours
Quick pickled vegetables stay fresh for 2 to 4 weeks in the refrigerator.
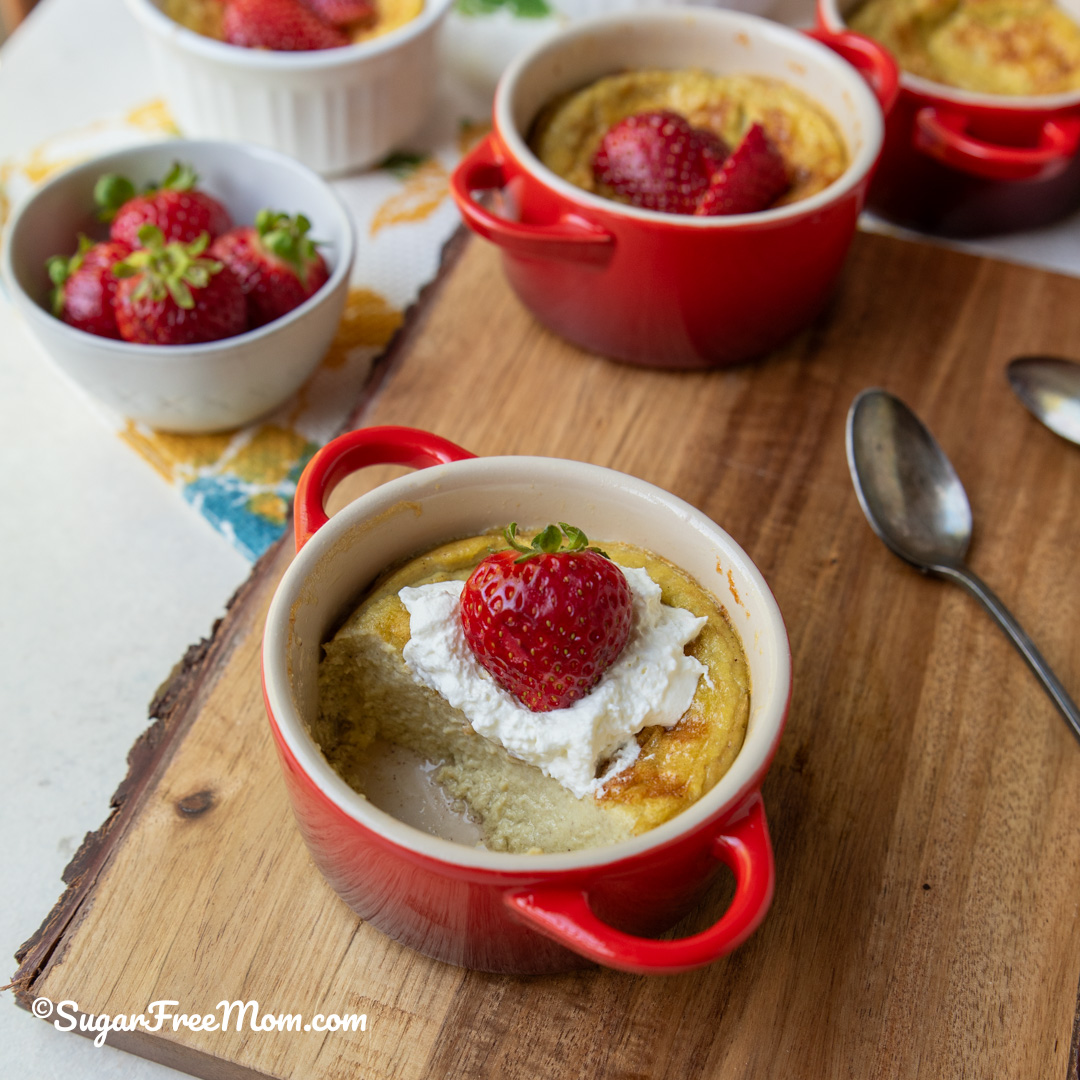
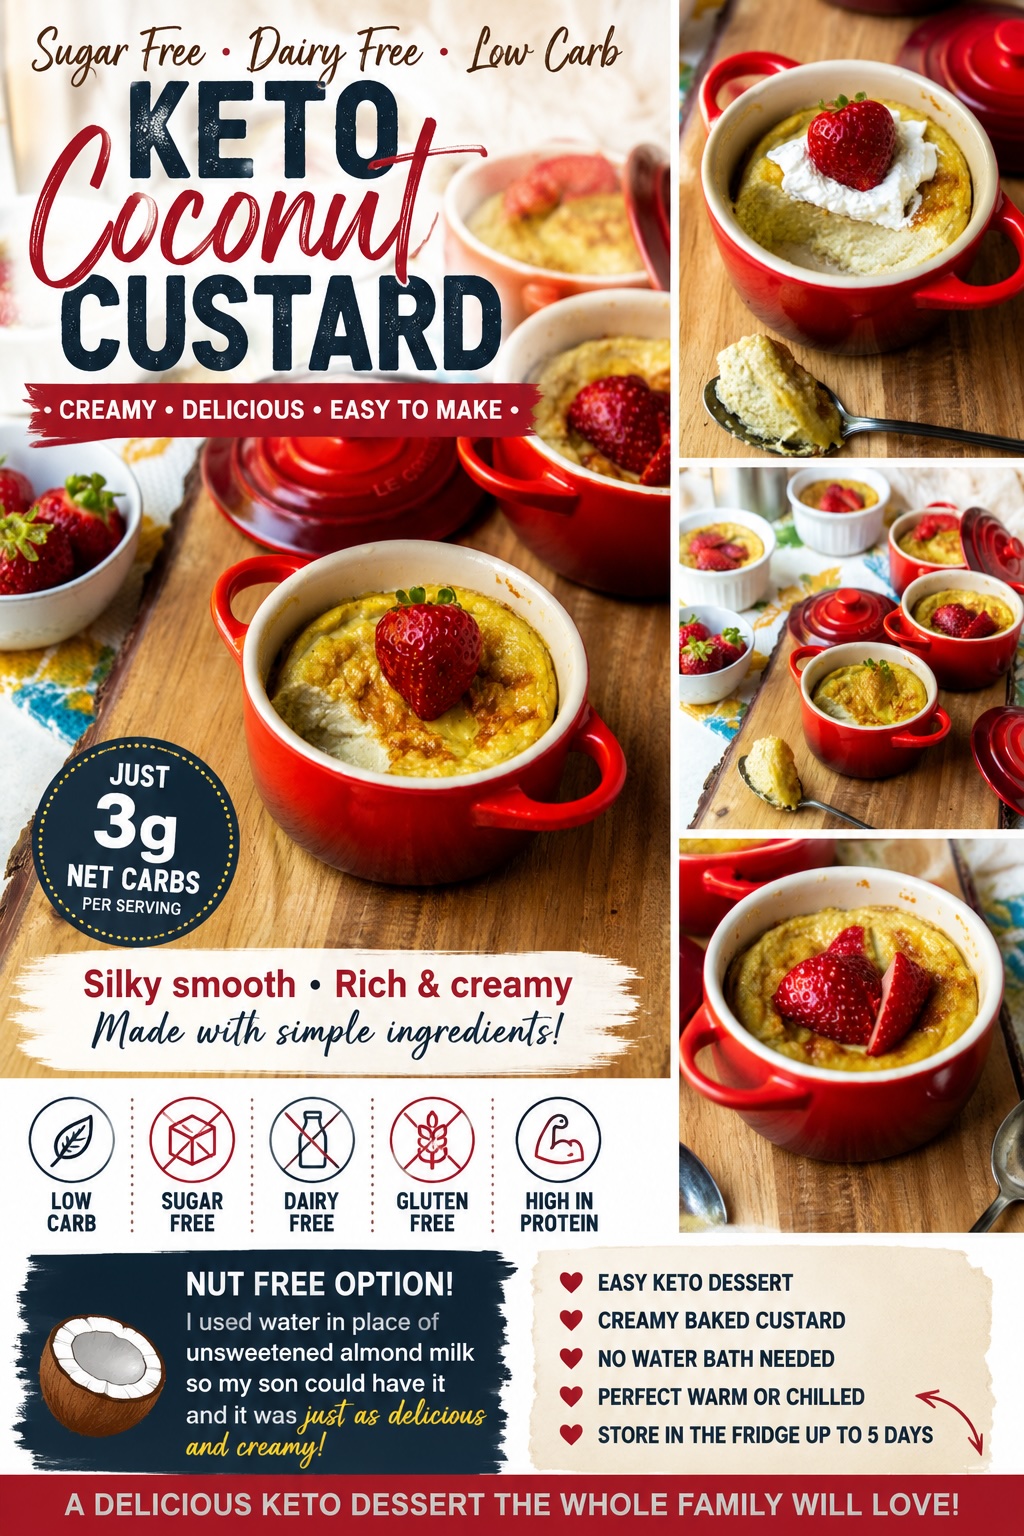
If you love traditional custard, but want a healthier keto and dairy free version with simple ingredients and just 3 g net carbs, this creamy keto coconut custard is about to become one of your favorite sugar free dessert recipes.
Keto Dairy Free Coconut Custard
This easy keto custard recipe has the silky smooth texture of classic baked custard, but it’s completely dairy-free, low carb, gluten free, and Midlife Macro Approved.
It’s rich, creamy, lightly sweet, and incredibly satisfying for anyone following a keto diet, low carb lifestyle, or simply trying to reduce sugar without giving up delicious keto dessert recipes.
The best part? I tested this recipe with both unsweetened almond milk and plain water in place of the almond milk so my son could enjoy it nut free, and honestly, it was just as delicious with the same creamy texture!
Whether you call it coconut custard, baked custard, egg custard, or even crème anglaise inspired custard cups, this recipe is one of the easiest ways to satisfy a sweet tooth while keeping carbs low.
Why You’ll Love This Easy Keto Custard Recipe
This sugar free dairy free custard is:
Low carb and keto friendly
Just 3 g net carbs per serving
Dairy-free and gluten free
Carnivore friendly with simple swaps
Made with healthy fats from coconut milk
Protein packed thanks to collagen and whole eggs
Perfect warm or chilled
Great for meal prep
Silky smooth texture without heavy cream
Made with simple ingredients you probably already have
Unlike traditional custard recipes that rely on heavy cream, double cream, or sweetened condensed milk, this low carb custard uses canned coconut milk for richness and a creamy custard texture.
The coconut cream from canned coconut milk gives this baked custard its rich texture while keeping it completely dairy free.
Using collagen also adds extra protein and helps create an even creamier custard mixture without needing xanthan gum or gelatin powder.
Step 1: Prepare the Egg Mixture
Preheat your oven and gather all ingredients at room temperature for the best creamy texture.
Add the coconut milk, almond milk or water, whole eggs, collagen, vanilla extract, vanilla stevia, cinnamon, and salt to a blender, stand mixer, hand mixer, or food processor.
Blend until smooth.
Step 2: Fill the Custard Cups
Grease individual ramekins or custard cups with coconut oil or cooking spray.
Pour the cream mixture evenly into each ramekin.
Sprinkle the tops with cinnamon or nutmeg.
Step 3: Bake the Custard
Place ramekins onto a large baking dish or baking sheet pan.
Bake until the center is just set and the custard has a soft jiggle.
Cool on a wire rack before serving.
Enjoy warm or chilled straight from the refrigerator topped with fresh berries.
Can I Use Water Instead of Unsweetened Almond Milk?
Yes! I tested both versions.
Using water instead of unsweetened almond milk still created a creamy custard with a silky smooth texture. This is a great option if you need:
Nut free custard
Tree nuts free desserts
Fewer ingredients
Lower additional cost
A simple pantry-friendly keto dessert
Honestly, next time I make this, I may even use water again because it worked so well.
Do I Need a Water Bath?
No water bath or bain marie is needed for this easy keto custard recipe.
Traditional custard recipes often use hot water in a larger baking dish to gently cook the egg mixture, but this recipe works beautifully without the extra step.
That means:
Less prep time
Less mess
Easier cleanup
Perfect results every time
Is Coconut Custard Good for Weight Loss?
This low carb egg custard can absolutely fit into a weight loss lifestyle because it’s:
Healthy fats
Rich in protein
Low in total carbs
Very satisfying
The combination of eggs, coconut milk, and collagen helps support fullness while keeping net carbs low.
It’s also Midlife Macro Approved, making it a great keto dessert option for women in perimenopause and menopause looking for a balanced low carb dessert.
Helpful Tips for the Best Keto Custard
Use Room Temperature Eggs
Cold eggs can affect the creamy texture of the custard mixture.
Don’t Overbake
The best keto custard still jiggles slightly in the center when removed from the oven. Overbaking can create a rubbery texture.
Chill for a Firmer Texture
Refrigerating overnight creates an even richer baked custard consistency.
Store Properly
Store in an airtight container or cover ramekins with plastic wrap for up to 5 days.
Can I Make This Ahead of Time?
Absolutely. This baked custard tastes even better chilled the next day.
Can I Freeze Keto Custard?
Yes, although the creamy texture is best fresh or refrigerated.
Is This Recipe Dairy Free?
Yes! There’s no heavy cream, heavy whipping cream, or dairy products.
Is This a Traditional Custard?
It’s inspired by traditional custard but made into a healthier keto version using low carb ingredients. My whole family loved this dairy-free custard!
Creamy sugar free dairy free keto coconut custard made with simple ingredients and just 3 g net carbs per serving. This easy low carb baked custard is silky smooth, rich, protein packed, and perfect warm or chilled for a delicious keto dessert the whole family will love.
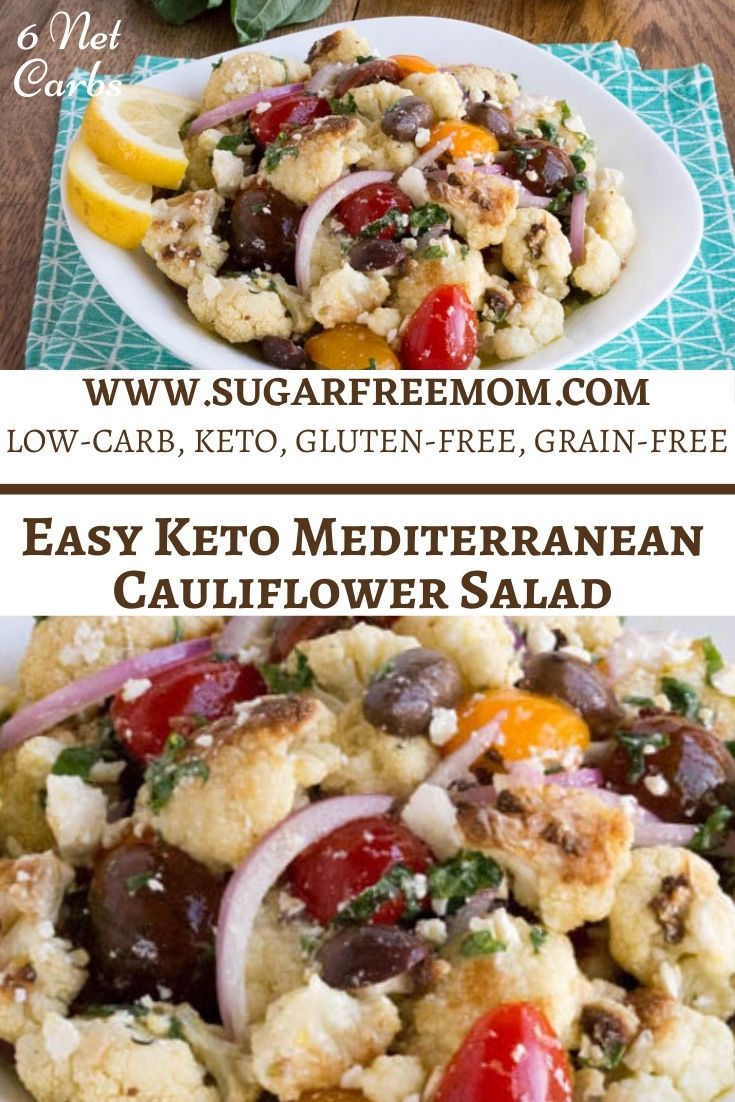
This easy keto Mediterranean Cauliflower Salad is the perfect side dish complementing any main entree or serving as a vegetarian Mediterranean dish full of low carb vegetables and gluten free too!
Easy Mediterranean Roasted Cauliflower Salad
Although I’m an full blooded Italian I crave, like nobodies business, Mediterranean flavors. Not surprisingly as they are pretty similar.
I never grew up eating black olives, it was always green with pimentos, Kalamata and flavors of Greek salad. We always had red onion, fresh tomatoes and of course fresh parsley in our house and in our meals, at least a few times a week.
Everything, and I mean most everything, was topped with olive oil. My mom rarely made much with butter, except every lazy Sunday night like clock work she would make me and my three brothers the best grilled cheese sandwiches in all the land!
It’s a great option for those on a keto diet with just 6 g net carbs.
Now that I’m on a low carb diet, I love using raw cauliflower in unique ways, hence the creation of this salad. While most cauliflower salad recipes are more of a mock potato salad style, this one has that European flare!
Mediterranean Salad Recipe
A squirt of lemon was always added to our typical fish dinners on Friday nights. As a child I could never quite understand why my dad was so in love with adding lemon.
But then I grew up and I realized how much lemon makes such a difference in some of my favorite recipes and especially keto salads!
I never grew up eating feta cheese either, but the flavors when mixed with fresh roasted vegetables are undeniably delicious in this Mediterranean cauliflower salad. Obviously you can eliminate the feta cheese if your dairy free.
Keto Potluck and BBQs
The oven-roasted cauliflower in this lovely dish has so much flavor, it’s perfect as it is. It’s a fantastic healthy option side dish to bring to a potluck or serve at a summer BBQ party.
Make the lemon dressing ahead with fresh herbs and the flavors will be even better the next day! If you’re not a fan of cauliflower you could even swap it with roasted broccoli, green beans, red peppers or Brussels sprouts.
If you’re not a fan of red onion of course you can leave it out. If you prefer different olives or another veggie please adapt as you think your family would enjoy.
Roasting all veggies with some good quality extra virgin olive oil and seasonings is how this low carb recipe gets amazing flavors!
It’s one of my families most favorite ways to enjoy all kinds of vegetables when I roast them. I know you might be tempted to skip the roasting step, but please trust me on this, you shouldn’t skip it because cooked cauliflower that’s been roasted is so much better than raw.
I will say it again, one more time, YOU MUST NOT LEAVE OUT THE MOST IMPORTANT STEP for this salad. The large florets NEED to roast.
The flavor of roasted cauliflower is beyond amazing and so much tastier than adding it raw in this salad. While you’re at it, you could make this a double batch and freeze in individual portions for an easy way to meal plan ahead!
Can I use Cauliflower Rice Instead?
If you really don’t want to roast the cauliflower florets for this cauliflower salad recipe, you could use cauliflower rice. I would recommend grating a fresh head of cauliflower using a food processor.
I think fresh is best because frozen cauliflower rice tends to hold a lot of moisture and will water down the flavors of the dressing.
I Don’t like Lemon what else can I use?
If you’re not a fan of lemon dressing, you can swap it with the same amount of red wine vinegar.
Make this a Main Course
An excellent choice to increase protein for this vegetarian salad is to add some cooked grilled chicken, or grilled steak tips or even canned tuna or canned salmon will work for a complete meal.
Just 6 g net carbs per serving for just the salad as is. If you add protein to make it a main dish, you will need to add the nutritional amount to what you see below on my printable recipe card.
This easy keto Mediterranean Cauliflower Salad is the perfect side dish complementing any main entree or serving as a vegetarian Mediterranean dish full of low carb vegetables and gluten free too!
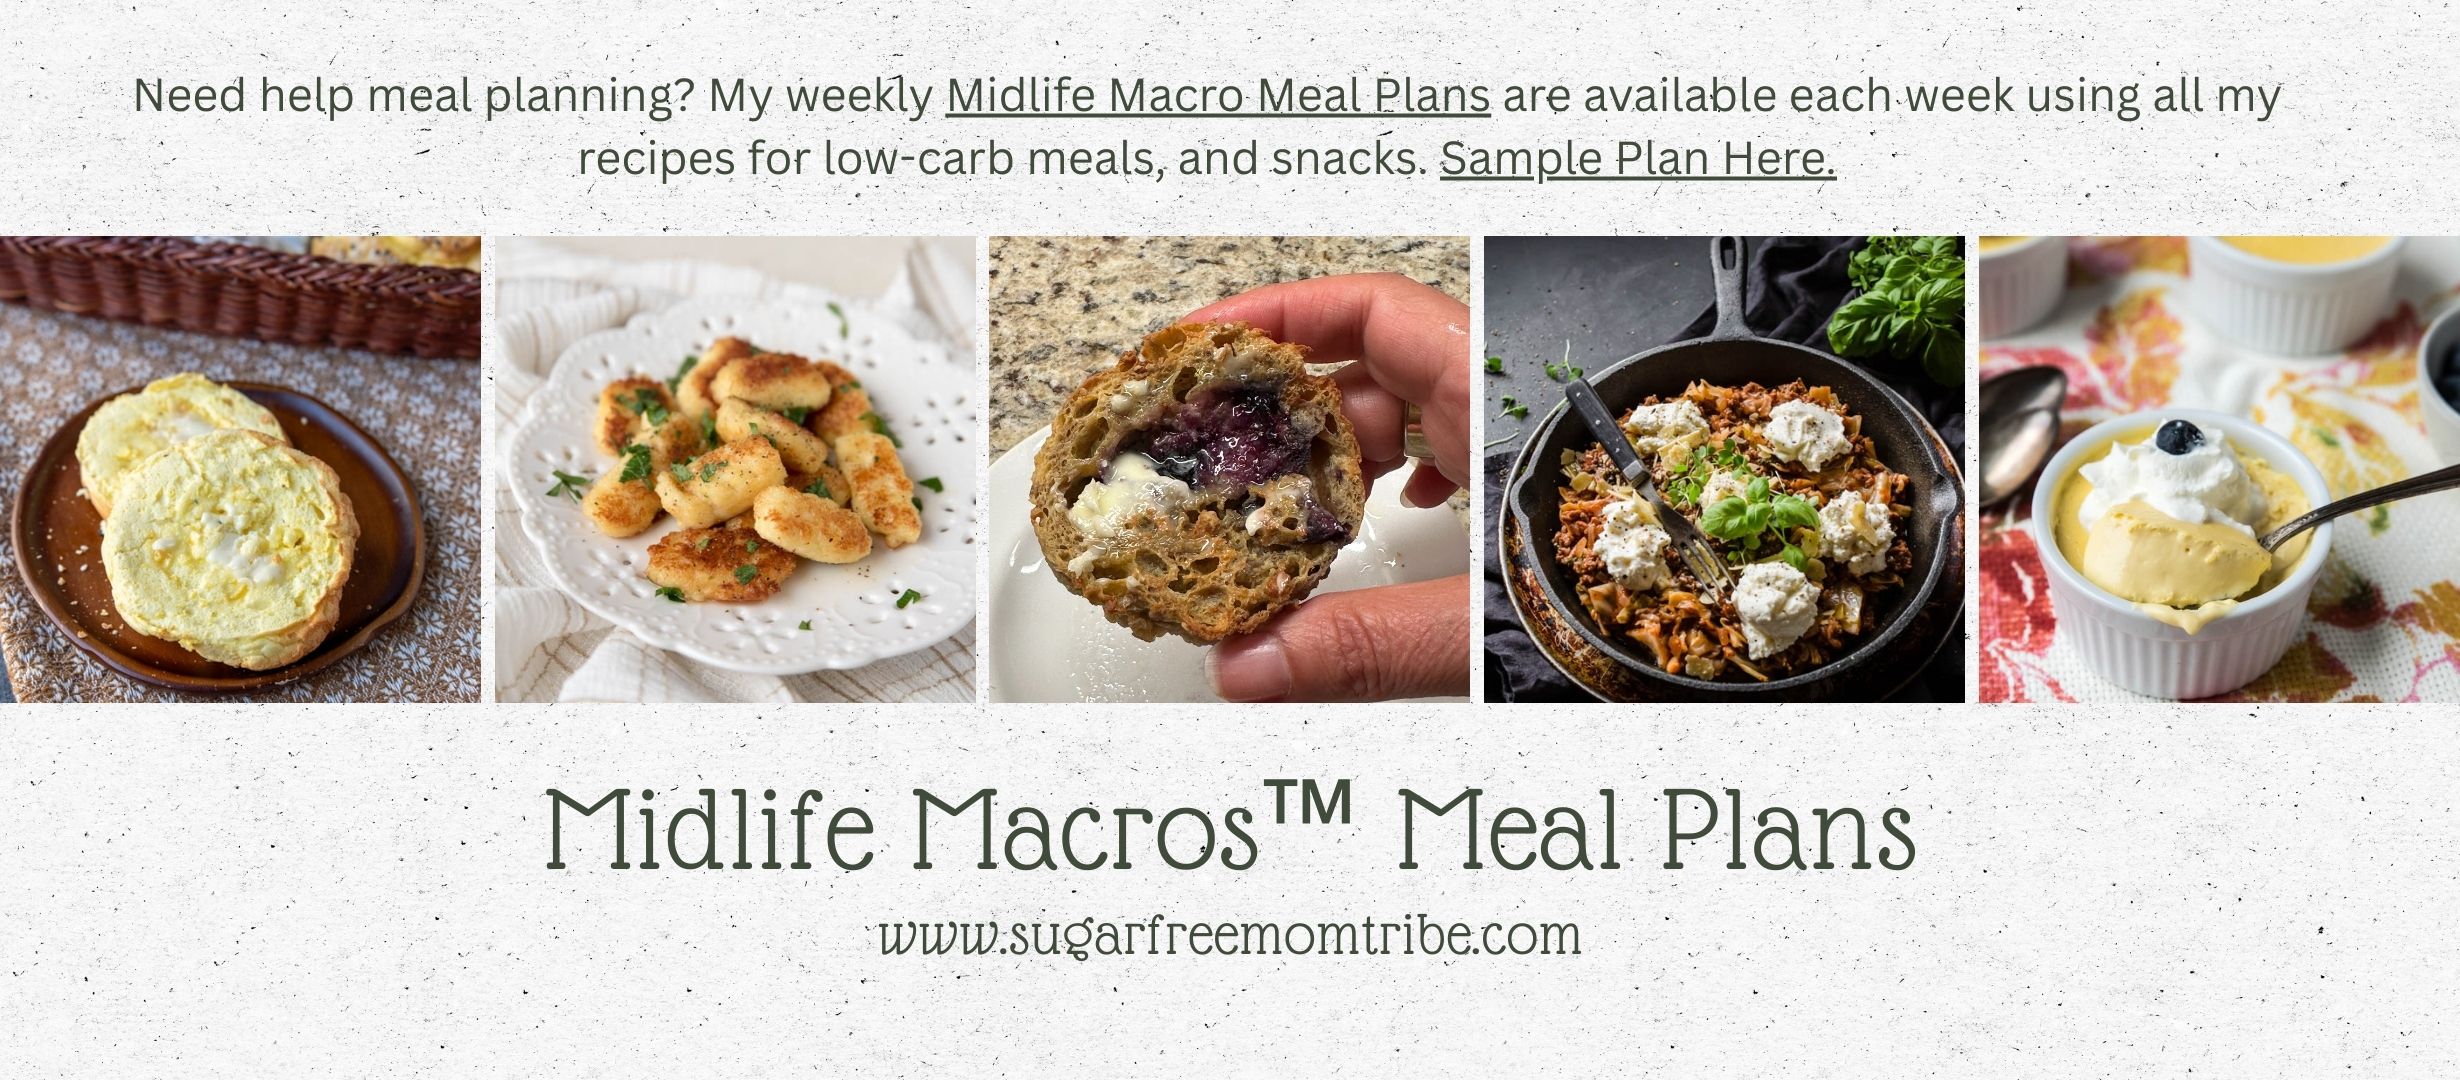
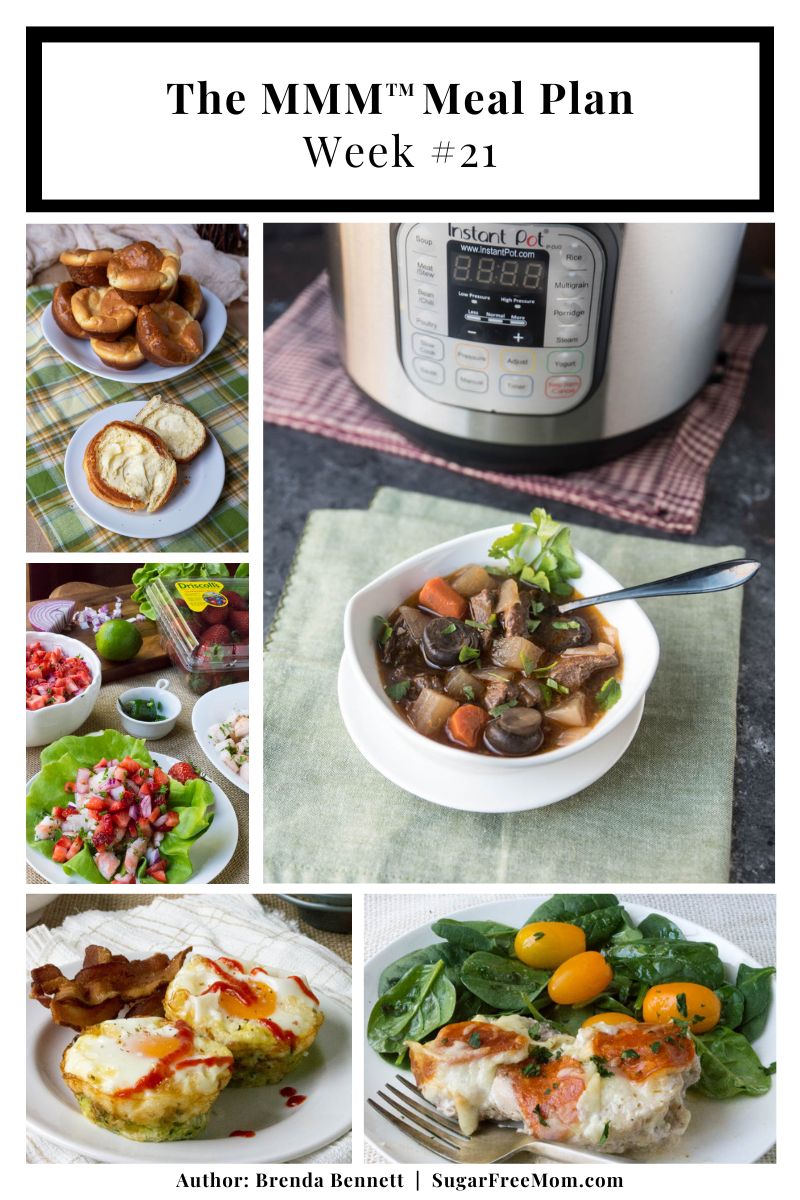
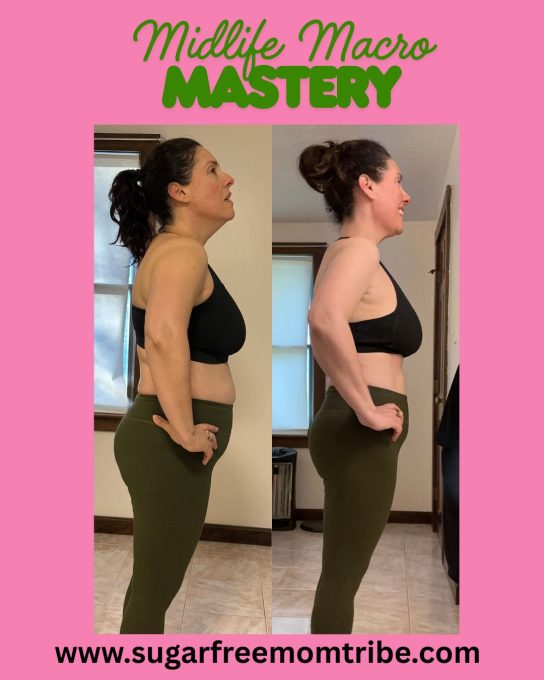
If you’re a woman over 40, in perimenopause or menopause struggling with stubborn weight gain, increased hunger, cravings, low energy, or feeling like your old keto plan no longer works, this simple high-protein midlife macro meal plan may be exactly what you need.
The Midlife Macro Method
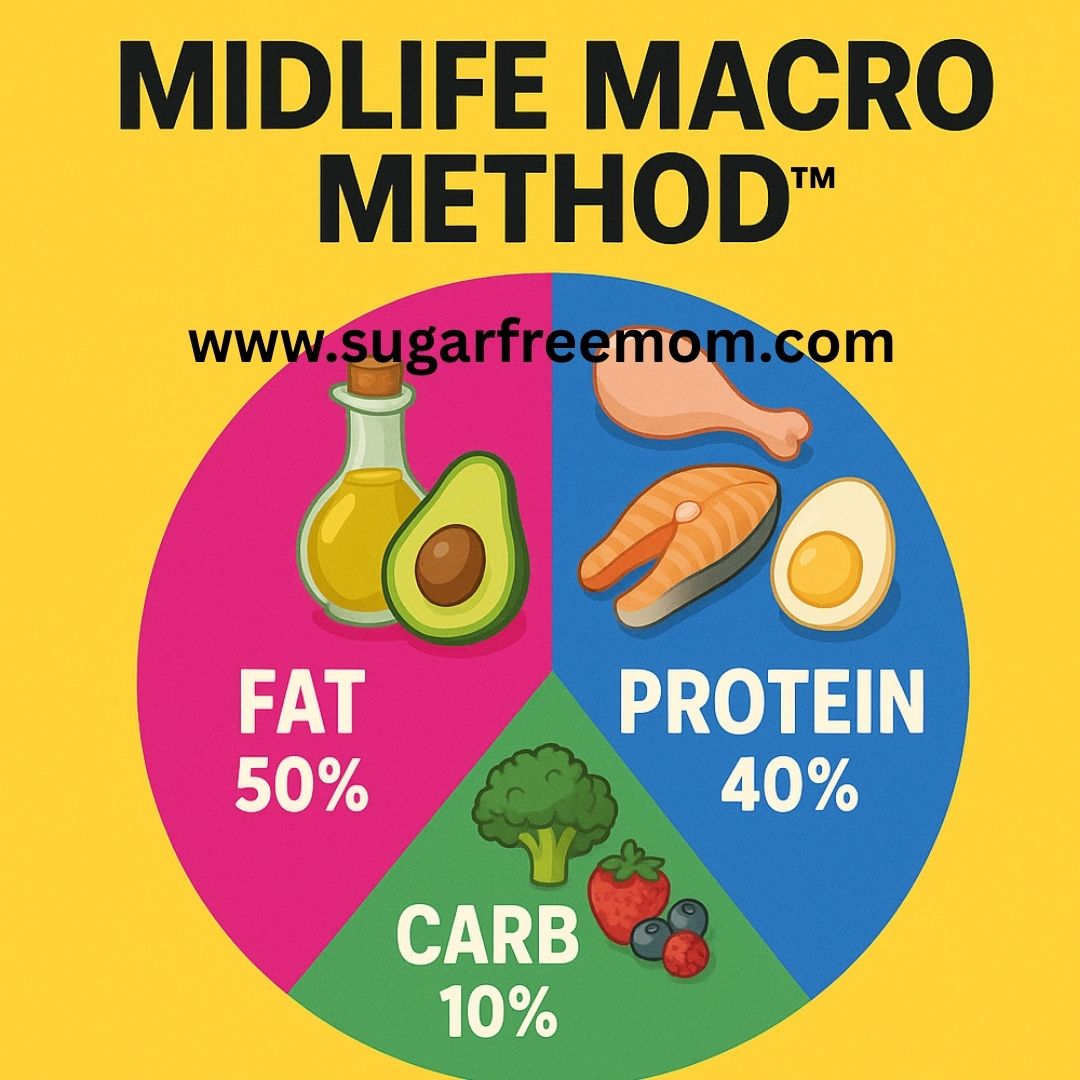
My Midlife Macro Method is designed specifically for women in midlife who want a realistic, sustainable way to lose weight, preserve muscle, support hormones, and simplify healthy eating without feeling deprived.
Unlike traditional keto plans that rely heavily on high fat intake, my Midlife Macro Meal Plans focus on:
Higher protein intake
Moderate healthy fats
Lower carbs
Strategic maintenance days
Real food meals
Easy meal prep
Sustainable fat loss
The goal is not perfection.
The goal is consistency with a way of eating that works for your changing body in midlife.
Why Midlife Women Often Need More Protein
One of the biggest nutritional shifts many women need in midlife is increasing protein intake.
As estrogen changes during perimenopause and menopause, many women experience:
Increased belly fat
Muscle loss
More cravings
Slower metabolism
Reduced insulin sensitivity
Low energy
Difficulty maintaining weight loss
One of the most effective ways to support healthy body composition in midlife is prioritizing protein at every meal.
Protein helps support:
Muscle preservation
Satiety
Blood sugar balance
Healthy metabolism
Hormone balance
Strength training recovery
Better appetite control
That’s why my Midlife Macro Meal Plans focus heavily on protein-forward meals that are still easy and enjoyable for real life.
What Makes My Midlife Macro Meal Plans Different?
My weekly meal plans are designed to help women stop overthinking food.
You do not need another restrictive diet. You need a simple structure you can actually maintain.
Each weekly plan includes:
High protein recipes
Balanced meals
Easy leftovers
Quick prep breakfasts
Lower carb meals
Family-friendly dinners
Macros already calculated
A realistic approach for busy women
The plans are also designed to reduce decision fatigue which is one of the biggest reasons women struggle to stay consistent.
When you already know what you’re eating, shopping becomes easier, prep becomes faster, and healthy eating feels much less overwhelming.
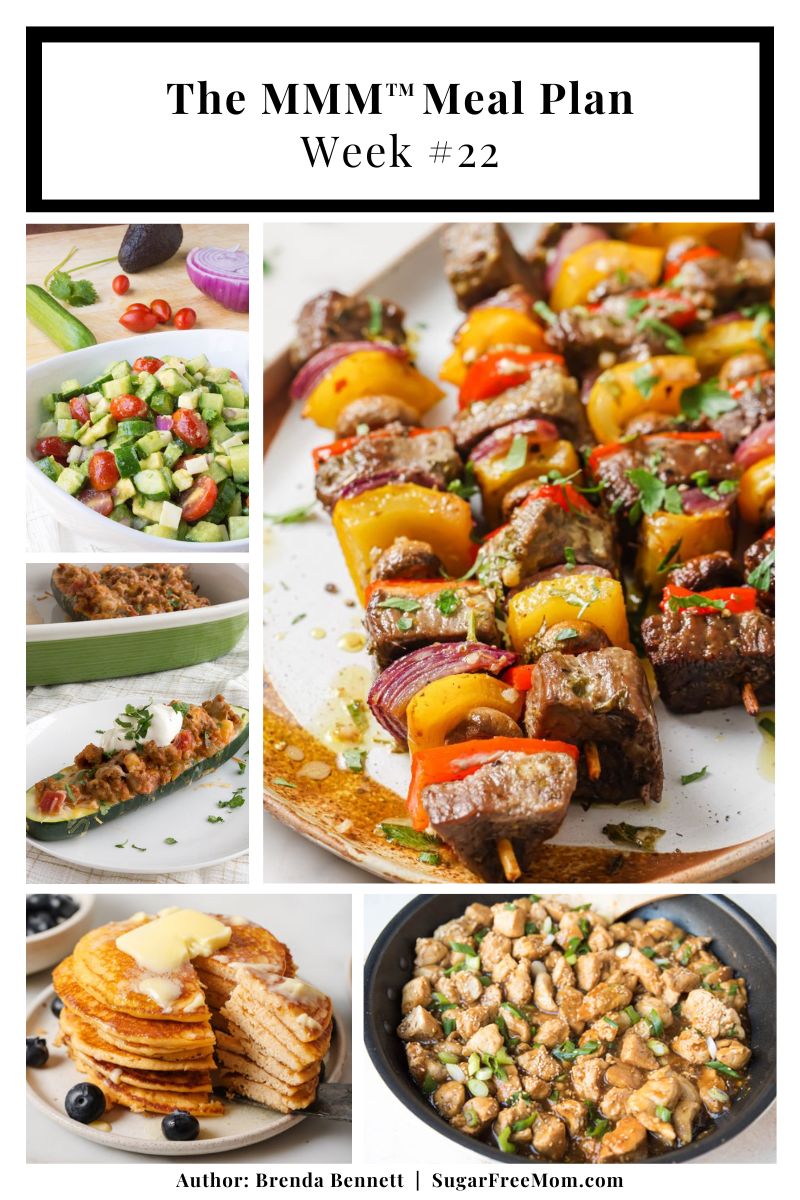
This Week’s Midlife Macro Meal Plan Recipes
This week’s meal plan is packed with easy, satisfying meals designed for busy women who want simple structure without spending hours in the kitchen.
Since this week includes Memorial Day weekend, I also included optional desserts and snacks you can strategically enjoy with your maintenance day.
Here are just some of the delicious recipes on this weeks plan:
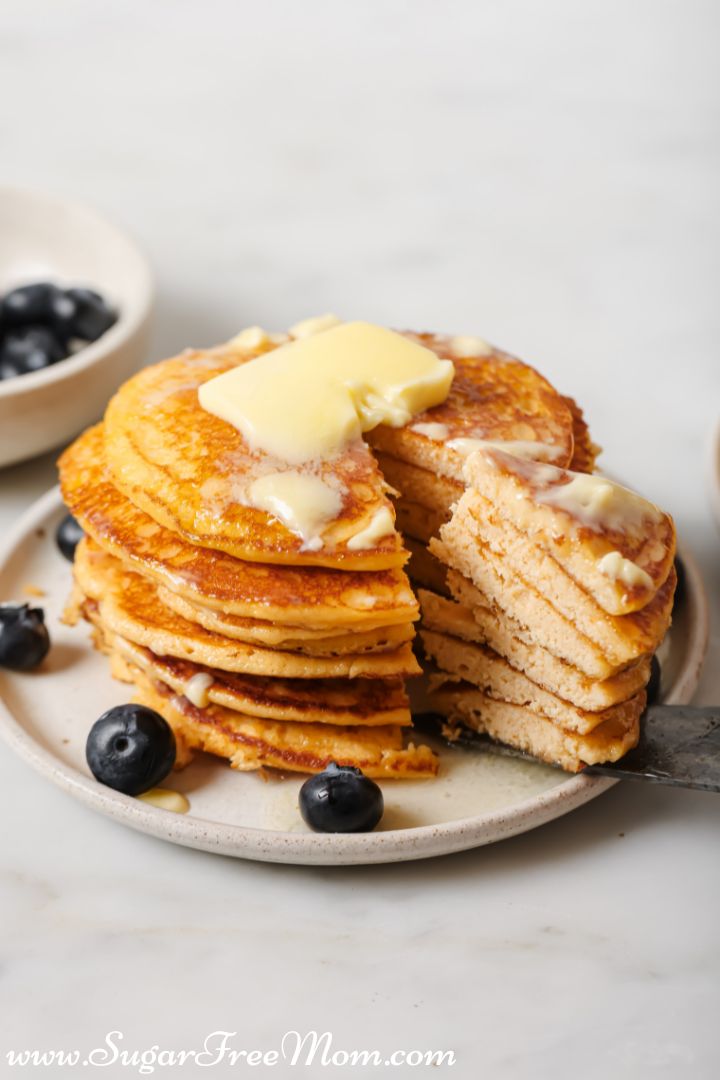
Cottage Cheese Pancakes
These high-protein pancakes are one of my favorite breakfast options for midlife women because they help keep you full and satisfied for hours.
Instead of a carb-heavy breakfast that spikes blood sugar and leaves you hungry again quickly, starting the day with protein can help support:
Better appetite control
Stable energy
Fewer cravings
Improved blood sugar balance
These are featured on Days 1, 3 and 4 this week for easy meal prep and simplicity.
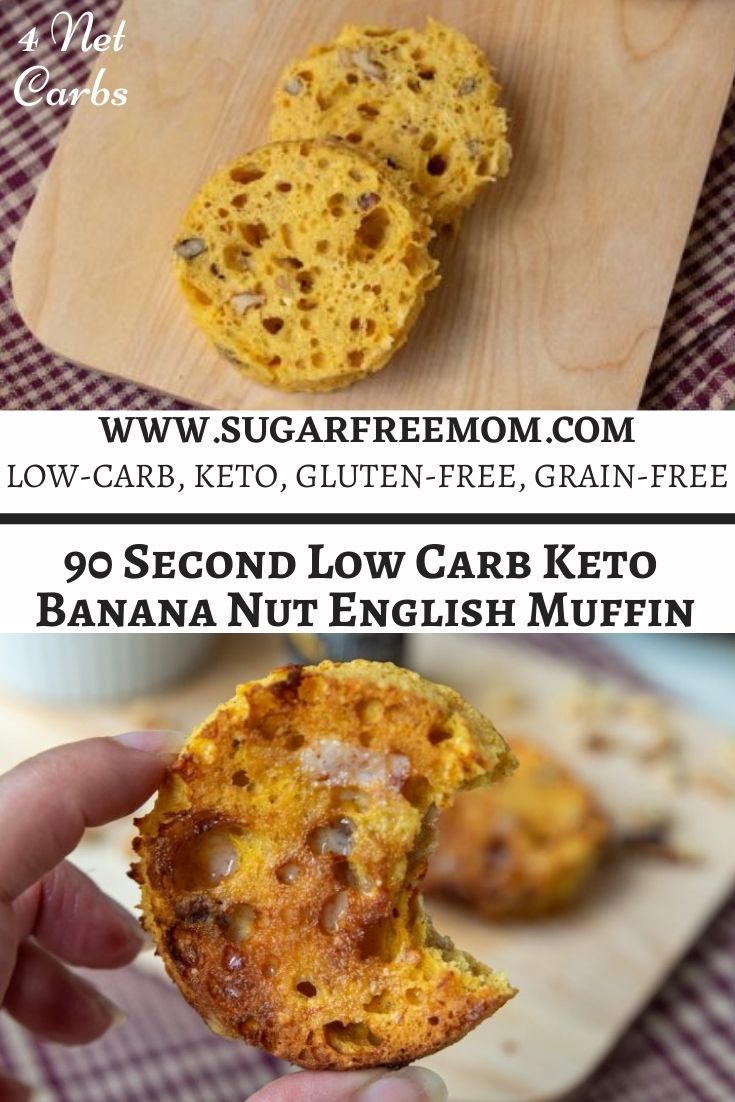
90 Second Banana Nut English Muffin
This quick microwave or oven cooked breakfast is perfect for busy mornings when you need something fast but still aligned with your goals.
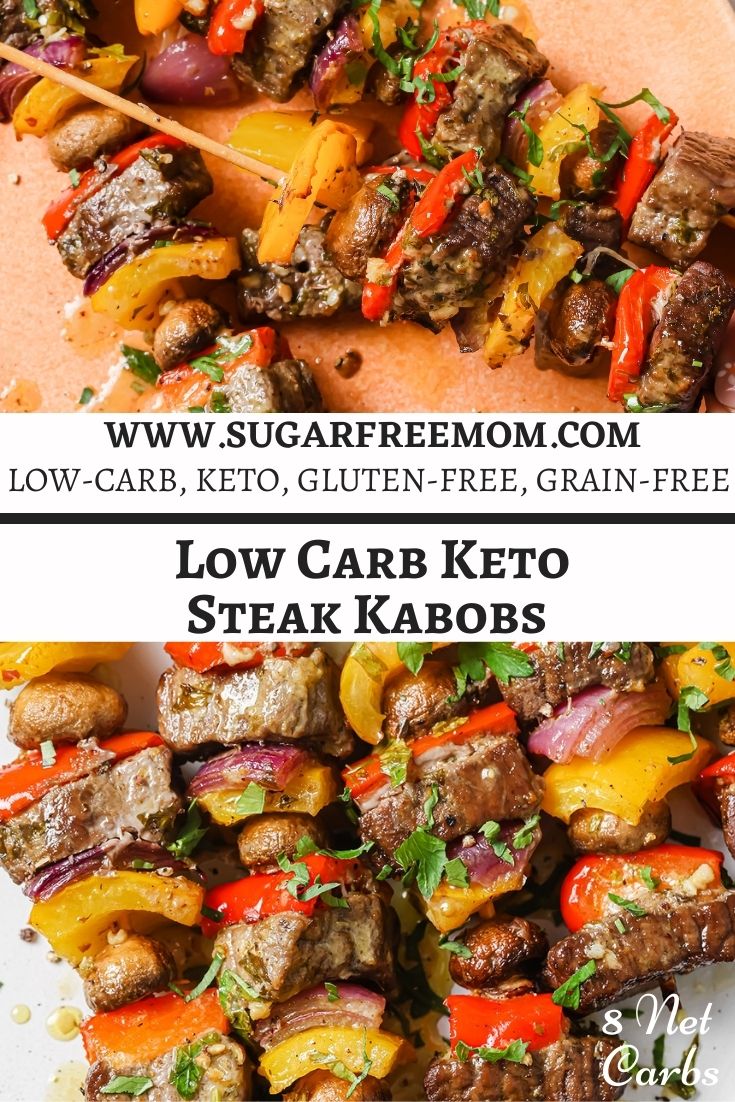
These steak kabobs are an easy weeknight dinner that feels fun and satisfying while still supporting your goals.
Using protein-focused meals with vegetables instead of highly processed foods helps support:
Insulin sensitivity
Blood sugar stability
Reduced cravings
Long-term consistency
Taco Stuffed Zucchini Boats
This dinner is one of my favorite examples of how comfort food can still fit into a healthy midlife lifestyle.
These taco stuffed zucchini boats adds fiber and volume while the taco filling provides satisfying protein that helps keep hunger under control.
And using leftovers strategically for lunch later in the week helps reduce cooking time and simplify meal prep.
Why Strategic Maintenance Days Matter
One of the biggest differences inside my Midlife Macro Method is teaching women how to use a strategic maintenance day.
This is not a cheat day.
A maintenance day can help support:
Hormonal balance
Reduced cravings
Better adherence
Improved energy
Metabolic support
Long-term sustainability
This week’s optional Memorial Day desserts and snacks are designed to fit into that balanced approach without spiraling into an all-or-nothing mindset.
These keto desserts can still be enjoyed on this meal plan even when working on fat loss.
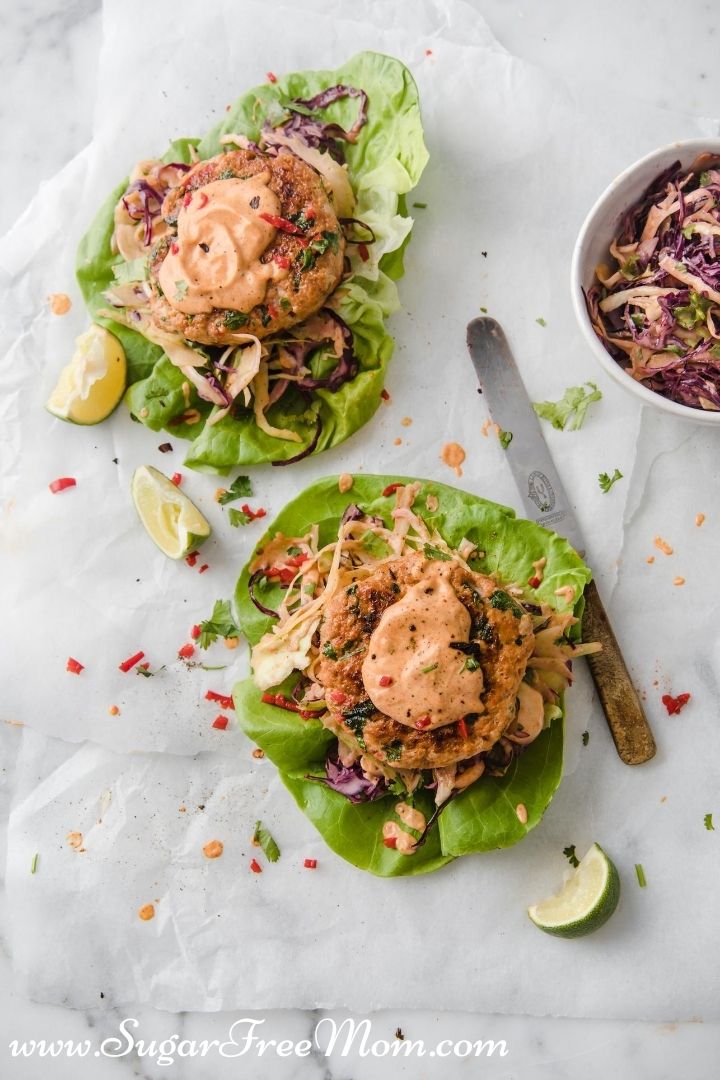
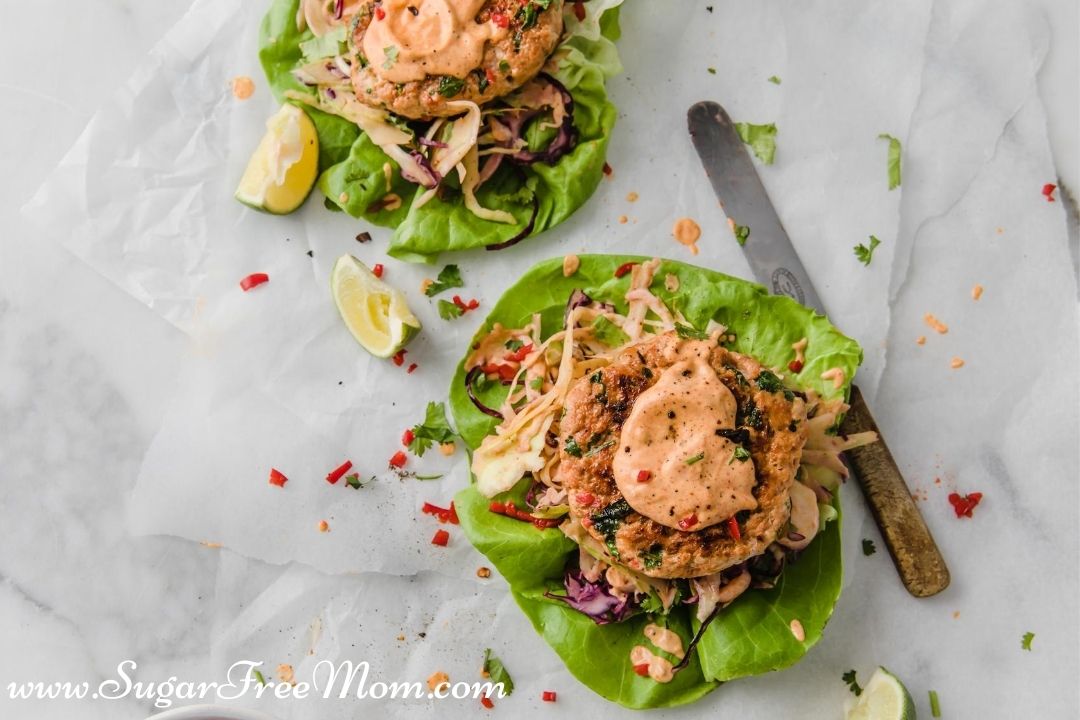
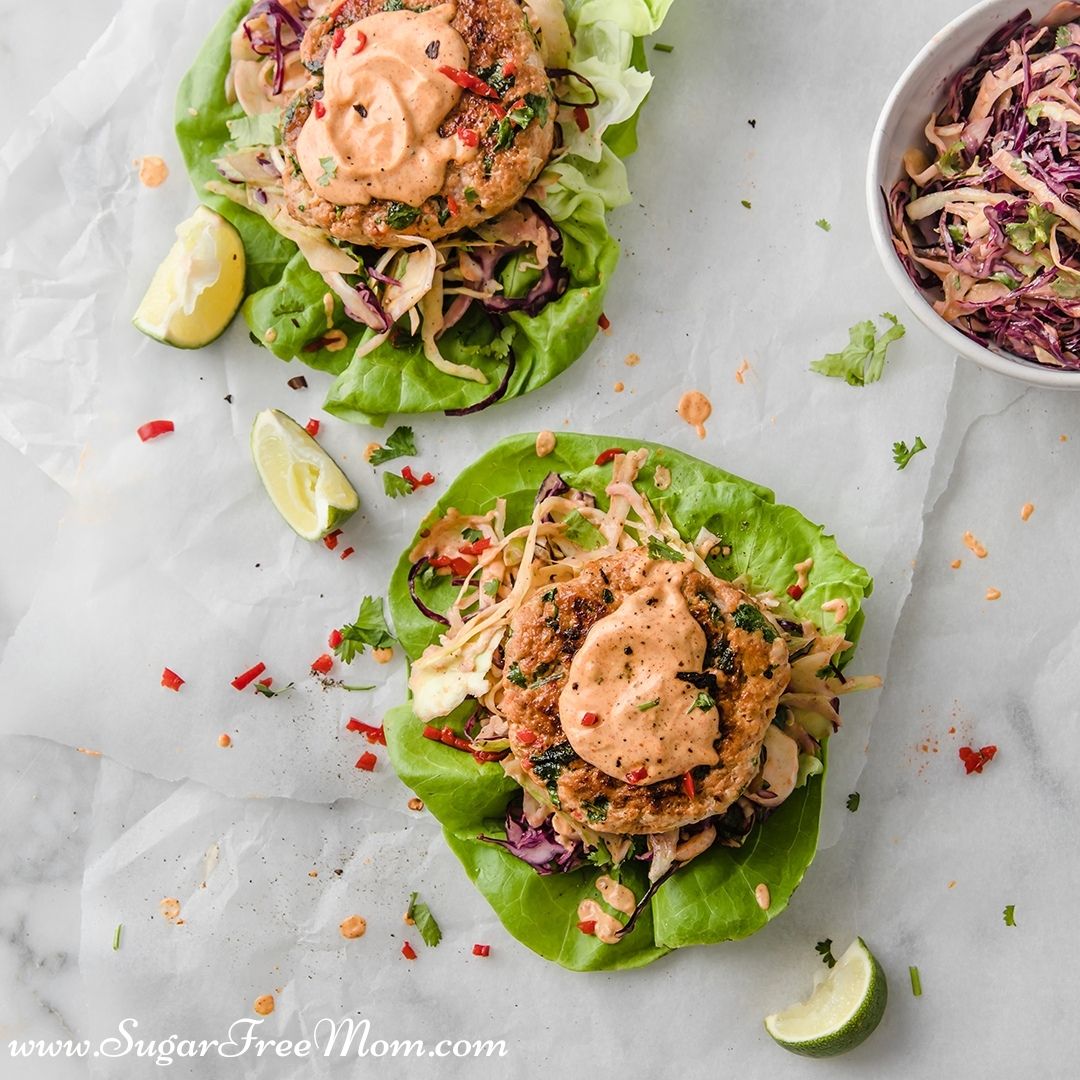
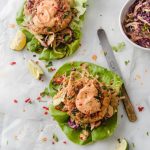
These easy keto chicken burger patties served with chipotle mayo slaw will satisfy that burger need without the need for a bun!
Easy Chicken Burgers
These easy keto chicken burgers with creamy chipotle mayo slaw are the perfect healthy burger recipe when you want something with less fat than traditional ground beef burgers, but still crave a satisfying, flavor-packed complete meal.
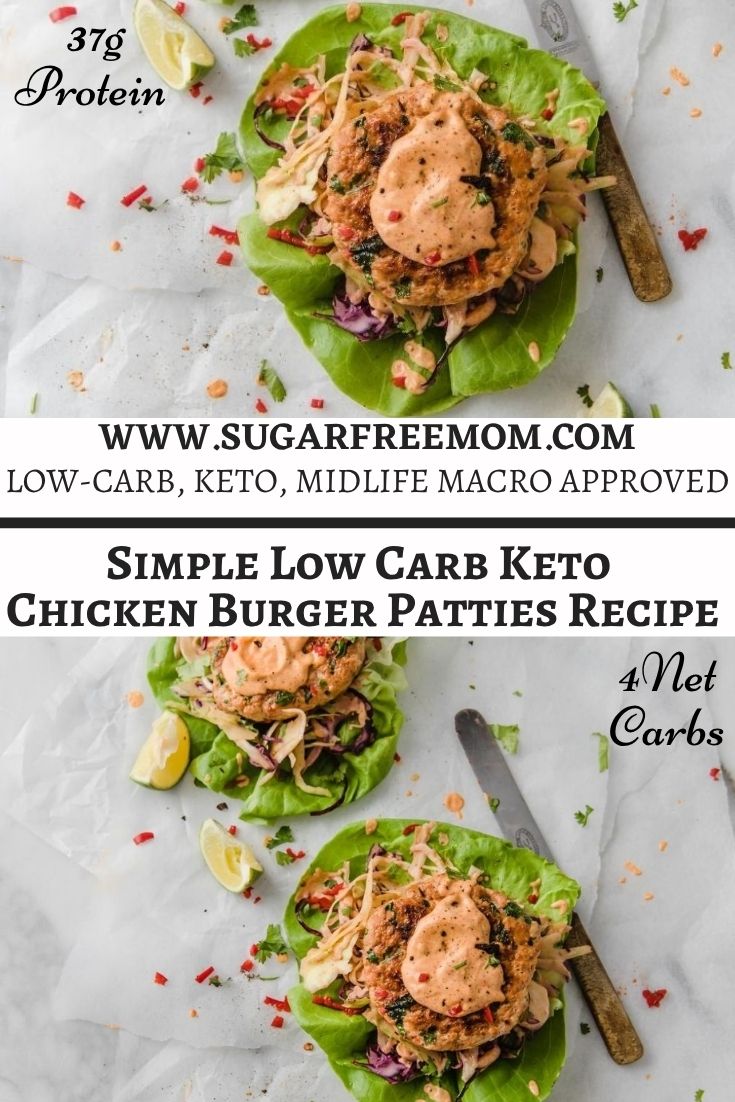
29 grams of protein for each chicken patty! All the nutritional information is at the bottom of this page on the printable recipe card.
Made with juicy chicken thighs, simple ingredients, and served without a bun, these healthy chicken burgers are low carb, high in protein, and absolutely delicious for an easy weeknight meal.
If you’ve been looking for a great way to enjoy burgers on a low carb diet or ketogenic diet without feeling heavy or overly full, these juicy chicken patties are one of sugar free mom’s best recipes.
They’re packed with flavor, naturally gluten-free, and perfect for anyone following a keto diet, low carb lifestyle, or my Midlife Macro Method approach.
Unlike classic keto recipes that rely heavily on cheddar cheese or mozzarella cheese and extra fat, these healthy burgers focus more on protein while still giving you incredible texture and taste.
Served without a bun, and topped with chipotle mayo slaw, giving you a party in your mouth! These can be made on the grill, stove top or even baked in the oven, however you decide to make these chicken burgers, you will not be disappointed!
Can be cooked in the air fryer, frying pan, grill, or oven
Whole family approved
Delicious with or without a keto hamburger bun
These easy chicken patties are especially helpful in midlife when many women notice classic high-fat keto meals no longer leave them feeling their best.
Prioritizing protein with moderate fat can help support satiety, muscle maintenance, and healthier body composition while still enjoying comforting keto meals.
The Secret to Juicy Chicken Burgers
The best way to make flavorful keto chicken burgers is using boneless skinless chicken thighs instead of chicken breast fillets alone. Chicken thighs provide more moisture and flavor which helps keep the burgers juicy instead of dry.
You can absolutely use:
Ground chicken
Ground turkey
Ground beef
Leftover rotisserie chicken
Canned chicken
But dark meat chicken thighs truly create the best texture for homemade chicken burgers.
If using chicken breast only, I recommend adding a little olive oil or avocado oil to help prevent dryness.
Midlife Macro Friendly Burgers
One thing I personally love about these healthy chicken burgers is that they fit beautifully into my Midlife Macro Method.
Instead of relying on massive amounts of cheese, cream cheese, pork rinds, or heavy fat bombs like many classic keto meals, this recipe prioritizes:
Protein
Flavor
Fiber-rich slaw
Moderate healthy fats
Lower total carbs
That combination can help keep you fuller longer without feeling overly stuffed or sluggish.
These burgers are also a great high-protein meal option after strength training workouts or on busy nights when you need a quick meal without sacrificing your goals.
Tools to Make Chicken Burgers
Food Processor– The best way to make a ground chicken in no time. Or just use already ground chicken, but I prefer grinding chicken thighs myself, just like in my Chicken Nugget recipe, plus it’s less expensive.
Mandoline– Or a really sharp chef knife to slice your cabbage very thin.
Large Bowl– Multiple sizes that stack perfectly in any kitchen.
Cast Iron Pan– If you decide not to grill these chicken burgers, using a cast iron pan is the nest way to get a nice crispy outside texture but ensure a moist burger inside.
Helpful Swaps and Variations
This favorite recipe is very versatile and easy to customize.
Dairy-Free Option
This recipe is naturally dairy free if you use olive oil or avocado oil instead of ghee.
Make It Less Spicy
Reduce the chipotle flakes and chili powder for a milder flavor.
Add More Heat
Love buffalo wings or spicy food? Add extra chipotle powder or hot sauce to and now you’ve got buffalo chicken burgers.
No Food Processor?
You can simply use already prepared ground chicken from the grocery store which will be the easiest way to mix it all together.
No Mayo?
Use Greek yogurt instead for a lighter high-protein sauce.
These must try Keto Chicken Burgers are healthy and low in carbs. They have a nice kick to them, but they are not too spicy. They are lean, filling and satisfying without the need for a bun. They can be made on the stove top, on the grill or baked in the oven. And they are served with a generous portion of Chipotle Mayo Slaw. A versatile low-carb dinner recipe that’s perfect all year round.
Prep Time 30 minutesminutes
Cook Time 10 minutesminutes
Servings 2burgers
Calories 283kcal
Author Brenda Bennett/Sugar Free Mom
Ingredients
BURGERS
3skinless boneless chicken thighs(250g) (or ground chicken or chicken breasts)
Place the chicken in a food processor along with the garlic and onion. Blitz to combine. Transfer to a bowl and mix with the tomato puree, chili, salt, pepper and parsley until combined.
Press into two burger patties or use a burger press. Add the ghee to a non stick frying pan. Fry the chicken burgers for about 3 – 4 minutes per side on low / medium heat (6 – 8 minutes in total) or until cooked through. Make sure the heat is not too high so you do not burn the outside.
SLAW
Shred the red and white cabbage using a mandoline, or sharp knife. Finely dice the onion and parsley. Transfer to a bowl and mix to combine.
MAYO
In a clean small bowl, mix the mayo ingredients together using a spoon. Stir through the slaw, keeping about 1.5 tbsp back to add on top of the burgers.
TO SERVE
Serve burgers with mayo and top with slaw.
STORAGE
Best served fresh or can be stored in airtight container in the fridge for up to 1 day and the burgers reheated.
Notes
3 g net carbs per burger (no slaw or mayo)Here’s the nutrition info including the chipotle mayo and slaw for each burger: Calories: 501, Carbs: 8g, Protein: 34g, Fat: 39g, Fiber: 2gIf using Greek yogurt in place of mayo and including it in nutrition with burger: Calories: 305, Carbs: 5g, Protein: 37g, Fat: 15g, Fiber: 1g
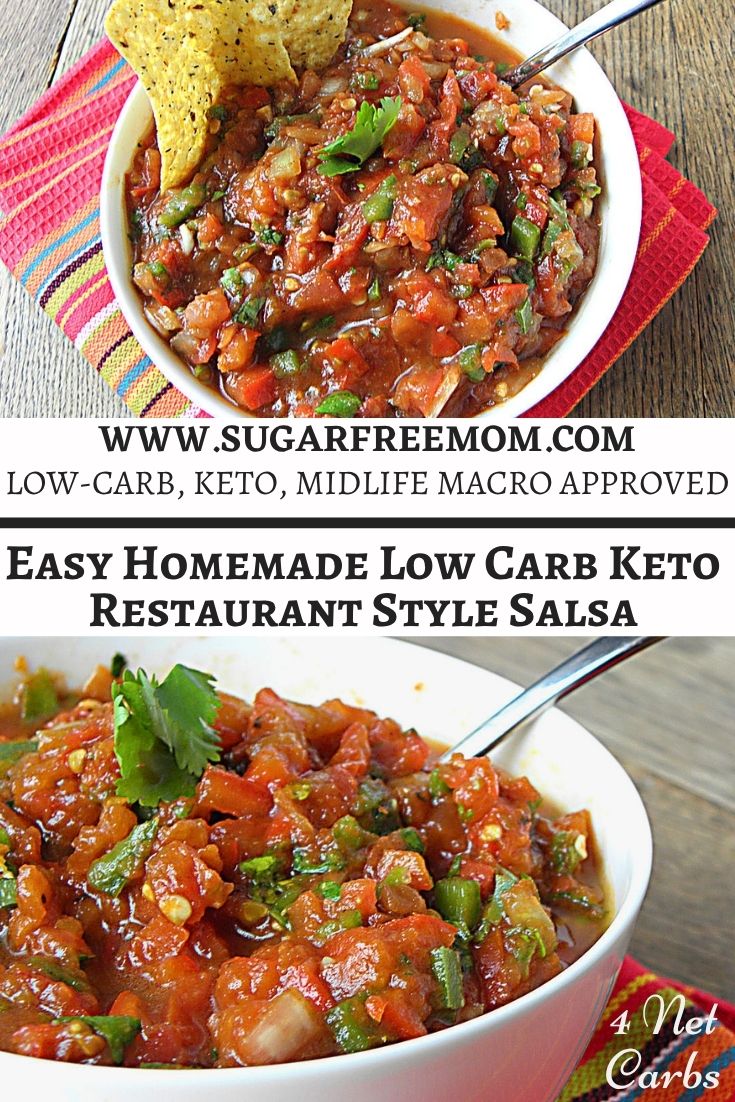
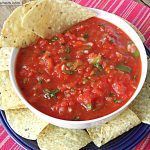
This is one of the easiest recipes for the Best Homemade keto Restaurant-Style Salsa Recipe that’s low in calories, made with healthy tomatoes, no added sugars and it can be mild or spicy to your preference. Just 4 grams of net carbs per serving with natural ingredients!
Homemade Salsa versus Store-Bought Salsa
Salsa is the BEST invention ever…. hands down! Buying store-bought salsa is so convenient I know, I’ve done it! I love the stuff and so does my family! BUT I was sick of buying a jar a week.
I always get inspired when we head to our favorite Mexican restaurant and they make the homemade guacamole right at the table for you and then give you that fresh salsa! Just simple ingredients but they pack a flavor punch! I finally decided to make my own great recipe for the best salsa.
I scoured the internet looking over fresh salsa recipes from Giada, Paula Dean and Ree Drummond. I mixed up what I liked and what I knew my family liked, then changed some of the fresh ingredients and added some other things to make it my own easy blender salsa recipe that pleased everyone.
The good news is that my recipe card gives you instructions to make it either a chunky salsa or a smooth low carb salsa that is typical of what you would enjoy at a restaurant.
Homemade Chunky Keto Salsa Recipe
These pictures are using some fresh plum tomatoes and it was super tasty. You could also use Roma tomatoes. In fact my husband prefers using only fresh tomatoes.
Whole tomatoes can be a hit or miss at the grocery store in the winter as far as ripeness and taste so I convinced him it would still be just as good using canned. He was skeptical, but actually loves it just as much, if not a little more!
I love it for the simple fact that canned tomatoes last forever in your pantry which means you can make this easy salsa any time. 😉 Perfect for Super Bowl Sunday or any night you decide to enjoy some Keto Mexican Recipes!!
To keep the texture chunky just process it only a few times.
Homemade Restaurant Style Salsa
This is our favorite salsa recip,e but it is only mildly spicy because my family can’t handle too much heat.
If you want spicy salsa, you can keep the seeds and membrane in the fresh jalapenos and then you get a lot more heat and spice from it. You could also add some chipotle pepper or green chiles as well.
I love me some chunks of tomato in my chunky fresh salsa, but the kids prefer smooth salsa, so the next time I made it I processed it about 10 times to get it to their liking. Mexican restaurants salsa is more pureed not chunky.
Do what you like, is what I say!
It makes a lot but we want a lot because we eat this easy recipe up pretty quickly in my house.
I top this flavorful fresh tomato salsa on many things, like our favorite keto tacos, breakfast burrito, keto carnitas, taco casserole and sometimes even in a taco salad!
My kids of course eat it up with crunchy tortilla chips. I buy the Siete brand as they are made with Cassava flour and use avocado oil instead of canola or soybean oil.
Zero Carb Tortilla Chips
If you want very low carb keto homemade tortilla chips, I recommend purchasing egg white wraps and simply toasting them.
Here’s how to make low carb chips:
I cut the egg white wraps into triangles, then spray with avocado oil cooking spray on both sides and add a sprinkle of Redmond Real Salt on both sides.
I air fry at 400 degrees F for 3-5 minutes and flip over once. Not exactly the same as corn chips but pretty darn good enough when you’re following a keto diet and definitely delicious with the fresh flavors of my chunky homemade salsa recipe!
Can I make less Of this Easy Salsa Recipe?
My salsa recipe makes about 5 and half cup of salsa. You can certainly reduce this amount if it’s too much for your household. Once you click print below in the recipe card you will have an option to change the serving amount and nutritional data.
If you want to make a smaller batch of this amazing best keto salsa, skip the whole peeled tomatoes and just stick with the diced tomatoes in the salsa ingredients for this whole recipe and reduce the remaining ingredients by half.
If using fresh tomatoes, you could also just use about 3 large ripe tomatoes instead of either of the cans of tomatoes.
Keto Mexican Food
It’s not too difficult to order keto friendly food at a Mexican restaurant. While tacos and burritos aren’t a great option since they include a flour tortilla, asking for fajitas is easy to customize for keto since the tortillas come on the side.
Just skip the soft tortillas and enjoy the chicken, steak or shrimp with the peppers and onions and toppings like sour cream, cheese, guacamole.
Skip the rice and refried beans and you’ll be good to go! Skip the corn tortillas and bring your own pork rinds or ask for fresh bell peppers to dip into your salsa or guacamole!
Here’s a picture of the salsa more pureed and typical of restaurant style salsa, YUM either way!
Football Games Day -Super Bowl- Keto Food & Snacks:
I haven’t tried freezing my salsa recipe only because it’s gone so fast in my house. But I do think it would be fine to freeze in an airtight container in the freezer for at least a month.
The good news is you do not have to figure this out alone.
My meal plans are designed to help midlife women create a powerful shift toward sustainable results, healthier habits, and long-term success with healthy eating. Register by Wednesday at midnight eastern and the new meal plan will be in your inbox Thursday morning!
Creamy Slow Cooker Low Carb Keto Asiago Ranch Chicken is the ultimate comfort food for busy weeknights! This creamy keto asiago ranch chicken is packed with flavor, easy to prepare, high in protein, and fits perfectly into a low carb lifestyle, keto diet recipes collection, or even your weekly meal prep routine. 38 grams of protein and less than 5 g net carbs per serving!
Keto Ranch Chicken
If you’re looking for an easy recipe the whole family will love, this crock pot chicken recipe is one of the best ways to create a cozy dinner without spending hours in the kitchen.
Tender spicy chicken breasts slow cooked in a rich creamy asiago cheese sauce with herbs, garlic powder, cream cheese, chicken broth, and ranch-inspired flavors makes this a fast food favorite copycat made healthier at home.
Whether you’re following a keto lifestyle, low-carb health plan, or my Midlife Macro approach with higher protein and moderate fat, this delicious recipe delivers satisfying comfort while helping you stay on track with your macro targets.
Simple ingredients on hand like boneless chicken breast, broth and cheese makes this an easy recipe to whip up.
If you need this to be ready after a long day at work, just cook on low for 6 hours and 30 minutes then keep warm until you get home.
It’s creamy and comforting without all the carbs. You could of course serve this over pasta if you desire.
My family enjoyed it topped with bacon as a sandwich. The buns you see below are Against the Grain rolls and made from mozzarella cheese in fact. They aren’t low carb so I skipped the bun and just enjoyed this chicken with a side salad topped with bacon of course!
My only suggestion is to make sure to pound the breasts thinner than you see in my picture above. I could not find my meat tenderizer tool and tried to pound the chicken with plastic wrap between the pieces and a wooden spoon, didn’t work that great. So moral of the story, proper tools in the kitchen make a difference lol!
Why Slow Cooker Meals Make Life Easier
Using a crock pot during busy seasons of life has always been one of my favorite health habits. Between work, activities, exercise tracker goals, appointments, and trying to stay consistent with healthy eating, having simple low carb keto recipes ready to go is a game changer.
One of the best tips I can give anyone trying to stay consistent with healthy eating is this:
Plan ahead
Keep simple ingredients stocked
Use kitchen tools that make life easier
Prep protein in advance
That’s exactly why this creamy asiago ranch chicken has become one of my favorite weekly meal ideas.
The slow cooker does all the work while you focus on your day. Then dinner is ready when you need it.
If you’re someone who struggles with grabbing takeout or drive-thru meals during hectic evenings, having easy recipes like this on hand can completely change your routine.
What Makes This Creamy Asiago Chicken So Good
This isn’t just another basic crock pot chicken recipe.
The combination of:
Asiago cheese
Cream cheese
Chicken broth
Garlic powder
Fresh herbs
White wine
Ranch-inspired seasoning
creates an ultra creamy sauce with rich flavor and juicy tender chicken thighs or chicken breasts.
The asiago cheese adds a bold savory flavor that takes this dish to the next level compared to traditional creamy chicken recipes.
The best part?
It tastes indulgent while still being:
low carb
keto friendly
high protein
gluten free
comforting and satisfying
Low Carb Comfort Food Without the Heavy Carbs
Traditional creamy chicken dishes are often served over pasta, rice, or potatoes which can quickly increase total carbs and make blood sugar management more difficult.
This low carb version keeps the flavor while dramatically lowering the carb count. Full macronutrient breakdown is at the bottom of this page on the printable recipe card.
Nutrition Facts for one serving provides:
38 g protein
4.6 g total carbs
15.8 g fat
Making this an excellent option for:
macro targets
glucose tracking
high protein meal plans
keto diet recipes
midlife weight loss goals
For my Midlife Macro approach, this recipe works beautifully because it prioritizes protein first while keeping fat moderate instead of excessive like classic keto recipes.
Midlife Macros vs Classic Keto
Many women discover that traditional high fat keto no longer works as effectively in midlife.
While keto helped me eliminate cravings years ago, my body changed in perimenopause and menopause. I needed:
The good news is you do not have to figure this out alone.
My meal plans are designed to help midlife women create a powerful shift toward sustainable results, healthier habits, and long-term success with healthy eating. Register by Wednesday at midnight eastern and the new meal plan will be in your inbox Thursday morning!
This creamy keto asiago ranch chicken is packed with flavor, easy to prepare, high in protein, and fits perfectly into a low carb lifestyle, keto diet recipes collection, or even your weekly meal prep routine. 38 grams of protein and less than 5 g net carbs per serving!
If you’re a peanut butter lover looking for an easy dessert recipe that fits a low carb diet or keto diet, this Dairy Free Low Carb Keto Peanut Butter Protein Fluff is about to become your new favorite sweet treat! This creamy mousse-like texture comes together with just 3 simple ingredients and takes only 5 minutes to make.
Sugar Free Dairy Free Keto Peanut Butter Fluff in Minutes
No gelatin, no chia seeds, no pudding mix, and no waiting for it to set in the fridge. Just instant creamy peanut butter fluff that satisfies sweet cravings while still being Midlife Macro Approved.
As I’ve gotten older and entered midlife, I’ve found that keeping my fats more moderate on most days works much better for my energy, appetite, and body composition goals.
While I still enjoy my classic higher-fat keto desserts on weekends and special holidays, my newer recipes are designed with more protein, moderate fat, and lower carbs in mind.
I’ve also been intentionally creating more dairy free options because many women in perimenopause and menopause notice dairy can sometimes feel inflammatory or harder to digest.
That doesn’t mean dairy is “bad,” but having options is always helpful. This easy peanut butter mousse recipe gives you all the creamy texture and peanut butter flavor you want without needing heavy cream, cream cheese, or sugar-free pudding mixes.
Why You’ll Love This Dairy Free Peanut Butter Protein Fluff
There’s a lot to love about this easy keto dessert recipe:
Just 3 ingredients
No bake dessert
Ready in minutes
No electric mixer needed
No stiff peaks or soft peaks required
No gelatin needed
No chilling required to thicken
Great for sweet cravings
Moderate fat and high protein
Perfect for meal prep
Great option for midlife macros
Dairy free and gluten free
Naturally sweetened
6 g net carbs per serving
Unlike those sugar free artificial pudding boxes filled with questionable ingredients, this peanut butter fluff uses real food ingredients you can feel good about.
My Midlife Macro Approach
Back in my earlier keto days, many of my recipes were much higher in fat because that was the traditional keto approach.
Today, I personally follow a higher protein, moderate fat, low carb approach most of the time because I’ve found it supports satiety, muscle preservation, and sustainable fat loss much better in midlife.
That’s why I love using peanut butter protein powder in recipes like this instead of regular peanut butter alone. You still get delicious peanut butter flavor, but with:
More protein
Less fat
Lower calories
Lower carbs
I save my classic high-fat desserts and recipes for holidays, vacations, or maintenance days instead of making them my everyday approach.
Ingredients Needed
You only need 3 simple ingredients for this creamy peanut butter mousse:
The good news is you do not have to figure this out alone.
My meal plans are designed to help midlife women create a powerful shift toward sustainable results, healthier habits, and long-term success with healthy eating. Register by Wednesday at midnight eastern and the new meal plan will be in your inbox Thursday morning!
Dairy Free Low Carb Keto Peanut Butter Protein Fluff
Mix ingredients together until smooth! Taste and adjust sweetener if needed. Enjoy immediately or refrigerate for up to 3 days in an airtight container or covered. Makes 4 servings at 1/2 cup.,
If a keto diet is no longer working for you in midlife to keep weight off, it’s time to pivot. My midlife macro meal plan is a simple approach that will give you real results especially if you are stalled or struggling to maintain weight.
Midlife Macro Meal Plan Ideas for Weight Loss, Muscle Mass, and Hormone Balance
If you’re a midlife woman struggling with weight gain, belly fat, low energy levels, cravings, or feeling like your old way of eating no longer works, you are not alone.
One of the biggest shifts I’ve learned after years of following a classic keto approach is that many midlife women like myself, need a more balanced macro-balanced diet focused on lean protein, moderate fat, lower carbs, and real food to support hormone balance, insulin sensitivity, muscle mass, and overall health.
These weekly meal plans are designed specifically for midlife women who want:
Sustainable weight management
Better blood sugar balance
Improved energy levels
Better protein intake
Healthy weight loss goals
Support for building muscle
A realistic calorie deficit without feeling deprived
A healthy diet built around nutrient-dense whole foods
Unlike many high-fat diets, my Midlife Macro Method focuses on prioritizing protein goals while keeping fats moderate and carbs lower to support midlife metabolism and hormonal balance.
Why Midlife Women Need a Different Approach
As estrogen changes during perimenopause and menopause, many women notice:
Increased belly fat
Reduced insulin sensitivity
Muscle loss
Slower metabolism
More cravings
Lower energy
Difficulty staying in a calorie deficit
Weight gain despite eating “healthy”
One common mistake is continuing to follow extremely high-fat diets without enough grams of protein to support muscle mass and metabolic health.
My Midlife Macro Method focuses on:
Higher protein intake, about 30-50 g protein per meal
Moderate fat, not low fat, about 50-70 g fat on deficit days
Lower carb meals, not as low as keto
Meal planning for consistency
Nutritional balance
Portion sizes that support satiety
Real food instead of processed “diet foods” or “keto” packaged foods
Protein becomes especially important in midlife because preserving muscle mass supports:
Bone health
Brain function
Healthy weight management
Immune system support
Total daily energy expenditure
Better blood sugar control
Improved hormone balance
What Makes My Midlife Macro Meal Plans Different?
My weekly meal plans are not about perfection.
They are designed to help you:
Enjoy favorite foods in healthier ways
Stay consistent
Hit your protein goals
Reduce decision fatigue
Simplify meal prep
Support healthy eating long term
Each monthly meal plan includes recipes with balanced macronutrient intake using:
Lean protein
Healthy fats
Dietary fiber
Low carb vegetables
Nutrient-dense whole foods
I also teach women how to use a strategic maintenance day instead of endless restriction. A maintenance day is not a cheat day.
It’s a powerful tool that helps support:
Hormonal balance
Better recovery
Physical activity performance
Reduced cravings
Sustainable caloric intake
Long-term consistency
Real Midlife Success Story from Pat
One of the ladies on our weekly meal plan subscription, Pat, recently shared an inspiring update.
After her husband received a difficult health diagnosis, stress and emotional eating caused her to gain 9 pounds.
Like many midlife women, she felt discouraged and overwhelmed.
But instead of giving up, she got back to meal planning, prioritizing protein intake, focusing on her calorie intake, and following the Midlife Macro Meal Plan again.
In just one week, she already lost 8 pounds and said she finally feels back in control again.
That’s the power of consistency and a realistic macro diet plan designed for real life.
This Week’s Midlife Macro Meal Plan Recipes
This week’s meal plans include some absolutely delicious meals that support healthy weight loss while helping you stay satisfied.
One of the hardest parts of changing your food intake is feeling like you can never enjoy bread again.
These sweet rolls help provide:
Extra grams of protein
Lower carbs
Better nutritional balance
A satisfying addition to meals
I love helping women recreate favorite foods in ways that better support their specific goals.
Why Protein Intake Matters More in Midlife
One of the most powerful shifts women make inside my Midlife Macro Method is increasing protein intake.
Adequate grams of protein help support:
Muscle mass
Bone health
Healthy metabolism
Satiety
Better body composition
Strength training recovery
Total calorie burn
Many midlife women simply are not eating enough protein throughout the day. Instead of focusing only on reducing food intake, I teach women to prioritize protein first.
This creates a much more sustainable approach to healthy weight loss.
Macronutrient Ratio: Midlife Macro Method vs. Classic Keto
One of the biggest differences between my Midlife Macro Method and a classic keto approach is the macronutrient ratio.
Traditional keto was originally designed as a very high-fat diet, often using:
70–80% fat
Moderate protein
Very low carbs
While many women initially lose weight on a classic keto approach, I’ve found that in midlife, especially during perimenopause and menopause, many women stop seeing results when fat intake stays too high and protein intake stays too low.
This is because midlife women are often dealing with:
Hormonal balance changes
Reduced muscle mass
Slower midlife metabolism
Lower total daily energy expenditure
Increased insulin resistance
More stubborn belly fat
Increased hunger and cravings
My Midlife Macro Method uses a very different macro-balanced diet approach focused on:
Higher protein intake
Moderate fat
Lower carbs
Better nutritional balance
Support for building muscle
Sustainable caloric intake
Classic Keto Approach
A classic keto approach often looks like:
70–80% fat
15–20% protein
5–10% carbs
This can sometimes lead to:
Not enough grams of protein
Difficulty preserving muscle mass
Excess calorie intake from fats
Weight loss stalls in midlife women
Increased hunger when protein is too low
Many women unknowingly add too much:
Butter
Heavy cream
Cheese
Fat bombs
Oils
High-fat snacks
Keto packaged snacks and desserts
Even healthy fats like olive oil, almond butter, fatty fish, and avocado can easily increase total calorie intake if protein is not prioritized first.
Midlife Macro Method Macronutrient Ratio
My Midlife Macro Method focuses on a more balanced macronutrient intake designed specifically for midlife women. I was able to lose 14 pounds in two months naturally using this method.
Instead of focusing on unlimited fat, I teach women to prioritize:
The good news is you do not have to figure this out alone.
My meal plans are designed to help midlife women create a powerful shift toward sustainable results, healthier habits, and long-term success with healthy eating. Register by Wednesday at midnight eastern and the new meal plan will be in your inbox Thursday morning!